Hello, welcome to my blog!!
Now through Monday, March 9th, Scrapbook.com is offering 10% off site wide!! Use coupon code MARCH2020 at checkout. Also, all Scrapbook.com exclusive adhesives are deeply discounted. This includes adhesive runners, adhesive sheets, tape in all widths, foam dots/sheets/tape plus more! I highly recommend their adhesives, they are very strong!
*I know die cut machines can be a bigger investment, but if you are in need of one and looking for a good price, Scrapbook.com has some really good prices on Big Shots - stand alone machines and bundles.
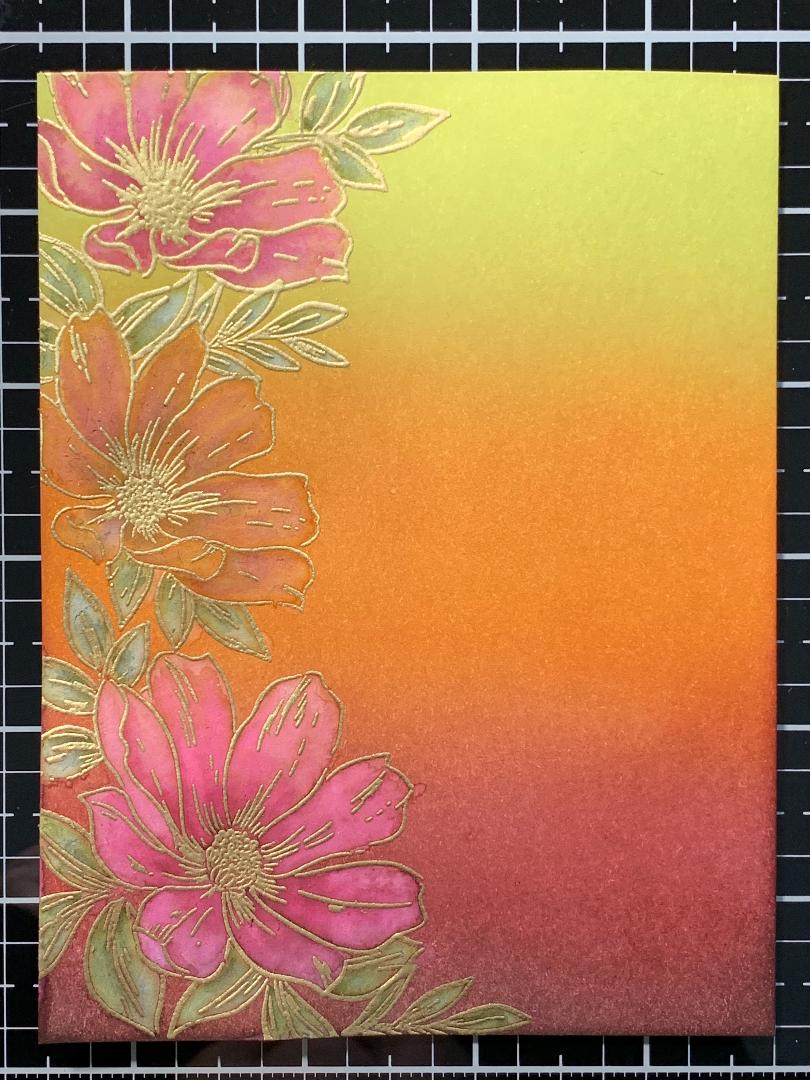
Today's card project involves ink blending and embossing images that I will then remove the blended ink and paint color back into my images. This gives a beautiful look of different colors painted on top of the blended panel. I will be working with regular Distress Inks. You should be able to do this technique with all water reactive dye inks. I used Neenah white cardstock on today's card, and did notice a little pilling when painting the color back onto my images. I think watercolor cardstock may be a better choice, but still loved the results using Neenah. Let's get started!!

To start, I use my Tim Holtz Guillotine paper trimmer and cut a 4" x 5 1/4" panel out of Neenah white cardstock. Using Blender Brushes, I start my ink blending using Bundled Sage onto the top third of my panel, fading out. Next, I blend Rusty Hinge onto the center, blending back into the previous color, then fade out. I then blend Aged Mahogany onto the bottom third of my panel, blending back into the previous color. For added depth, I blend Black Soot to the very bottom of the panel along the edge and corners. I then go back with each color to intensify and blend.


I use my Ranger Craft Tool to dry my panel, drying on both sides to reduce warping. You can also leave the panel to dry on it's own for a few hours. After my panel is completely dry, I place it into my MISTI stamp positioner and prep with my Anti Static powder bag. I then stamp flowers from the Perfectly Perfect stamp set using Versamark ink. I use Gold Embossing Powder and heat set with my Heat Tool. I now place masks over the flowers using Masking Magic, then stamp the leaves. I carefully remove the masks and again add gold embossing powder and heat set.


After all stamping and embossing is done, I take a small paintbrush and using clean water, I start with one of the leaves, one at a time and add water. I then take a clean paper towel and soak up the water from the leaf. This also pulls the ink up with the water. I do this again to pull up even more ink until I'm satisfied with the amount removed. I do this with each leaf and petal from the flowers, and repeat the process.


I now take Bundled Sage ink and press the pad onto my Tim Holtz Glass Media Mat and put down some clean water next to the ink, this will be my pallet for the leaves. I wet my brush in the water and dab slightly onto a paper towel as I don't want to dilute my ink too much. I then take my brush to the ink to pick up color and start adding to my leaves. I repeat this until I'm satisfied with the color of the leaf.


Next, I work on the flowers. I start by adding Aged Mahogany towards the center portion of the bottom flower. I then use Picked Raspberry for the remainder of the petals, blending into the Aged Mahogany. I do this same color combo with the flower on the top of the panel.


For the middle flower, I start by adding Tattered Rose over all of the petals. Next, I add Vintage Photo to the center of the flower. I decided Tattered Rose was too light, so I added Wild Honey over the rest of the petals. (This color combo really dried back light in color)
To add more color and shadows to the leaves, I add Forest Moss.


Next, using my Infinity Heart Dies, I cut a heart out of Black Cardstock running them through my Big Shot die cut machine. I prep with my anti static powder bag, then stamp a sentiment from the same stamp set onto the black heart using Versamark ink. I stamp an additional sentiment (from the same stamp set) just above and left of the previous sentiment. I then add gold embossing powder and heat set. To add a finished look to my heart die cut, I gently tapped the edges onto my Versamark ink pad, added gold embossing powder and heat set.
I ink blend with Aged Mahogany onto a strip of Neenah cardstock to match my panel then dry with my heat tool. I then stamp another sentiment from the same stamp set using Versamark, adding gold embossing powder, then heat set. I use a die from my Sentiment Banners die set and cut out my ink blended sentiment using my Big Shot. I then adhere the banner strip just below the sentiment onto the black heart. ***Before adhering my panel onto my card base, using my small paintbrush, I spatter water drops onto the panel and quickly add gold embossing powder and heat set***
I take my blended panel and adhere it to a black card base using Double Sided Tape. Finally, I attach the black heart onto the front of the card using Foam Tape. To finish, I add Water Droplets using Liquid Glue and this completes my card.


Today's card was fun for me, discovering that I could remove ink from my blended panel to paint my images. There are other ways to achieve a similar look such as masking the images before ink blending so you could paint or color on the white cardstock. I like the way all of the colors tie together and found it interesting with the technique I used. I'm anxious to try this on future cards!!
If this is the first time visiting my blog, welcome and I hope you return. If you are a returning visitor, thank you so much for your support!
Should you have any questions or comments please leave them in the comments section. I'd love to hear from you and what you thought about today's card.
If you would like to be notified by email each time I post something new to my blog, you can click on the subscribe button at the top of the page.
Thank you for visiting and I hope you come back soon!
Happy Stamping!!
Jeannie
Now through Monday, March 9th, Scrapbook.com is offering 10% off site wide!! Use coupon code MARCH2020 at checkout. Also, all Scrapbook.com exclusive adhesives are deeply discounted. This includes adhesive runners, adhesive sheets, tape in all widths, foam dots/sheets/tape plus more! I highly recommend their adhesives, they are very strong!
*I know die cut machines can be a bigger investment, but if you are in need of one and looking for a good price, Scrapbook.com has some really good prices on Big Shots - stand alone machines and bundles.
Today's card project involves ink blending and embossing images that I will then remove the blended ink and paint color back into my images. This gives a beautiful look of different colors painted on top of the blended panel. I will be working with regular Distress Inks. You should be able to do this technique with all water reactive dye inks. I used Neenah white cardstock on today's card, and did notice a little pilling when painting the color back onto my images. I think watercolor cardstock may be a better choice, but still loved the results using Neenah. Let's get started!!

To start, I use my Tim Holtz Guillotine paper trimmer and cut a 4" x 5 1/4" panel out of Neenah white cardstock. Using Blender Brushes, I start my ink blending using Bundled Sage onto the top third of my panel, fading out. Next, I blend Rusty Hinge onto the center, blending back into the previous color, then fade out. I then blend Aged Mahogany onto the bottom third of my panel, blending back into the previous color. For added depth, I blend Black Soot to the very bottom of the panel along the edge and corners. I then go back with each color to intensify and blend.


I use my Ranger Craft Tool to dry my panel, drying on both sides to reduce warping. You can also leave the panel to dry on it's own for a few hours. After my panel is completely dry, I place it into my MISTI stamp positioner and prep with my Anti Static powder bag. I then stamp flowers from the Perfectly Perfect stamp set using Versamark ink. I use Gold Embossing Powder and heat set with my Heat Tool. I now place masks over the flowers using Masking Magic, then stamp the leaves. I carefully remove the masks and again add gold embossing powder and heat set.


After all stamping and embossing is done, I take a small paintbrush and using clean water, I start with one of the leaves, one at a time and add water. I then take a clean paper towel and soak up the water from the leaf. This also pulls the ink up with the water. I do this again to pull up even more ink until I'm satisfied with the amount removed. I do this with each leaf and petal from the flowers, and repeat the process.


I now take Bundled Sage ink and press the pad onto my Tim Holtz Glass Media Mat and put down some clean water next to the ink, this will be my pallet for the leaves. I wet my brush in the water and dab slightly onto a paper towel as I don't want to dilute my ink too much. I then take my brush to the ink to pick up color and start adding to my leaves. I repeat this until I'm satisfied with the color of the leaf.


Next, I work on the flowers. I start by adding Aged Mahogany towards the center portion of the bottom flower. I then use Picked Raspberry for the remainder of the petals, blending into the Aged Mahogany. I do this same color combo with the flower on the top of the panel.


To add more color and shadows to the leaves, I add Forest Moss.


Next, using my Infinity Heart Dies, I cut a heart out of Black Cardstock running them through my Big Shot die cut machine. I prep with my anti static powder bag, then stamp a sentiment from the same stamp set onto the black heart using Versamark ink. I stamp an additional sentiment (from the same stamp set) just above and left of the previous sentiment. I then add gold embossing powder and heat set. To add a finished look to my heart die cut, I gently tapped the edges onto my Versamark ink pad, added gold embossing powder and heat set.
I ink blend with Aged Mahogany onto a strip of Neenah cardstock to match my panel then dry with my heat tool. I then stamp another sentiment from the same stamp set using Versamark, adding gold embossing powder, then heat set. I use a die from my Sentiment Banners die set and cut out my ink blended sentiment using my Big Shot. I then adhere the banner strip just below the sentiment onto the black heart. ***Before adhering my panel onto my card base, using my small paintbrush, I spatter water drops onto the panel and quickly add gold embossing powder and heat set***
I take my blended panel and adhere it to a black card base using Double Sided Tape. Finally, I attach the black heart onto the front of the card using Foam Tape. To finish, I add Water Droplets using Liquid Glue and this completes my card.


Today's card was fun for me, discovering that I could remove ink from my blended panel to paint my images. There are other ways to achieve a similar look such as masking the images before ink blending so you could paint or color on the white cardstock. I like the way all of the colors tie together and found it interesting with the technique I used. I'm anxious to try this on future cards!!
If this is the first time visiting my blog, welcome and I hope you return. If you are a returning visitor, thank you so much for your support!
Should you have any questions or comments please leave them in the comments section. I'd love to hear from you and what you thought about today's card.
If you would like to be notified by email each time I post something new to my blog, you can click on the subscribe button at the top of the page.
Thank you for visiting and I hope you come back soon!
Happy Stamping!!
Jeannie
Jeannie this is beautiful! I’ve done a similar technique using splashless bleach and coloring the the areas with Q tip w bleach. From there you can add color. I think your technique is bit more organic looking.
ReplyDeleteHave a great day!
Joy
Thank you Joy!
DeleteI have also used the bleach method in the past with great results! This technique gives more of a muted color look. I love the results of both methods!
gorgeous.....can't wait to try this.
ReplyDeleteThank you! Have fun with the technique
DeleteThis really caught my eye. Stunning work!!!
ReplyDeleteThank you so much!
DeleteJeanie, I just got done trying this all out and was going great until the water droplets and gold embossing powder. It did not work for me. Can you think of what I did wrong? Thank you Dawn
ReplyDeleteCan you send me a picture? Kampakreations@gmail.com
DeleteThis comment has been removed by the author.
ReplyDelete
ReplyDeleteThank you for sharing the techniques. The card is amazing. Can't wait to try.
Thank you so much!!
Deletebeautiful
ReplyDeleteThank you so much!!
Delete