Hello, welcome to my blog!!
Scrapbook.com is celebrating National Craft Month, and their Huge Die Cutting Sale is happening now! Save 20% to 50% on all your Die Cutting needs from machines to dies and more! These low prices are good through Monday, March 23rd at midnight MST. I've placed a store logo on the front page of my blog, just down below my profile that takes you directly to their store!
*Re-Design, Rina K, Gina K, Lawn Fawn, My Sweet Petunia (MISTI), and Scrapbook.com 'Handmade Essentials' Stamp Set (SKU sbc-ds19-7) are excluded from all discounts and promotions.
Today's card project will be focusing on Altenew's Watercolor 36 Pan Set. I will be water coloring a giant succulent from Picket Fence Studios. I purchased this stamp almost a year ago, and this is the first time I've ever used it! I am by no means a "watercolor artist", however, these watercolors by Altenew make it easy for anyone to lay down color and get a beautiful watercolor look. I will be working on Tim Holtz Distress Watercolor Cardstock. Let's get started!!

I will be doing all of my work on my Tim Holtz Glass Media Mat.
To start, I take a 4 1/4" x 5 1/2" panel of Tim Holtz Distress Watercolor Cardstock. I prep the panel with my Anti Static Powder Bag and place into my MISTI Stamp Positioner. Seeing as this is textured watercolor cardstock, I stamp using Versamark Ink the Aeonium African Succulent Stamp, three times to get a good impression. I then add Detail Gold Embossing Powder and heat set with my Heat Tool.


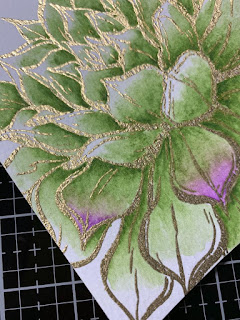
Next taking my 36 Pan Watercolor Set, I begin to watercolor my image. When I paint on watercolor cardstock, I like to first dampen the petal (petal... is that what it's called on a succulent???) I am working on. Taking the water brush, I add a little clean water to the area I am about to color. Next, using the water brush, I dab and pick up some green (Forest Glade) paint and add at the base of the petal, then pull and fade the color toward the tip of the petal, but not all the way as I want to leave an area for the second color. I repeat this process for all of the petals. Once all of the petals are colored green, I go back and add a little more at just the base where petals overlap to create a little shadow. ***During my entire painting process, I have a paper towel next to my panel that I am either dabbing color off of my brush, or soaking water off my brush. I like to have a wet, but damp brush, not too wet. If the brush gets too dry, I squeeze the barrel of the water brush to release more water. Once I do this, the brush will be too wet, so I soak that excess water off onto the paper towel.


Next, repeating the process from above, I add purple (Midnight Violet) to the ends of each petal, blending it into the previous green color. I have attached a picture of my watercolors and circled the two colors I used. Green being on the top left, and purple being on the bottom right.


For my sentiment, I choose one from my Heartfelt Stamp Set. Using my MISTI Stamp Positioner, I stamp my sentiment onto a piece of the same watercolor cardstock using Versafine Claire Nocturn Ink. Again, because of the texture of the cardstock, I stamp my image a few times until I get a crisp image, that's were my MISTI comes in handy!!
I now trim my sentiment down to 1" x 3 3/4". To create a backer for my sentiment, I take a 1 1/" x 3 3/4" strip and press the sides into my Versamark Ink Pad. Next, I add Detail Gold Embossing Powder and heat set using my Heat Tool. I layer my sentiment on top of the embossed strip and adhere using Double Sided Tape.


Next, I attach my water colored panel onto a white card base. I then add Foam Tape to my sentiment and attach to my card front, add Water Droplets using Liquid Glue and this completes my card.


Today's card project was different from my usual floral images, but I enjoyed it. Water coloring is a little bit of a process but goes pretty fast. I find it to be very calming and relaxing. With the issues going on in our world right now, it's so nice to escape to my craft room and lose myself in my work. Crafting is such a wonderful form of therapy for the soul, I turn on my uplifting, encouraging music and for a while, I forget about all the stress and worries. I hope you can find some time for yourself this weekend doing what you enjoy. Do what you can to stay safe, and don't stress about the things that are out of your control. I will see you back on Monday for another fun card project!
If this is the first time visiting my blog, welcome and I hope you return. If you are a returning visitor, thank you so much for your support!
Should you have any questions or comments please leave them in the comments section. I'd love to hear from you and what you thought about today's card.
If you would like to be notified by email each time I post something new to my blog, you can click on the subscribe button at the top of the page.
Thank you for visiting and I hope you come back soon!
Happy Stamping!!
Jeannie
Scrapbook.com is celebrating National Craft Month, and their Huge Die Cutting Sale is happening now! Save 20% to 50% on all your Die Cutting needs from machines to dies and more! These low prices are good through Monday, March 23rd at midnight MST. I've placed a store logo on the front page of my blog, just down below my profile that takes you directly to their store!
*Re-Design, Rina K, Gina K, Lawn Fawn, My Sweet Petunia (MISTI), and Scrapbook.com 'Handmade Essentials' Stamp Set (SKU sbc-ds19-7) are excluded from all discounts and promotions.
Today's card project will be focusing on Altenew's Watercolor 36 Pan Set. I will be water coloring a giant succulent from Picket Fence Studios. I purchased this stamp almost a year ago, and this is the first time I've ever used it! I am by no means a "watercolor artist", however, these watercolors by Altenew make it easy for anyone to lay down color and get a beautiful watercolor look. I will be working on Tim Holtz Distress Watercolor Cardstock. Let's get started!!

I will be doing all of my work on my Tim Holtz Glass Media Mat.
To start, I take a 4 1/4" x 5 1/2" panel of Tim Holtz Distress Watercolor Cardstock. I prep the panel with my Anti Static Powder Bag and place into my MISTI Stamp Positioner. Seeing as this is textured watercolor cardstock, I stamp using Versamark Ink the Aeonium African Succulent Stamp, three times to get a good impression. I then add Detail Gold Embossing Powder and heat set with my Heat Tool.


Next taking my 36 Pan Watercolor Set, I begin to watercolor my image. When I paint on watercolor cardstock, I like to first dampen the petal (petal... is that what it's called on a succulent???) I am working on. Taking the water brush, I add a little clean water to the area I am about to color. Next, using the water brush, I dab and pick up some green (Forest Glade) paint and add at the base of the petal, then pull and fade the color toward the tip of the petal, but not all the way as I want to leave an area for the second color. I repeat this process for all of the petals. Once all of the petals are colored green, I go back and add a little more at just the base where petals overlap to create a little shadow. ***During my entire painting process, I have a paper towel next to my panel that I am either dabbing color off of my brush, or soaking water off my brush. I like to have a wet, but damp brush, not too wet. If the brush gets too dry, I squeeze the barrel of the water brush to release more water. Once I do this, the brush will be too wet, so I soak that excess water off onto the paper towel.


Next, repeating the process from above, I add purple (Midnight Violet) to the ends of each petal, blending it into the previous green color. I have attached a picture of my watercolors and circled the two colors I used. Green being on the top left, and purple being on the bottom right.


For my sentiment, I choose one from my Heartfelt Stamp Set. Using my MISTI Stamp Positioner, I stamp my sentiment onto a piece of the same watercolor cardstock using Versafine Claire Nocturn Ink. Again, because of the texture of the cardstock, I stamp my image a few times until I get a crisp image, that's were my MISTI comes in handy!!
I now trim my sentiment down to 1" x 3 3/4". To create a backer for my sentiment, I take a 1 1/" x 3 3/4" strip and press the sides into my Versamark Ink Pad. Next, I add Detail Gold Embossing Powder and heat set using my Heat Tool. I layer my sentiment on top of the embossed strip and adhere using Double Sided Tape.


Next, I attach my water colored panel onto a white card base. I then add Foam Tape to my sentiment and attach to my card front, add Water Droplets using Liquid Glue and this completes my card.


Today's card project was different from my usual floral images, but I enjoyed it. Water coloring is a little bit of a process but goes pretty fast. I find it to be very calming and relaxing. With the issues going on in our world right now, it's so nice to escape to my craft room and lose myself in my work. Crafting is such a wonderful form of therapy for the soul, I turn on my uplifting, encouraging music and for a while, I forget about all the stress and worries. I hope you can find some time for yourself this weekend doing what you enjoy. Do what you can to stay safe, and don't stress about the things that are out of your control. I will see you back on Monday for another fun card project!
If this is the first time visiting my blog, welcome and I hope you return. If you are a returning visitor, thank you so much for your support!
Should you have any questions or comments please leave them in the comments section. I'd love to hear from you and what you thought about today's card.
If you would like to be notified by email each time I post something new to my blog, you can click on the subscribe button at the top of the page.
Thank you for visiting and I hope you come back soon!
Happy Stamping!!
Jeannie
Such a beautiful card!
ReplyDeleteThank you Marsha!!
DeleteAmazing!!!! I love the colors you chose I so love the gold embossing. Please do more watercolor
ReplyDeleteAbsolutely beautiful.
ReplyDeleteThank you so much!!
Delete