Hello, welcome to my blog!!
Today's card uses simple ink blending with embossing. Embossing with black on a lighter color gives a dramatic look! Using black embossing creates a clean, sharp look. It's not always about fancy dies, tools, stamps or even techniques. Using contrasting colors can really pull a card together. I thought the sentiment from this set was so fitting for today. Just a simple card letting someone know we are thinking of them can really make their day! I will be using Gina K. Designs ink, cardstock and stamps. Let's get started!!!

I will be doing all of my work on my Tim Holtz Glass Media Mat.
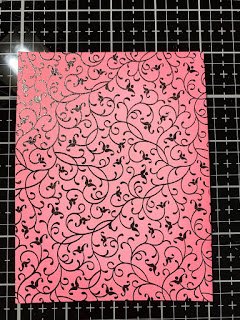
To start, I cut a 4" x 5 1/4" panel out of Bubble Gum Cardstock using my Tim Holtz Guillotine Paper Trimmer. Using my Blender Brushes, I blend Dusty Rose Ink onto the panel around the edges and corners, fading out towards the center. Next, I lay the panel into my MISTI Stamp Positioner and prep using my Anti Static Powder Bag. Using the Petite Flourish Background Stamp, I stamp the panel with Embossing Ink, then add Detail Black Embossing Powder and heat set with my Heat Tool.


Next, I take a piece of White Cardstock and blend in the center Bubble Gum Ink, fading into the white center leaving a highlight. I then blend Dusty Rose Ink around the outer edge of the previous color, fading into it.


Using my MISTI, I take the image from Peaceful Floral Stamp Set, and stamp it on the blended piece using Obsidian Ink. I now take a circle from my Infinity Circle Die Set to cut out my image, running them through my Big Shot Die Cut Machine. Now that I have my image cut out, I need to stamp my sentiment. I put the panel back into my MISTI to use as a guide. I then place the circle I just cut out back into it's cut out. This works especially well when stamping odd shapes in the MISTI. I then stamp my sentiment with the same black ink as the image.


I decided I wanted to back my circle image with black cardstock, so I actually cut the image down one more circle size, then cut out of Black Cardstock the next size up circle. I then attach the two together using Terrific Tape.


I now attach my blended embossed panel onto a black card base using Terrific Tape. I decided I wanted to add a little something to add more interest to my card. I cut a 1" x 4" strip of black cardstock, put it in an embossing folder from my stash and run it through my Big Shot. I adhere the strip onto the front center of my card, then add Foam Tape to my image circle and place it over the strip. I add a few Black Jewels to the image circle and this completes my card.


This was a very easy card to put together, the colors and sentiment can easily be changed to fit any occasion. Changing the embossing powder to white, clear or any other color can dramatically change the look of this card.
If this is the first time visiting my blog, welcome and I hope you return. If you are a returning visitor, thank you so much for your support!
Should you have any questions or comments please leave them in the comments section. I'd love to hear from you and what you thought about today's card.
If you would like to be notified by email each time I post something new to my blog, you can click on the subscribe button at the top of the page.
Thank you for visiting and I hope you come back soon!
Happy Stamping!!
Jeannie
Today's card uses simple ink blending with embossing. Embossing with black on a lighter color gives a dramatic look! Using black embossing creates a clean, sharp look. It's not always about fancy dies, tools, stamps or even techniques. Using contrasting colors can really pull a card together. I thought the sentiment from this set was so fitting for today. Just a simple card letting someone know we are thinking of them can really make their day! I will be using Gina K. Designs ink, cardstock and stamps. Let's get started!!!

I will be doing all of my work on my Tim Holtz Glass Media Mat.
To start, I cut a 4" x 5 1/4" panel out of Bubble Gum Cardstock using my Tim Holtz Guillotine Paper Trimmer. Using my Blender Brushes, I blend Dusty Rose Ink onto the panel around the edges and corners, fading out towards the center. Next, I lay the panel into my MISTI Stamp Positioner and prep using my Anti Static Powder Bag. Using the Petite Flourish Background Stamp, I stamp the panel with Embossing Ink, then add Detail Black Embossing Powder and heat set with my Heat Tool.


Next, I take a piece of White Cardstock and blend in the center Bubble Gum Ink, fading into the white center leaving a highlight. I then blend Dusty Rose Ink around the outer edge of the previous color, fading into it.


Using my MISTI, I take the image from Peaceful Floral Stamp Set, and stamp it on the blended piece using Obsidian Ink. I now take a circle from my Infinity Circle Die Set to cut out my image, running them through my Big Shot Die Cut Machine. Now that I have my image cut out, I need to stamp my sentiment. I put the panel back into my MISTI to use as a guide. I then place the circle I just cut out back into it's cut out. This works especially well when stamping odd shapes in the MISTI. I then stamp my sentiment with the same black ink as the image.


I decided I wanted to back my circle image with black cardstock, so I actually cut the image down one more circle size, then cut out of Black Cardstock the next size up circle. I then attach the two together using Terrific Tape.


I now attach my blended embossed panel onto a black card base using Terrific Tape. I decided I wanted to add a little something to add more interest to my card. I cut a 1" x 4" strip of black cardstock, put it in an embossing folder from my stash and run it through my Big Shot. I adhere the strip onto the front center of my card, then add Foam Tape to my image circle and place it over the strip. I add a few Black Jewels to the image circle and this completes my card.


If this is the first time visiting my blog, welcome and I hope you return. If you are a returning visitor, thank you so much for your support!
Should you have any questions or comments please leave them in the comments section. I'd love to hear from you and what you thought about today's card.
If you would like to be notified by email each time I post something new to my blog, you can click on the subscribe button at the top of the page.
Thank you for visiting and I hope you come back soon!
Happy Stamping!!
Jeannie
Comments
Post a Comment