Hello and welcome to my blog!!
Now through Monday, March 9th, Scrapbook.com is offering 10% off site wide!! Use coupon code MARCH2020 at checkout. Also, all Scrapbook.com exclusive adhesives are deeply discounted. This includes adhesive runners, adhesive sheets, tape in all widths, foam dots/sheets/tape plus more! I highly recommend their adhesives, they are very strong!
*I know die cut machines can be a bigger investment, but if you are in need of one and looking for a good price, Scrapbook.com has some really good prices on Big Shots - stand alone machines and bundles.
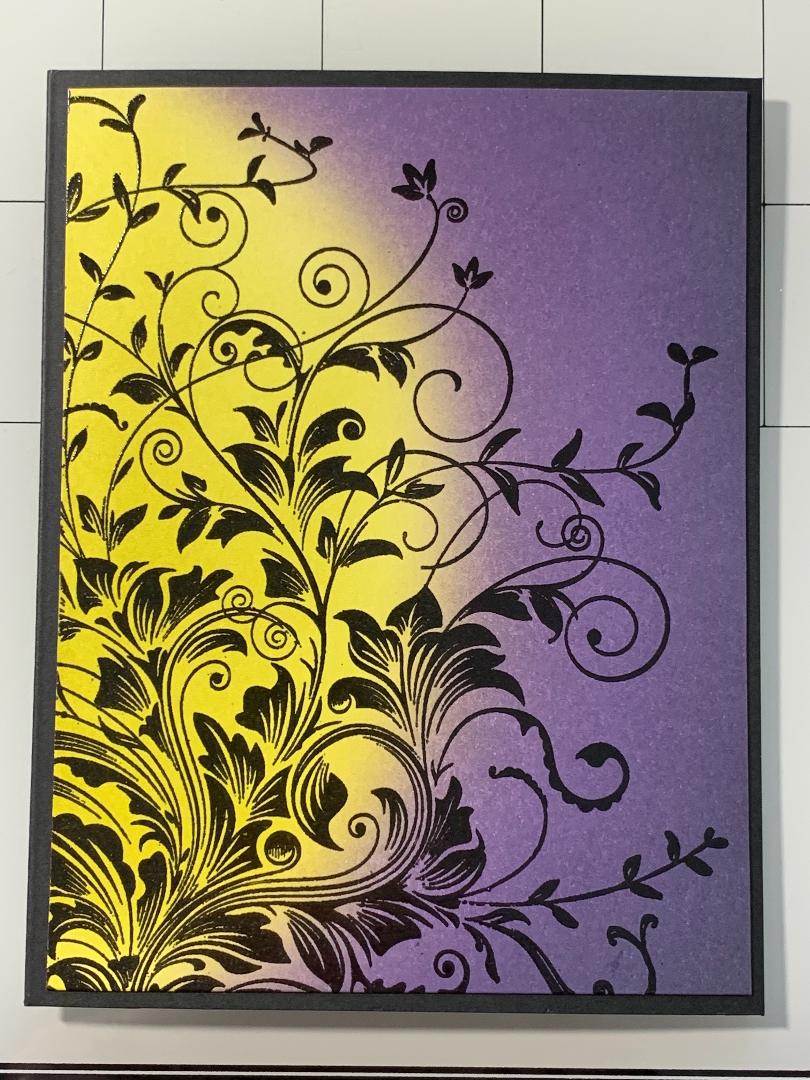
Today I will show you some simple ink blending with a dramatic look. Choosing the right colors to blend can determine the look of your card. You can choose different shades of one color for a soft, subtle look. Earth tones for a rustic, masculine look. Today, I am choosing two colors that one wouldn't normally choose when blending ink, in fact, they are colors that would normally give a muddy look and are at the opposite ends of the color wheel! I will show you how to blend these two colors to give a bold, dramatic look! I will be using regular Distress Inks for today's ink blending. Let's get started!!

I start by cutting a 4" x 5 1/4" of Neenah white cardstock using my Tim Holtz Guillotine paper trimmer. Using my Blender Brushes, I start my ink blending with Crushed Olive ink onto the left side of my panel. I blend the ink toward the center of my panel but not as far at the top and bottom. I then fade out a bit, this will help in the blending with the next color. Next, I add Dusty Concord to the left side of my panel, blending toward the center as well as the top and bottom. I again fade out, meeting with the previous color. I keep the blending lighter where the two colors meet to avoid getting a muddy color. For added depth, I add Black Soot to the right side of the panel and two corners. I now go back through the first two colors, blending more ink until I get bright, bold colors. I again blend the ink lighter where the two meet. *I blended a little more Crushed Olive where the two colors meet than the final blended picture shows.


I dry my panel completely by using my Ranger Craft Tool. (you could also use your heat embossing tool) Next, I lay the blended panel into my MISTI stamp platform (I like to add a little dot runner tape to the back of my panel to keep it from moving) and prep with an Anti Static powder bag. Using the Leafy Vine (cling rubber) background stamp, Leafy Vine (if you prefer wood mount), I position it over my panel then pick up with the door of my MISTI. I ink up the stamp using Versamark ink and stamp onto my panel. I then add Black Embossing Powder and heat set with my Heat Tool. Next, I mount my panel onto a 4 1/4" x 5 1/2" Black card base using Double Sided Tape.


Using Crushed Olive ink, I blend onto a 1" x 3 3/8" strip of Neenah cardstock to match my panel. Again, I dry completely before stamping. I choose a sentiment from the Heartfelt stamp set and with my MISTI I stamp the sentiment onto my blended strip using Versafine Clair Nocturn ink. I then mount onto a 1 1/8" x 3 1/2" strip of black cardstock using Double Sided Tape.


I attach the sentiment to the front of my card using Foam Tape and add some Water Droplets using Liquid Glue and this completes my card.

I hope you enjoyed today's card project. Even though the colors I chose today are colors that wouldn't normally mix well together without becoming muddy, blending can be achieved when you use a light hand where the colors meet. Creating a deep, dark color along with a bright, vibrant color pairs well with the black embossing. This stamp is one of my favorites, I love using it as a silhouette against colorful backgrounds. Whether the ink colors are pastel, earth tones or bright and vibrant, embossing this stamp with white or black gives a stunning look!
If this is the first time visiting my blog, welcome and I hope you return. If you are a returning visitor, thank you so much for your support!
Should you have any questions or comments please leave them in the comments section. I'd love to hear from you and what you thought about today's card.
If you would like to be notified by email each time I post something new to my blog, you can click on the subscribe button at the top of the page.
Thank you for visiting and I hope you come back soon!
Happy Stamping!!
Jeannie
Now through Monday, March 9th, Scrapbook.com is offering 10% off site wide!! Use coupon code MARCH2020 at checkout. Also, all Scrapbook.com exclusive adhesives are deeply discounted. This includes adhesive runners, adhesive sheets, tape in all widths, foam dots/sheets/tape plus more! I highly recommend their adhesives, they are very strong!
*I know die cut machines can be a bigger investment, but if you are in need of one and looking for a good price, Scrapbook.com has some really good prices on Big Shots - stand alone machines and bundles.
Today I will show you some simple ink blending with a dramatic look. Choosing the right colors to blend can determine the look of your card. You can choose different shades of one color for a soft, subtle look. Earth tones for a rustic, masculine look. Today, I am choosing two colors that one wouldn't normally choose when blending ink, in fact, they are colors that would normally give a muddy look and are at the opposite ends of the color wheel! I will show you how to blend these two colors to give a bold, dramatic look! I will be using regular Distress Inks for today's ink blending. Let's get started!!

I start by cutting a 4" x 5 1/4" of Neenah white cardstock using my Tim Holtz Guillotine paper trimmer. Using my Blender Brushes, I start my ink blending with Crushed Olive ink onto the left side of my panel. I blend the ink toward the center of my panel but not as far at the top and bottom. I then fade out a bit, this will help in the blending with the next color. Next, I add Dusty Concord to the left side of my panel, blending toward the center as well as the top and bottom. I again fade out, meeting with the previous color. I keep the blending lighter where the two colors meet to avoid getting a muddy color. For added depth, I add Black Soot to the right side of the panel and two corners. I now go back through the first two colors, blending more ink until I get bright, bold colors. I again blend the ink lighter where the two meet. *I blended a little more Crushed Olive where the two colors meet than the final blended picture shows.


I dry my panel completely by using my Ranger Craft Tool. (you could also use your heat embossing tool) Next, I lay the blended panel into my MISTI stamp platform (I like to add a little dot runner tape to the back of my panel to keep it from moving) and prep with an Anti Static powder bag. Using the Leafy Vine (cling rubber) background stamp, Leafy Vine (if you prefer wood mount), I position it over my panel then pick up with the door of my MISTI. I ink up the stamp using Versamark ink and stamp onto my panel. I then add Black Embossing Powder and heat set with my Heat Tool. Next, I mount my panel onto a 4 1/4" x 5 1/2" Black card base using Double Sided Tape.

Using Crushed Olive ink, I blend onto a 1" x 3 3/8" strip of Neenah cardstock to match my panel. Again, I dry completely before stamping. I choose a sentiment from the Heartfelt stamp set and with my MISTI I stamp the sentiment onto my blended strip using Versafine Clair Nocturn ink. I then mount onto a 1 1/8" x 3 1/2" strip of black cardstock using Double Sided Tape.


I attach the sentiment to the front of my card using Foam Tape and add some Water Droplets using Liquid Glue and this completes my card.

I hope you enjoyed today's card project. Even though the colors I chose today are colors that wouldn't normally mix well together without becoming muddy, blending can be achieved when you use a light hand where the colors meet. Creating a deep, dark color along with a bright, vibrant color pairs well with the black embossing. This stamp is one of my favorites, I love using it as a silhouette against colorful backgrounds. Whether the ink colors are pastel, earth tones or bright and vibrant, embossing this stamp with white or black gives a stunning look!
If this is the first time visiting my blog, welcome and I hope you return. If you are a returning visitor, thank you so much for your support!
Should you have any questions or comments please leave them in the comments section. I'd love to hear from you and what you thought about today's card.
If you would like to be notified by email each time I post something new to my blog, you can click on the subscribe button at the top of the page.
Thank you for visiting and I hope you come back soon!
Happy Stamping!!
Jeannie
Beautiful!
ReplyDeleteThank you Cheryl!
Deletetruly beautiful , thank you for sharing your talents
ReplyDeleteThank you for your kind words Nancy!
Delete