Hello, welcome to my blog!!
Scrapbook.com is celebrating National Craft Month and now through Monday, March 16th, you can save up to 50% off Stamps, Stamping Accessories and Stencils!! Every couple of days they will be offering free items along with great sales! Check often as the sales will be frequently changing. I have placed a store logo on the front page of my blog just down below my profile that brings you directly to their store!
***Re-Design, Rina K, Gina K, Lawn Fawn, My Sweet Petunia (MISTI), and Scrapbook.com 'Handmade Essentials' Stamp Set (SKU sbc-ds19-7) are excluded from all discounts and promotions.
*I know die cut machines can be a bigger investment, but if you are in need of one and looking for a good price, Scrapbook.com has some really good prices on Big Shots - stand alone machines and bundles.
Today's card project includes more spring colors!! I thought I would end the week with a bright, colorful card. I will be using a background stamp from Pinkfresh Studio's new release and one of my favorite peony stamps from Altenew, both of which are on sale right now! All products I use will be highlighted and linked in the instructions below. For my ink blending, I will be using regular Distress Ink. For my water coloring, I will be using Zig Clean Color Real Brush markers. *I want to note that the cardstock you do your Zig water coloring on is very important. I do ALL of my Zig water coloring on Strathmore Bristol Smooth cardstock. It is the only cardstock I have found to make blending a breeze! Let's get started!!

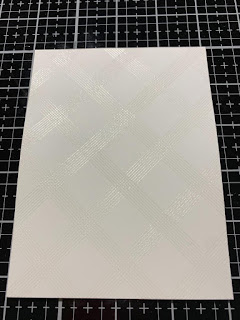
I will be doing all of my work on my Tonic Tim Holtz Glass Media Mat. To start, I cut a 4" x 5 1/4" panel out of Neenah White Cardstock using my Tim Holtz Guillotine Paper Trimmer. Next, I prep my panel using Anti Static Powder then place the panel into my MISTI. I then add a little Dot Runner Tape to the back side of my panel to hold it into place when stamping background stamps, if I don't get a good impression the first time, I can then stamp my panel again. I now ink up my Diamond Tiles Background Stamp with Versamark Ink and stamp onto my panel. I add Clear Detail Embossing Powder and heat set with my Heat Tool.

Next, using my MISTI, I stamp floral images from the Peony Bouquet Stamp Set with Versamark Ink onto Strathmore Bristol Smooth Cardstock. Next, I add Clear Embossing Powder then heat set with my Heat Tool. For my water coloring, I will be using the 36 count Zig Clean Color Real Brush Box Set. The first color I use is Light Violet-081, adding a small amount at the base of the first petal, I then take my Water Brush and dab/pull at the color working my way to almost the end of the petal as I like to leave the tips white. I repeat this process until all petals are colored.


For my second color, I use Violet-080. I repeat the process from above, only I use this color very sparingly as it is a much darker color and I don't want to over power my base color. I only want to add depth and shadow. I color the small flower the same way.


For the leaves, I start with Mid Green-046. I lay color and blend with my water brush. I use Olive Green-043 for my second color and again blend with my water brush.


I now go back to my embossed background panel. Using my Blender Brushes, I blend Crushed Olive Distress Ink onto the center of the panel, fading out a bit. I then take Mustard Seed Distress Ink and blend around the edges of the previous color, fading out to white. I take a clean, soft cloth to gently buff the panel to remove any ink laying on top of the embossing.


I now stamp my sentiment from the Heartfelt Stamp Set onto a 1" x 4" strip of white cardstock using Versafine Clair Nocturn Ink. Next, I mount it onto a 1 1/8" x 4" strip of Cilantro Cardstock.

I fussy cut out all of my flowers and leaves using my Razor Edge Easy Action Shears. **Altenew does sell Peony Bouquet Dies for this stamp set, however, I do not own them. I lay the large flower down, then start gluing the leaves and small flower behind it using Liquid Glue.

I now adhere the sentiment strip toward the bottom of the embossed panel using Double Sided Tape, then adhere to a Cilantro card base.


Finally, I adhere the flower arrangement to my card front with Foam Tape, add some Water Droplets using Liquid Glue and this completes my card.


I hope you enjoyed today's card! I like the way this card came together and had fun incorporating colors I don't normally use. I normally stay away from fussy cutting, but these images trimmed out easily and were worth the little bit of time it took.
I hope you find some relaxing time to craft this weekend and stay healthy!
If this is the first time visiting my blog, welcome and I hope you return. If you are a returning visitor, thank you so much for your support!
Should you have any questions or comments please leave them in the comments section. I'd love to hear from you and what you thought about today's card.
If you would like to be notified by email each time I post something new to my blog, you can click on the subscribe button at the top of the page.
Thank you for visiting and I hope you come back soon!
Happy Stamping!!
Jeannie
Scrapbook.com is celebrating National Craft Month and now through Monday, March 16th, you can save up to 50% off Stamps, Stamping Accessories and Stencils!! Every couple of days they will be offering free items along with great sales! Check often as the sales will be frequently changing. I have placed a store logo on the front page of my blog just down below my profile that brings you directly to their store!
***Re-Design, Rina K, Gina K, Lawn Fawn, My Sweet Petunia (MISTI), and Scrapbook.com 'Handmade Essentials' Stamp Set (SKU sbc-ds19-7) are excluded from all discounts and promotions.
*I know die cut machines can be a bigger investment, but if you are in need of one and looking for a good price, Scrapbook.com has some really good prices on Big Shots - stand alone machines and bundles.
Today's card project includes more spring colors!! I thought I would end the week with a bright, colorful card. I will be using a background stamp from Pinkfresh Studio's new release and one of my favorite peony stamps from Altenew, both of which are on sale right now! All products I use will be highlighted and linked in the instructions below. For my ink blending, I will be using regular Distress Ink. For my water coloring, I will be using Zig Clean Color Real Brush markers. *I want to note that the cardstock you do your Zig water coloring on is very important. I do ALL of my Zig water coloring on Strathmore Bristol Smooth cardstock. It is the only cardstock I have found to make blending a breeze! Let's get started!!

I will be doing all of my work on my Tonic Tim Holtz Glass Media Mat. To start, I cut a 4" x 5 1/4" panel out of Neenah White Cardstock using my Tim Holtz Guillotine Paper Trimmer. Next, I prep my panel using Anti Static Powder then place the panel into my MISTI. I then add a little Dot Runner Tape to the back side of my panel to hold it into place when stamping background stamps, if I don't get a good impression the first time, I can then stamp my panel again. I now ink up my Diamond Tiles Background Stamp with Versamark Ink and stamp onto my panel. I add Clear Detail Embossing Powder and heat set with my Heat Tool.


Next, using my MISTI, I stamp floral images from the Peony Bouquet Stamp Set with Versamark Ink onto Strathmore Bristol Smooth Cardstock. Next, I add Clear Embossing Powder then heat set with my Heat Tool. For my water coloring, I will be using the 36 count Zig Clean Color Real Brush Box Set. The first color I use is Light Violet-081, adding a small amount at the base of the first petal, I then take my Water Brush and dab/pull at the color working my way to almost the end of the petal as I like to leave the tips white. I repeat this process until all petals are colored.


For my second color, I use Violet-080. I repeat the process from above, only I use this color very sparingly as it is a much darker color and I don't want to over power my base color. I only want to add depth and shadow. I color the small flower the same way.


For the leaves, I start with Mid Green-046. I lay color and blend with my water brush. I use Olive Green-043 for my second color and again blend with my water brush.


I now go back to my embossed background panel. Using my Blender Brushes, I blend Crushed Olive Distress Ink onto the center of the panel, fading out a bit. I then take Mustard Seed Distress Ink and blend around the edges of the previous color, fading out to white. I take a clean, soft cloth to gently buff the panel to remove any ink laying on top of the embossing.


I now stamp my sentiment from the Heartfelt Stamp Set onto a 1" x 4" strip of white cardstock using Versafine Clair Nocturn Ink. Next, I mount it onto a 1 1/8" x 4" strip of Cilantro Cardstock.

I fussy cut out all of my flowers and leaves using my Razor Edge Easy Action Shears. **Altenew does sell Peony Bouquet Dies for this stamp set, however, I do not own them. I lay the large flower down, then start gluing the leaves and small flower behind it using Liquid Glue.

I now adhere the sentiment strip toward the bottom of the embossed panel using Double Sided Tape, then adhere to a Cilantro card base.


Finally, I adhere the flower arrangement to my card front with Foam Tape, add some Water Droplets using Liquid Glue and this completes my card.


I hope you enjoyed today's card! I like the way this card came together and had fun incorporating colors I don't normally use. I normally stay away from fussy cutting, but these images trimmed out easily and were worth the little bit of time it took.
I hope you find some relaxing time to craft this weekend and stay healthy!
If this is the first time visiting my blog, welcome and I hope you return. If you are a returning visitor, thank you so much for your support!
Should you have any questions or comments please leave them in the comments section. I'd love to hear from you and what you thought about today's card.
If you would like to be notified by email each time I post something new to my blog, you can click on the subscribe button at the top of the page.
Thank you for visiting and I hope you come back soon!
Happy Stamping!!
Jeannie
Comments
Post a Comment