Hello, welcome to my blog!!
I hope everyone is doing well and staying safe. We are well here in Minnesota... my card making has been a great distraction from everything going on in the world!
For today's card project, I wanted to create a soft, subtle card. I love bold, bright colors but wanted to change things up a bit. I will be doing a very small amount of ink blending on the panel and also simple coloring on my image, both using Distress Oxide inks. Let's get started!!

I will be doing all of my work on my Tim Holtz Glass Media Mat.
To start, I cut a 4" x 5 1/4" out of Neenah White Cardstock using my Tim Holtz Guillotine Paper Trimmer. Next, I place the panel into my MISTI Stamp Positioner and prep with my Anti Static Powder Bag. Taking my Diamond Tiles Background Stamp, I ink it with Versamark Ink and stamp onto my panel. I then add Detail White Embossing Powder and heat set with my Heat Tool.

Next, I take my Blender Brushes and blend Milled Lavender Oxide Ink onto the embossed panel, keeping it darker in the center then fading out toward the edges. Taking a small paintbrush and clean water, I add spatters to the panel then soak up with a paper towel. I then mount onto a Barely There Cardstock card base, shifting to the top left using Double Sided Tape.


I now stamp my images from the Perfectly Perfect Stamp Set onto Neenah White Cardstock using Amalgam Ink. Next, I use the white part of my Glass Media Mat for a pallet and press some Oxide ink onto it. Using a small paintbrush and clean water, I pick up a little color starting with Antique Linen Oxide Ink. I start at the base of each petal, dabbing the ink towards the ends. The next color I use is Milled Lavender Oxide Ink and paint more at the ends of each petal, blending into the previous color a bit. I then add Victorian Velvet Oxide Ink to the shadow areas of the flower. For the leaves, I start with Iced Spruce Oxide Ink and lay some color down, then add Bundled Sage Oxide Ink. ***The more water you add to the Oxide ink, the lighter the color will be.


Using my Fiskars Shears, I fussy cut out all of my images then adhere the leaves to the flower using Liquid Glue.


Next, I take my Leafy Branch Die and a piece of Vellum then run them through my Big Shot Die Cut Machine. Using Liquid Glue, I adhere the vellum die cut to the back of the flower cluster. I now take a sentiment from the You Make A Difference Stamp Set and stamp it onto a strip of white cardstock using Versafine Clair Nocturn Ink. Using Foam Tape, I adhere the strip onto the front of the card front.
I then add Foam Dots to the back of the cluster and adhere to my card front, above the sentiment and over the inked area. I then add Water Droplets using Liquid Glue and this completes my card.


I hope you enjoyed this card, and give Oxide ink water coloring a try. There are so many options for coloring mediums out there, don't forget about using your ink pads!
If this is the first time visiting my blog, welcome and I hope you return. If you are a returning visitor, thank you so much for your support!
Should you have any questions or comments please leave them in the comments section. I'd love to hear from you and what you thought about today's card.
If you would like to be notified by email each time I post something new to my blog, you can click on the subscribe button at the top of the page.
Thank you for visiting and I hope you come back soon!
Happy Stamping!!
Jeannie
I hope everyone is doing well and staying safe. We are well here in Minnesota... my card making has been a great distraction from everything going on in the world!
For today's card project, I wanted to create a soft, subtle card. I love bold, bright colors but wanted to change things up a bit. I will be doing a very small amount of ink blending on the panel and also simple coloring on my image, both using Distress Oxide inks. Let's get started!!

I will be doing all of my work on my Tim Holtz Glass Media Mat.
To start, I cut a 4" x 5 1/4" out of Neenah White Cardstock using my Tim Holtz Guillotine Paper Trimmer. Next, I place the panel into my MISTI Stamp Positioner and prep with my Anti Static Powder Bag. Taking my Diamond Tiles Background Stamp, I ink it with Versamark Ink and stamp onto my panel. I then add Detail White Embossing Powder and heat set with my Heat Tool.

Next, I take my Blender Brushes and blend Milled Lavender Oxide Ink onto the embossed panel, keeping it darker in the center then fading out toward the edges. Taking a small paintbrush and clean water, I add spatters to the panel then soak up with a paper towel. I then mount onto a Barely There Cardstock card base, shifting to the top left using Double Sided Tape.


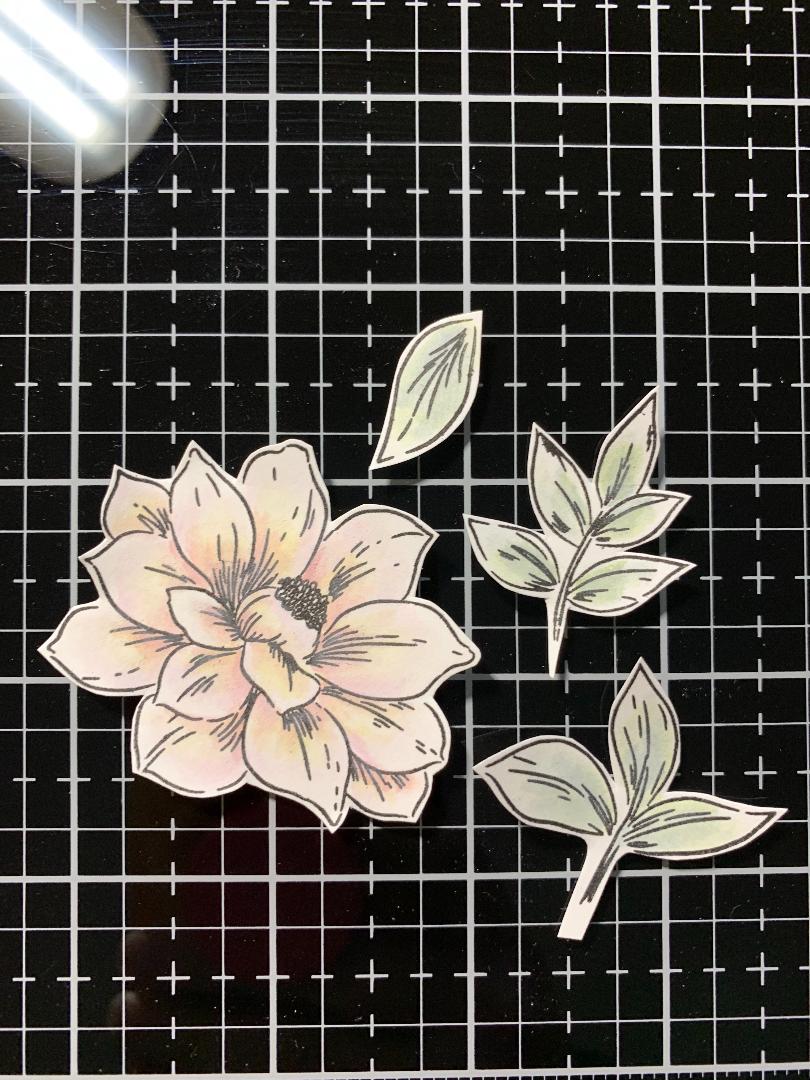
I now stamp my images from the Perfectly Perfect Stamp Set onto Neenah White Cardstock using Amalgam Ink. Next, I use the white part of my Glass Media Mat for a pallet and press some Oxide ink onto it. Using a small paintbrush and clean water, I pick up a little color starting with Antique Linen Oxide Ink. I start at the base of each petal, dabbing the ink towards the ends. The next color I use is Milled Lavender Oxide Ink and paint more at the ends of each petal, blending into the previous color a bit. I then add Victorian Velvet Oxide Ink to the shadow areas of the flower. For the leaves, I start with Iced Spruce Oxide Ink and lay some color down, then add Bundled Sage Oxide Ink. ***The more water you add to the Oxide ink, the lighter the color will be.


Using my Fiskars Shears, I fussy cut out all of my images then adhere the leaves to the flower using Liquid Glue.

Next, I take my Leafy Branch Die and a piece of Vellum then run them through my Big Shot Die Cut Machine. Using Liquid Glue, I adhere the vellum die cut to the back of the flower cluster. I now take a sentiment from the You Make A Difference Stamp Set and stamp it onto a strip of white cardstock using Versafine Clair Nocturn Ink. Using Foam Tape, I adhere the strip onto the front of the card front.
I then add Foam Dots to the back of the cluster and adhere to my card front, above the sentiment and over the inked area. I then add Water Droplets using Liquid Glue and this completes my card.


I hope you enjoyed this card, and give Oxide ink water coloring a try. There are so many options for coloring mediums out there, don't forget about using your ink pads!
If this is the first time visiting my blog, welcome and I hope you return. If you are a returning visitor, thank you so much for your support!
Should you have any questions or comments please leave them in the comments section. I'd love to hear from you and what you thought about today's card.
If you would like to be notified by email each time I post something new to my blog, you can click on the subscribe button at the top of the page.
Thank you for visiting and I hope you come back soon!
Happy Stamping!!
Jeannie
What a special card! Love everything that you have chosen for this gorgeous card!
ReplyDeleteThank you Deb! I do like the soft, comforting feeling this card gives. =)
Delete