Hello and welcome to my blog!
Today's card project is a very simple ink blended panel with white embossing. Even though this is a very simple card, the embossed background gives it a beautiful, elegant look. I will be using all Gina K. designs ink, paper and stamps. I have chosen three ink colors to blend for this card and just let me tell you.... Gina's inks blend beautifully!!! I will also be using matching cardstock to one of the inks... she even has matching colored envelopes! If you have never tried Gina's products, I highly recommend them. From the high quality stamps to great quality cardstock with matching inks and envelopes and everything in between, you will not be disappointed!!
Let's get started on today's card!

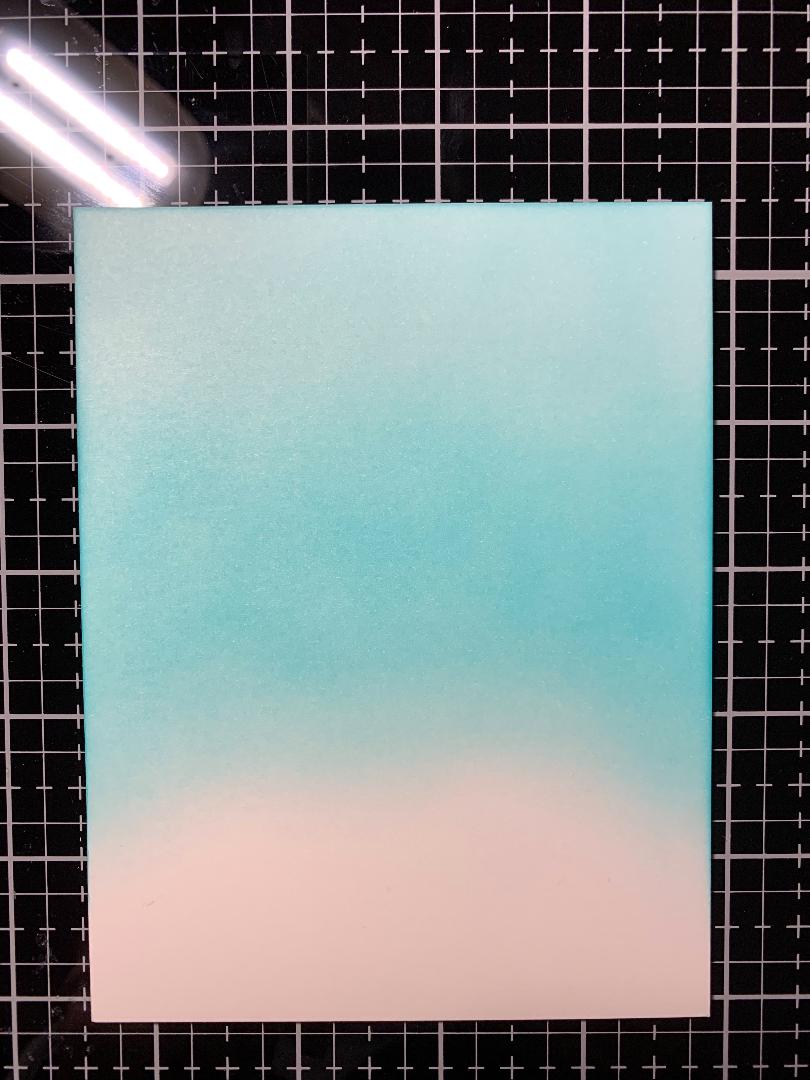
I start with a 3 3/4" x 5" White Cardstock panel to do my ink blending. Using my Blender Brushes, I blend Ocean Mist ink on the top third of the white panel, fading out. Next, I use Turquoise Sea ink and blend onto the center of the panel, blending back into the previous color and fading out. The final color is Tranquil Teal that I blend onto the bottom of the panel, also blending back into the previous color. Once I have my three colors laid down, I go back through each one adding more ink and continue to blend into each other until I am satisfied with the blending.


After my blended panel is completely dry, I prep with my Anti Static Powder Bag and place the panel into my MISTI stamp positioner. With the Petite Flourish Background Stamp, I ink with Embossing Ink and stamp onto my inked panel. I then add Detail White Embossing Powder and heat set with my Heat Tool.
Next, I take a 4 1/4" x 11" piece of Turquoise Sea Cardstock and using my Scor Buddy, I score it in half at 5 1/2" creating a top folding card base. I then cut a 3 7/8" x 5 1/8" panel out of Black Onyx Cardstock.


Using Terrific Tape, I attach my blended panel onto the black cardstock panel, then onto my card base.


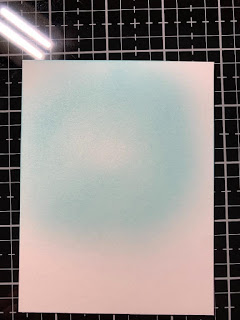
To create a background for my stamping, I use Ocean Mist Ink and blend an area of a white cardstock panel, fading out to the white cardstock in the center of the ink blending, leaving a small highlighted area in the middle. Next, I use Turquoise Sea Ink and blend around the previous color.

I place this panel into my MISTI and stamp my images from the Love And Prayers Stamp set using Amalgam Obsidian Ink. Next, I cut out my image using a circle die from my Infinity Circle Dies set.


To create a frame for my image, I use Purple Tape to hold together two circle dies from my infinity die set, and with black cardstock, I run through my Big Shot die cut machine. I then attach the frame to my image with Connect Liquid Glue.


I attach my image onto the front of my card base using Foam Tape. Using my Jewel Picker, I add Water Droplets using Connect Liquid Glue and this completes my card.

I hope you enjoyed today's card. I love the basic black and white colors paired with shades of turquoise. Having ink with matching cardstock really gives this card a complete look. Add a matching envelope and you are all set!
If this is the first time visiting my blog, welcome and I hope you return. If you are a returning visitor, thank you so much for your support!
Should you have any questions or comments please leave them in the comments section. I'd love to hear from you and what you thought about today's card.
If you would like to be notified by email each time I post something new to my blog, you can click on the subscribe button at the top of the page.
Thank you for visiting and I hope you come back soon!
Happy Stamping!!
Jeannie
Today's card project is a very simple ink blended panel with white embossing. Even though this is a very simple card, the embossed background gives it a beautiful, elegant look. I will be using all Gina K. designs ink, paper and stamps. I have chosen three ink colors to blend for this card and just let me tell you.... Gina's inks blend beautifully!!! I will also be using matching cardstock to one of the inks... she even has matching colored envelopes! If you have never tried Gina's products, I highly recommend them. From the high quality stamps to great quality cardstock with matching inks and envelopes and everything in between, you will not be disappointed!!
Let's get started on today's card!

I start with a 3 3/4" x 5" White Cardstock panel to do my ink blending. Using my Blender Brushes, I blend Ocean Mist ink on the top third of the white panel, fading out. Next, I use Turquoise Sea ink and blend onto the center of the panel, blending back into the previous color and fading out. The final color is Tranquil Teal that I blend onto the bottom of the panel, also blending back into the previous color. Once I have my three colors laid down, I go back through each one adding more ink and continue to blend into each other until I am satisfied with the blending.


After my blended panel is completely dry, I prep with my Anti Static Powder Bag and place the panel into my MISTI stamp positioner. With the Petite Flourish Background Stamp, I ink with Embossing Ink and stamp onto my inked panel. I then add Detail White Embossing Powder and heat set with my Heat Tool.
Next, I take a 4 1/4" x 11" piece of Turquoise Sea Cardstock and using my Scor Buddy, I score it in half at 5 1/2" creating a top folding card base. I then cut a 3 7/8" x 5 1/8" panel out of Black Onyx Cardstock.


Using Terrific Tape, I attach my blended panel onto the black cardstock panel, then onto my card base.


To create a background for my stamping, I use Ocean Mist Ink and blend an area of a white cardstock panel, fading out to the white cardstock in the center of the ink blending, leaving a small highlighted area in the middle. Next, I use Turquoise Sea Ink and blend around the previous color.


To create a frame for my image, I use Purple Tape to hold together two circle dies from my infinity die set, and with black cardstock, I run through my Big Shot die cut machine. I then attach the frame to my image with Connect Liquid Glue.


I attach my image onto the front of my card base using Foam Tape. Using my Jewel Picker, I add Water Droplets using Connect Liquid Glue and this completes my card.

I hope you enjoyed today's card. I love the basic black and white colors paired with shades of turquoise. Having ink with matching cardstock really gives this card a complete look. Add a matching envelope and you are all set!
If this is the first time visiting my blog, welcome and I hope you return. If you are a returning visitor, thank you so much for your support!
Should you have any questions or comments please leave them in the comments section. I'd love to hear from you and what you thought about today's card.
If you would like to be notified by email each time I post something new to my blog, you can click on the subscribe button at the top of the page.
Thank you for visiting and I hope you come back soon!
Happy Stamping!!
Jeannie
Very pretty.
ReplyDeleteThank you Cindy!
ReplyDeleteNice card
ReplyDeleteThank you Carol!
Delete