Hello, welcome to my blog!
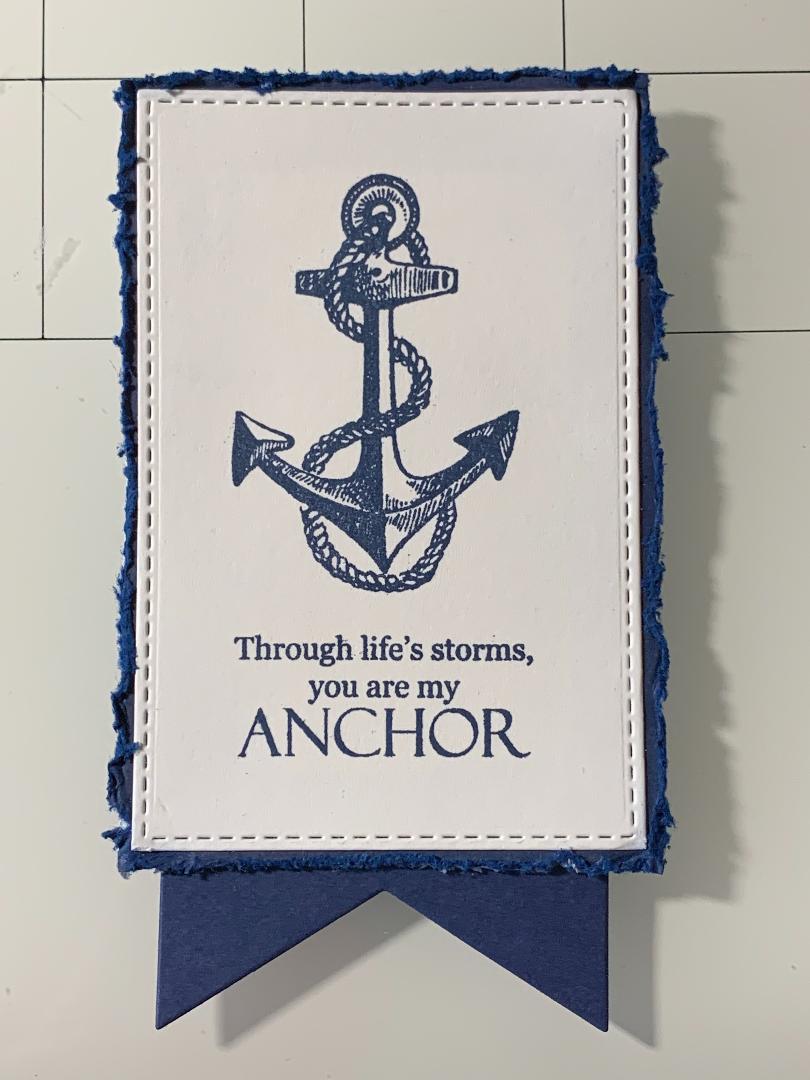
Today's card project is featuring Gina K. Designs My Anchor stamp set. This is a monochromatic card using In The Navy ink and cardstock. This could be used as a masculine card, or a card to let someone know how much you appreciate their support in your life. Gina K. Designs has a new release coming out tonight at 7:00 pm central time. I encourage you to check it out as Gina always puts together an outstanding kit that is priced much lower than actual retail pricing. She also has stand alone stamp sets and products in her new releases. Let's get started on today's project!!

To start, I take Neenah white cardstock and cut a panel using Gina K. Designs Single Stitched Rectangle dies, running them through my Big Shot die cut machine. Next, using my MISTI stamp positioner, I stamp the anchor and greeting from Gina K. Designs My Anchor stamp set using In The Navy ink.


Next, I cut a 2 3/4" x 4" panel of white cardstock then, taking my In The Navy ink pad, I ink the edges as I am going to distress this piece and want a white core to show through. (I ended up applying a little too much ink and the white didn't show through quite like I would have liked in the end, but still looked good) I attached my stitched panel onto the inked panel. Using Tonic Paper Distresser, I distress all four edges.


Using Jumbo Nested Flag Banners die set, I cut a banner out of In The Navy cardstock. I then attached the banner to the back of my greeting panel and set aside.

Next, I cut a 3 3/4" x 5" panel out of white cardstock and using my Scor-Buddy, I score lines every 1/2". I then take my In The Navy ink pad and run it down the front of my scored panel creating a wood grain look. You can add more color by more pressure on the ink pad. I attach my scored panel onto a 4" x 5 1/4" white panel the attached to a top folding In The Navy card base.


Taking some hemp cord from my stash, I tie a loose knot to the end then tape it down to the front of my card just above center on both the left and right sides. I cut my cord in half, you could use one strand and knot both ends, this was just easier for me to cut in half. I use Gina K. Designs Connect liquid glue to hold the knots in place. Next, using Gina K. Designs White Foam Tape, I adhere my greeting panel to the front of my card, over the hemp cord and my card is finished.


Making a monochromatic card is an easy way to match everything together and gives a nice clean look. Using Gina K. Designs ink and cardstock takes all of the guess work out as her inks and cardstock match perfectly! Don't forget to check out the new release tonight, Gina never disappoints!!
If you would like to do any shopping, I have a direct link to Gina's store on the right side bar of my blog page. I thank you for your support!!
Today's card project is featuring Gina K. Designs My Anchor stamp set. This is a monochromatic card using In The Navy ink and cardstock. This could be used as a masculine card, or a card to let someone know how much you appreciate their support in your life. Gina K. Designs has a new release coming out tonight at 7:00 pm central time. I encourage you to check it out as Gina always puts together an outstanding kit that is priced much lower than actual retail pricing. She also has stand alone stamp sets and products in her new releases. Let's get started on today's project!!

To start, I take Neenah white cardstock and cut a panel using Gina K. Designs Single Stitched Rectangle dies, running them through my Big Shot die cut machine. Next, using my MISTI stamp positioner, I stamp the anchor and greeting from Gina K. Designs My Anchor stamp set using In The Navy ink.


Next, I cut a 2 3/4" x 4" panel of white cardstock then, taking my In The Navy ink pad, I ink the edges as I am going to distress this piece and want a white core to show through. (I ended up applying a little too much ink and the white didn't show through quite like I would have liked in the end, but still looked good) I attached my stitched panel onto the inked panel. Using Tonic Paper Distresser, I distress all four edges.


Using Jumbo Nested Flag Banners die set, I cut a banner out of In The Navy cardstock. I then attached the banner to the back of my greeting panel and set aside.
Next, I cut a 3 3/4" x 5" panel out of white cardstock and using my Scor-Buddy, I score lines every 1/2". I then take my In The Navy ink pad and run it down the front of my scored panel creating a wood grain look. You can add more color by more pressure on the ink pad. I attach my scored panel onto a 4" x 5 1/4" white panel the attached to a top folding In The Navy card base.


Taking some hemp cord from my stash, I tie a loose knot to the end then tape it down to the front of my card just above center on both the left and right sides. I cut my cord in half, you could use one strand and knot both ends, this was just easier for me to cut in half. I use Gina K. Designs Connect liquid glue to hold the knots in place. Next, using Gina K. Designs White Foam Tape, I adhere my greeting panel to the front of my card, over the hemp cord and my card is finished.


Making a monochromatic card is an easy way to match everything together and gives a nice clean look. Using Gina K. Designs ink and cardstock takes all of the guess work out as her inks and cardstock match perfectly! Don't forget to check out the new release tonight, Gina never disappoints!!
If you would like to do any shopping, I have a direct link to Gina's store on the right side bar of my blog page. I thank you for your support!!
If this is the first time visiting
my blog, welcome and I hope you return. If you are a returning visitor, thank
you so much for your support!
Should you have any questions or
comments please leave them in the comments section. I'd love to hear from you
and what you thought about today's card.
If you would like to be notified by
email each time I post something new to my blog, you can click on the subscribe
button at the top of the page.
Thank you for visiting and I hope
you come back soon!
Happy Stamping!!
Jeannie
What an awesome card. I need a lot of masculine cards and this will certainly go in my idea file. Thanks for the great inspiration and for always sharing the wonderful details of how you create your cards.
ReplyDeleteThank you so much for your kind words Judy!
ReplyDeleteI struggle with masculine cards, and this Gina K set is perfect!