Hello, welcome to my blog!
If this is your first time visiting my blog, welcome and I hope you enjoy what you see! If you are a returning guest, I thank you so much for your support!
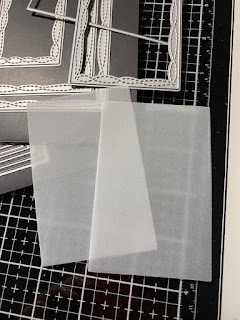
Today's card project is a shaker card using vellum instead of acetate. Vellum gives a frosted, soft look to shaker cards. Vellum is inexpensive and can be used in many ways. It comes in many weights from thin and more transparent, to thicker and more sturdy. I will be using a thinner vellum for today's technique.
Let's get started!

To start, I take my Hero Arts Infinity Rectangle Dies and die cut a panel out of vellum using the 9th smallest die in the set, running it through my Big Shot die cutting machine. Next, I die cut a panel out of Gina K. Designs Passionate Pink cardstock using Kat Scrappiness Wonky Wavy Stitched Rectangle dies, using the 3rd smallest die.

To turn the pink panel into a frame, I take the 10th smallest rectangle frame from my Infinity Rectangle dies and center it between the wonky stitching on the pink panel, tape it down and run it through my Big Shot. This creates a frame for our shaker window. Using 1/8" double sided tape, I adhere the vellum to the back of the frame.


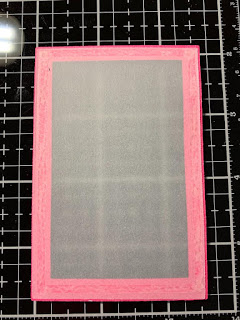
Next, I make a thin frame out of Fun Foam. I take the 9th and 10th smallest dies from my Infinity Rectangle dies, evenly space them and tape them from the back side, lay them on a piece of fun foam, then run them through my Big Shot. Now I have a thin foam frame for my pink frame to sit on.


I now add Gina K. Designs Connect Liquid Glue to the foam frame and carefully glue it to the back of my pink frame adjusting it so it doesn't show through the front side of the window. I like to use liquid glue as it lets you adjust and move things a bit before it dries. Once in place, I gently press down then set a large acrylic block on top to hold it in place for a few minutes as it dries.


I move on to making a panel for the front of the card. I cut a 4" x 5 1/4" white panel out of Neenah cardstock. Using my Darice Scroll embossing folder, I run the white panel through my Big Shot. Next, I adhere the embossed white panel to a 4 1/4" x 5 1/2" Passionate Pink card base.


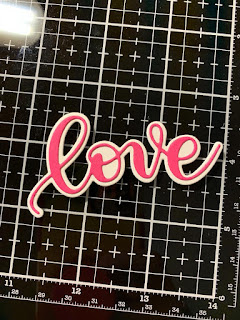
For my greeting, I use my Love Shadow die. I cut the love from Passionate Pink cardstock and the shadow from white cardstock. I glue them together using my Connect liquid glue.

Next, I create a mix of shaker bits using sequins and tiny beads from my stash to add to the inside of my shaker window. I sprinkle my mix onto the front of my card where the window will go. Next, I add Connect liquid glue to the foam frame on the back of my pink window and carefully set it over the sequin mix. Once I have the frame lined up straight on the front of my card, I gently press down and again set a large acrylic block on top to hold it into place while the glue dries. I make sure there is liquid glue on the entire foam frame so that it is sealed onto the card so no shaker bits can escape.


Next, I add Connect liquid glue to only the parts of the greeting that will connect to the pink frame. I again set the acrylic block on top to hold it down for a few minutes. Last, I glue down a few sequins from my mix onto the front of the card.
***Foam strips could also be used in place of the fun foam. I like using fun foam as it gives a complete barrier and has a nice, finished look.


This finishes today's card. I hope you enjoyed seeing a different version from using acetate on a shaker card. Vellum can be used with embossing folders, stamped on, heat embossed (just be careful to not add too much heat, also thicker vellum works better for heat embossing), you can even color an image from the back side of the vellum to give a subtle, soft look.
If you have any questions, comments or have suggestions for future projects, please leave them in the comments section.
Also, if you would like to be notified by email when a new project is posted to my blog, you can click on the subscribe button at the top of the page.
I appreciate you visiting my blog and hope you stop back for another card project soon!
Happy Stamping!!
Jeannie
If this is your first time visiting my blog, welcome and I hope you enjoy what you see! If you are a returning guest, I thank you so much for your support!
Today's card project is a shaker card using vellum instead of acetate. Vellum gives a frosted, soft look to shaker cards. Vellum is inexpensive and can be used in many ways. It comes in many weights from thin and more transparent, to thicker and more sturdy. I will be using a thinner vellum for today's technique.
Let's get started!

To start, I take my Hero Arts Infinity Rectangle Dies and die cut a panel out of vellum using the 9th smallest die in the set, running it through my Big Shot die cutting machine. Next, I die cut a panel out of Gina K. Designs Passionate Pink cardstock using Kat Scrappiness Wonky Wavy Stitched Rectangle dies, using the 3rd smallest die.


To turn the pink panel into a frame, I take the 10th smallest rectangle frame from my Infinity Rectangle dies and center it between the wonky stitching on the pink panel, tape it down and run it through my Big Shot. This creates a frame for our shaker window. Using 1/8" double sided tape, I adhere the vellum to the back of the frame.


Next, I make a thin frame out of Fun Foam. I take the 9th and 10th smallest dies from my Infinity Rectangle dies, evenly space them and tape them from the back side, lay them on a piece of fun foam, then run them through my Big Shot. Now I have a thin foam frame for my pink frame to sit on.


I now add Gina K. Designs Connect Liquid Glue to the foam frame and carefully glue it to the back of my pink frame adjusting it so it doesn't show through the front side of the window. I like to use liquid glue as it lets you adjust and move things a bit before it dries. Once in place, I gently press down then set a large acrylic block on top to hold it in place for a few minutes as it dries.


I move on to making a panel for the front of the card. I cut a 4" x 5 1/4" white panel out of Neenah cardstock. Using my Darice Scroll embossing folder, I run the white panel through my Big Shot. Next, I adhere the embossed white panel to a 4 1/4" x 5 1/2" Passionate Pink card base.


For my greeting, I use my Love Shadow die. I cut the love from Passionate Pink cardstock and the shadow from white cardstock. I glue them together using my Connect liquid glue.


Next, I create a mix of shaker bits using sequins and tiny beads from my stash to add to the inside of my shaker window. I sprinkle my mix onto the front of my card where the window will go. Next, I add Connect liquid glue to the foam frame on the back of my pink window and carefully set it over the sequin mix. Once I have the frame lined up straight on the front of my card, I gently press down and again set a large acrylic block on top to hold it into place while the glue dries. I make sure there is liquid glue on the entire foam frame so that it is sealed onto the card so no shaker bits can escape.


Next, I add Connect liquid glue to only the parts of the greeting that will connect to the pink frame. I again set the acrylic block on top to hold it down for a few minutes. Last, I glue down a few sequins from my mix onto the front of the card.
***Foam strips could also be used in place of the fun foam. I like using fun foam as it gives a complete barrier and has a nice, finished look.


This finishes today's card. I hope you enjoyed seeing a different version from using acetate on a shaker card. Vellum can be used with embossing folders, stamped on, heat embossed (just be careful to not add too much heat, also thicker vellum works better for heat embossing), you can even color an image from the back side of the vellum to give a subtle, soft look.
If you have any questions, comments or have suggestions for future projects, please leave them in the comments section.
Also, if you would like to be notified by email when a new project is posted to my blog, you can click on the subscribe button at the top of the page.
I appreciate you visiting my blog and hope you stop back for another card project soon!
Happy Stamping!!
Jeannie
Comments
Post a Comment