Hello, welcome to my blog!
Today's card project focuses on making backgrounds using dye inks and Cling Wrap (you could use any food wrap). I will be using regular Distress Ink, any dye ink will work. You could also use Distress Oxide inks for a softer, milky background. To get good results, use colors that blend together well so the colors don't get muddy. You will need food wrap, dye inks, spray bottle with clean water and cardstock. The paper I use in the examples is Bristol Smooth cardstock. This cardstock holds up well with water and gives a nice smooth look. Watercolor paper can also be used, but I personally prefer the smooth look from the Bristol cardstock.
*I learned this technique watching a Jennifer McGuire YouTube video years ago.
Today's post will show the technique process, ending with a finished card. I created several cards with my backgrounds, today's blog would be extremely long if I posted them all. Come back tomorrow to see the rest of the cards I created with these backgrounds.
Let's get started!!

I choose several Distress Ink pads and tear off a sheet of Cling Wrap. I will be using panels of Strathmore Bristol Smooth cardstock, cut down to 5" x 7". For my first panel, the color of inks I use are Picked Raspberry, Spiced Marmalade, Mustard Seed, Twisted Citron, Peacock Feathers and Wilted Violet. To start, I lay my Cling Wrap on my Tim Holtz Tonic Glass Media Mat for easy clean up. For my first panel, I lay down my ink in rainbow order, ROYGBIV. Starting with Picked Raspberry I press the ink pad onto the plastic wrap laying down some ink, then continue with each color. Next, I use my Distress Sprayer filled with clean water and spray over all of the ink I laid down. I spray enough water so that the ink beads up good.
***I put a piece of white paper under my plastic wrap so that the ink is easier to see.


Next, I lay my cardstock face down onto the ink. I give the panel a slight twist back and forth to help get the ink to blend a bit. Leaving the panel in the ink, I fold up each side of the plastic wrap over the backside of my panel then flip it over. I then slide my fingers around on top of the plastic to help blend the colors, making sure there are no white spots showing. I set the panel aside to let the ink soak in to the panel for about 5 - 10 minutes. After letting the panel sit, I carefully unwrap the plastic from my panel and lay flat on my glass mat. I use my Ranger Heat Tool to dry the ink. The cardstock will be warped a bit after drying it,to help flatten it out, I put it in the back of a heavy book.


Using the same colors, this time in random order I lay my color down and repeat the process from above.


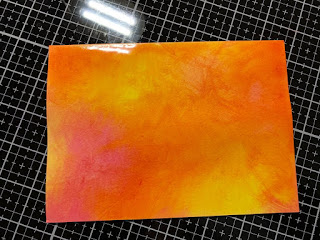
For my next panel, I use Picked Raspberry, Mustard Seed and Spiced Marmalade and repeat the process.


For my final panel I used Picked Raspberry, Peacock Feathers and Wilted Violet.


Now that all of the panels are finished, I start on my cards. I am using the panel I created with the 6 colors from above randomly placed. I start with a 4 1/4" x 5 1/2" white Neenah card base. I take my inked panel and adhere it down to my card base at an angle and trim off the overhang. Next, using my Simon Says Stamp Big Friend die, I cut the shadow out of white cardstock and the greeting out of Taylored Expressions Oreo cardstock and glue them together using Gina K. Designs Connect liquid glue, then glue the greeting to my panel. Next, using my MISTI stamp positioner, I stamp a sentiment from Simon Says Stamp Tiny Words with Versafine Clair Nocturne ink just below the greeting. I finish my card off with some sprinkles from Lucy's Cards Shooting Stars.


I hope you found today's card project interesting and give this technique a try. No two backgrounds will be the same. It's exciting to see how the colors blend and what you end up with.
Come back tomorrow to check out the other cards I made with the remaining backgrounds!
If this is the first time visiting my blog, welcome and I hope you return. If you are a returning visitor, thank you so much for your support!
Should you have any questions or comments please leave them in the comments section. I'd love to hear from you and what you thought about today's card.
If you would like to be notified by email each time I post something new to my blog, you can click on the subscribe button at the top of the page.
Thank you for visiting and I hope you come back soon!
Happy Stamping!!
Jeannie
Today's card project focuses on making backgrounds using dye inks and Cling Wrap (you could use any food wrap). I will be using regular Distress Ink, any dye ink will work. You could also use Distress Oxide inks for a softer, milky background. To get good results, use colors that blend together well so the colors don't get muddy. You will need food wrap, dye inks, spray bottle with clean water and cardstock. The paper I use in the examples is Bristol Smooth cardstock. This cardstock holds up well with water and gives a nice smooth look. Watercolor paper can also be used, but I personally prefer the smooth look from the Bristol cardstock.
*I learned this technique watching a Jennifer McGuire YouTube video years ago.
Today's post will show the technique process, ending with a finished card. I created several cards with my backgrounds, today's blog would be extremely long if I posted them all. Come back tomorrow to see the rest of the cards I created with these backgrounds.
Let's get started!!

I choose several Distress Ink pads and tear off a sheet of Cling Wrap. I will be using panels of Strathmore Bristol Smooth cardstock, cut down to 5" x 7". For my first panel, the color of inks I use are Picked Raspberry, Spiced Marmalade, Mustard Seed, Twisted Citron, Peacock Feathers and Wilted Violet. To start, I lay my Cling Wrap on my Tim Holtz Tonic Glass Media Mat for easy clean up. For my first panel, I lay down my ink in rainbow order, ROYGBIV. Starting with Picked Raspberry I press the ink pad onto the plastic wrap laying down some ink, then continue with each color. Next, I use my Distress Sprayer filled with clean water and spray over all of the ink I laid down. I spray enough water so that the ink beads up good.
***I put a piece of white paper under my plastic wrap so that the ink is easier to see.


Next, I lay my cardstock face down onto the ink. I give the panel a slight twist back and forth to help get the ink to blend a bit. Leaving the panel in the ink, I fold up each side of the plastic wrap over the backside of my panel then flip it over. I then slide my fingers around on top of the plastic to help blend the colors, making sure there are no white spots showing. I set the panel aside to let the ink soak in to the panel for about 5 - 10 minutes. After letting the panel sit, I carefully unwrap the plastic from my panel and lay flat on my glass mat. I use my Ranger Heat Tool to dry the ink. The cardstock will be warped a bit after drying it,to help flatten it out, I put it in the back of a heavy book.


Using the same colors, this time in random order I lay my color down and repeat the process from above.


For my final panel I used Picked Raspberry, Peacock Feathers and Wilted Violet.


Now that all of the panels are finished, I start on my cards. I am using the panel I created with the 6 colors from above randomly placed. I start with a 4 1/4" x 5 1/2" white Neenah card base. I take my inked panel and adhere it down to my card base at an angle and trim off the overhang. Next, using my Simon Says Stamp Big Friend die, I cut the shadow out of white cardstock and the greeting out of Taylored Expressions Oreo cardstock and glue them together using Gina K. Designs Connect liquid glue, then glue the greeting to my panel. Next, using my MISTI stamp positioner, I stamp a sentiment from Simon Says Stamp Tiny Words with Versafine Clair Nocturne ink just below the greeting. I finish my card off with some sprinkles from Lucy's Cards Shooting Stars.


I hope you found today's card project interesting and give this technique a try. No two backgrounds will be the same. It's exciting to see how the colors blend and what you end up with.
Come back tomorrow to check out the other cards I made with the remaining backgrounds!
If this is the first time visiting my blog, welcome and I hope you return. If you are a returning visitor, thank you so much for your support!
Should you have any questions or comments please leave them in the comments section. I'd love to hear from you and what you thought about today's card.
If you would like to be notified by email each time I post something new to my blog, you can click on the subscribe button at the top of the page.
Thank you for visiting and I hope you come back soon!
Happy Stamping!!
Jeannie
Awesome job! Gonna try that!
ReplyDeleteThank you Cindy!! I hope you had a chance to give this technique a try!
Delete