Hello, welcome to my blog!
Happy New Year! In today's project, I will show you an easy technique on how to watercolor using Color Bursts and Zig Clean Color Real Brush markers. With this technique you need no watercolor experience at all, the inks and water do it all for you!
Let's get started!

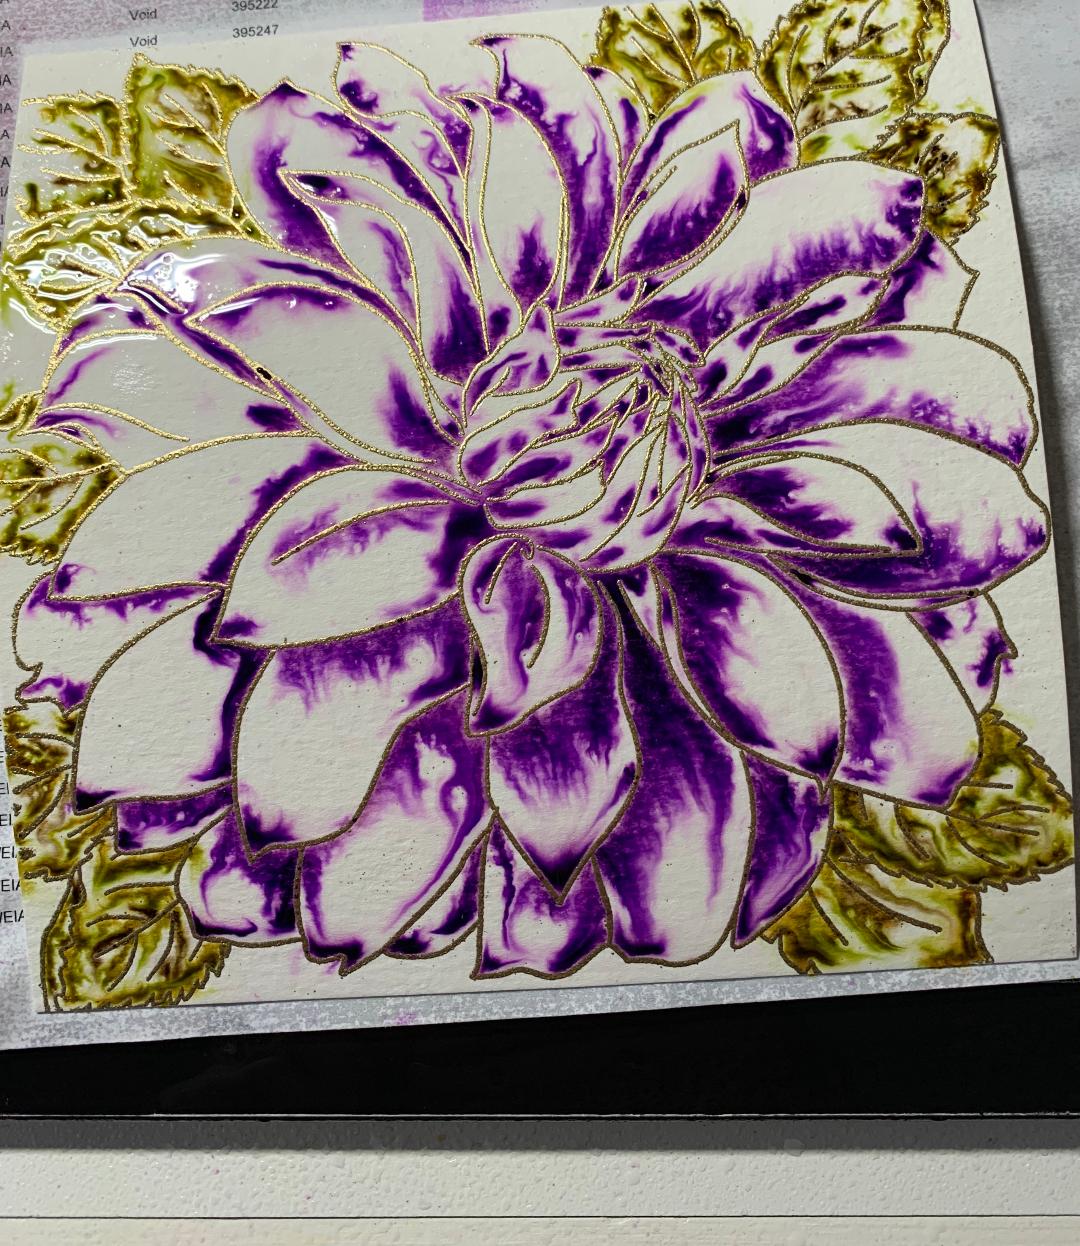
To start, I heat emboss with Brutus Monroe Gilded gold embossing powder onto a 5 3/4" x 5 3/4"
Canson XL Watercolor paper using a stamp from The Ton called Dahlia Close Up 2. I do this using my MISTI stamping tool.
*This is a huge stamp that is great for water coloring. The Ton has many large, beautiful flowers that are great for this technique.

I have a small watercolor tin of half pans that I keep my Color Bursts in. If you don't have something like this, you can put a very little amount of powder into a small paint tray and add a small amount of water to the powder. ***These powders are highly pigmented... a little goes a long way.

Using a Pentel Arts Water Brush I pick up a little Orchid pigment from the Caribbean Brights collection from my tin and paint small areas of each petal of the flower. Next, I use Olive Green Color Burst from the Moroccan Shades collection and do the same with the leaves. I also chose to add a little Sepia Color Burst from the Earth Tones collection to the leaves. The amount of color I add to the panel doesn't look like much, but remember that these paints are high in pigment.

Next, I take my Tim Holtz Distress Sprayer filled with clean water and spray the panel. The more water you add, the more the color moves. Now I use my Ranger Heat Tool to dry the panel, keeping it moving so that I don't overheat the embossed image. ***The panel will start to bow a bit when water is added, but will flatten back out after it is dried. With so much water being added, the ink/water will pool up in areas that create water lines. I left mine as is, but the pooled ink/water can be picked up with the corner of a paper towel if you don't want harsh lines.


After the panel is completely dry, I adhere using Bazic double sided tape to a 4 1/4" x 5 1/2" Taylored Expressions Oreo black cardstock panel. I attach the panel leaving approximately 1/4" border of black on the right side and bottom then trim off all overhang. I then attached this to a 4 1/4" x 5 1/2" Neenah white card base.
***When adhering watercolor paper after it's been warped by using water, make sure you are using a strong adhesive to not only hold it onto the card, but to keep it flattened out. The Bazic double sided tape is extremely sticky - once it comes into contact with your card it is stuck so be sure you have it lined up the way you want it.

Now I work on a greeting. I prep a 5" x 6" black panel with my anti static powder bag, then stamp with Versamark embossing ink using Taylored Expressions Simple Strips Background rubber stamp and my MISTI stamping tool. I use Brutus Monroe Alabaster white embossing powder and heat set with my Wagner Heat Tool. Next, I take my Taylored Expressions Simple Strips Die and line it up over the square markings and tape it down with Purple Tape then run it through my Big Shot die cutting machine.


I choose a sentiment and mount it to the front of the panel using a strip of foam tape. I use my T-Square Ruler to help line the sentiment before pressing it in to place. This completes my first card.

For my second card, I will be repeating the process from the previous card. Instead of Color Bursts, I will be using Zig Clean Color Real Brush markers. Using another embossed Dahlia Up Close 2 panel, I use Cobalt Blue and put down a little color on each petal, I then add a small amount of Violet for some contrast. I use Light Green first, then add a small amount of Olive Green for added contrast to the leaves. I then spray the panel with clean water and repeat the entire process from above with the exception of cutting my panel down to 4 1/4" x 5" so that approximately 1/4" inch of black border shows on the top and bottom of the completed card.


This completes my two cards for today. This watercolor technique is so fun and easy. Even if you have never tried water coloring before, I encourage you to give it a try. Any water reactive ink can be used in place of Color Bursts or Zig markers.
Thank you for stopping by my blog, I appreciate you taking the time. If you have any questions, comments or ideas for future projects, please leave them in the comments section.
If you would like to be notified by email each time I post a new project, you can hit the subscribe button located at the top of my blog.
Happy Stamping!!
Jeannie
Happy New Year! In today's project, I will show you an easy technique on how to watercolor using Color Bursts and Zig Clean Color Real Brush markers. With this technique you need no watercolor experience at all, the inks and water do it all for you!
Let's get started!

To start, I heat emboss with Brutus Monroe Gilded gold embossing powder onto a 5 3/4" x 5 3/4"
Canson XL Watercolor paper using a stamp from The Ton called Dahlia Close Up 2. I do this using my MISTI stamping tool.
*This is a huge stamp that is great for water coloring. The Ton has many large, beautiful flowers that are great for this technique.

I have a small watercolor tin of half pans that I keep my Color Bursts in. If you don't have something like this, you can put a very little amount of powder into a small paint tray and add a small amount of water to the powder. ***These powders are highly pigmented... a little goes a long way.

Using a Pentel Arts Water Brush I pick up a little Orchid pigment from the Caribbean Brights collection from my tin and paint small areas of each petal of the flower. Next, I use Olive Green Color Burst from the Moroccan Shades collection and do the same with the leaves. I also chose to add a little Sepia Color Burst from the Earth Tones collection to the leaves. The amount of color I add to the panel doesn't look like much, but remember that these paints are high in pigment.

Next, I take my Tim Holtz Distress Sprayer filled with clean water and spray the panel. The more water you add, the more the color moves. Now I use my Ranger Heat Tool to dry the panel, keeping it moving so that I don't overheat the embossed image. ***The panel will start to bow a bit when water is added, but will flatten back out after it is dried. With so much water being added, the ink/water will pool up in areas that create water lines. I left mine as is, but the pooled ink/water can be picked up with the corner of a paper towel if you don't want harsh lines.


After the panel is completely dry, I adhere using Bazic double sided tape to a 4 1/4" x 5 1/2" Taylored Expressions Oreo black cardstock panel. I attach the panel leaving approximately 1/4" border of black on the right side and bottom then trim off all overhang. I then attached this to a 4 1/4" x 5 1/2" Neenah white card base.
***When adhering watercolor paper after it's been warped by using water, make sure you are using a strong adhesive to not only hold it onto the card, but to keep it flattened out. The Bazic double sided tape is extremely sticky - once it comes into contact with your card it is stuck so be sure you have it lined up the way you want it.

Now I work on a greeting. I prep a 5" x 6" black panel with my anti static powder bag, then stamp with Versamark embossing ink using Taylored Expressions Simple Strips Background rubber stamp and my MISTI stamping tool. I use Brutus Monroe Alabaster white embossing powder and heat set with my Wagner Heat Tool. Next, I take my Taylored Expressions Simple Strips Die and line it up over the square markings and tape it down with Purple Tape then run it through my Big Shot die cutting machine.


I choose a sentiment and mount it to the front of the panel using a strip of foam tape. I use my T-Square Ruler to help line the sentiment before pressing it in to place. This completes my first card.

For my second card, I will be repeating the process from the previous card. Instead of Color Bursts, I will be using Zig Clean Color Real Brush markers. Using another embossed Dahlia Up Close 2 panel, I use Cobalt Blue and put down a little color on each petal, I then add a small amount of Violet for some contrast. I use Light Green first, then add a small amount of Olive Green for added contrast to the leaves. I then spray the panel with clean water and repeat the entire process from above with the exception of cutting my panel down to 4 1/4" x 5" so that approximately 1/4" inch of black border shows on the top and bottom of the completed card.


This completes my two cards for today. This watercolor technique is so fun and easy. Even if you have never tried water coloring before, I encourage you to give it a try. Any water reactive ink can be used in place of Color Bursts or Zig markers.
Thank you for stopping by my blog, I appreciate you taking the time. If you have any questions, comments or ideas for future projects, please leave them in the comments section.
If you would like to be notified by email each time I post a new project, you can hit the subscribe button located at the top of my blog.
Happy Stamping!!
Jeannie
Comments
Post a Comment