Hello, welcome to my blog!!
I want to start out by thanking everyone for the support and nice comments you all leave for me. I truly appreciate the support of this blog!! I enjoy card making and bringing my creations to you, this wouldn't be possible without your support, so again, thank you!!!
Today is the day!!! Gina K. Designs has a new release tonight at 7:00 pm (CST) and I am very excited to see what she has for us! She has been showing some sneak peeks the last few days, and I'm very much interested in the new kit! My plans are to purchase the kit and stock up on some Connect Glue and replenish some of my cardstock!! Too many times I have thought I didn't really want to purchase the new kit then after a couple of weeks of seeing everyone's cards made with them, I decide to go buy it, then it's sold out!! The good thing about Gina's kits, should they sell out, (they do not get restocked) everything in the kit will be sold separately when a new kit is released. If you've never purchased one of Gina's kits and are interested, they are a HUGE value! Most of the stamps in her kits come with coordinating dies and come on their own magnetic sheet. When purchasing the kit, it usually meets the $50.00 free shipping threshold so there wouldn't be any added shipping cost. Also, when your order subtotal reaches $75.00, not only will you receive free shipping, you will also receive a free mini stamp set, these free sets never disappoint!! I have a Gina K. Designs banner located at the lower right side of my blog that will take you directly to her store if you are interested. Ok!! Can you tell I'm excited?! I need to get on with blogging today's card so I can get my wish list together and ready to go!
Today, I will be making a Father's Day card using an alcohol inked background. I will also be using the alcohol lift ink technique to create a subtle focal image for my card. The stamp set I will be using for today's card is from Gina K. Designs, called By The Sea 1, I will be using an image and a greeting from this set. I will also be using a stencil with some texture paste. I felt like this stencil gave off a nautical look which ties into the lighthouse. Let's get started!!

To start, I take a piece of Yupo Paper and add drops of Laguna Alcohol Ink, Patina Alcohol Ink and Pool Alcohol Ink. I also add a couple of drops of Gilded Alloy Alcohol Ink (not pictured, sorry) along with a few drops of Blending Solution. I then take my Air Blower to move around and blend the ink. *If there area areas that need more ink, I add a drop or two, add blending solution and blow the ink around until I am satisfied with the look. I then set the panel aside to dry.


Taking a die from the Infinity Circle Dies Set and my blending panel, I run them through my Big Shot Die Cut Machine. Next, I add some Dot Runner Adhesive to the back of my circle die cut and place it into my MISTI Stamp Positioner and stamp an image from the By The Sea 1 Stamp Set using Alcohol Lift Ink. After stamping onto the die cut, I take a clean, soft rag and dab up the excess ink then gently buff to brighten the stamped image. I then clean off my stamp and repeat this process three or four times to intensify the stamped image, making sure to clean off the stamp before reapplying ink. *The reason I add dot runner adhesive to the back of my die cut is that I knew I would be stamping my image more that once and didn't want it to shift. With the size of my stamp vs the size of the die cut, I didn't want the magnets to get in the way.


I now take the next size up die from my Infinity Circles Die Set and cut out of Slate Cardstock, running them through my Big Shot. I then adhere my inked circle onto the slate circle die cut using Double Sided Tape.

Next, I cut a 3 3/4" x 5" panel out of Turquoise Sea Cardstock using my Guillotine Paper Trimmer. I then place the panel into my MISTI and stamp a greeting from the By The Sea 1 Stamp Set using Versafine Clair Nocturn Ink onto the lower right corner of the panel.


I then spray my Spiral Stencil with Pixie Spray, let dry for a few minutes then place over my turquoise panel. *The pixie spray is a low tack spray that temporarily adheres stencils onto cardstock. I then use Purple Tape to hold the stencil onto my Glass Media Mat. Using a Palette Knife, I spread some Texture Paste over the stencil onto my panel being careful not to cover up my greeting, also leaving some open areas around the edges of the panel. I then carefully remove the stencil and let my panel dry for about a half hour. *After removing the stencil, I immediately place the stencil and palette knife into a container of warm soapy water until I can clean it.


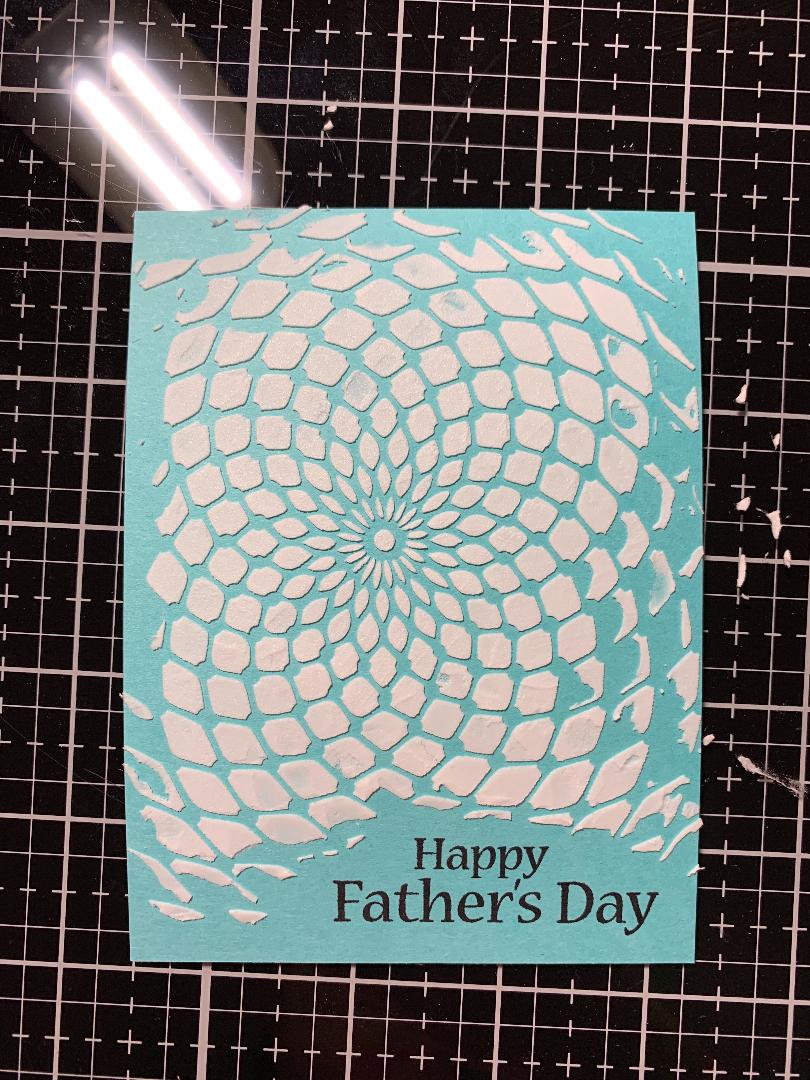
After the texture paste is completely dry, I adhere the circle die cuts to the front of my panel using Double Sided Tape, leaving it hang off the edge a bit. Using my Guillotine Paper Trimmer, I cut the edge of the circle die off the panel. I then adhere my panel onto a 3 7/8" x 5 1/8" piece of Slate Cardstock using Double Sided Tape.


For added dimension, I mount a piece of Double Sided Adhesive Foam to the back of my panel. I remove the release paper and mount onto a Turquoise Sea Cardstock card base and this completes my card.


This card will be given to my father in-law for Father's Day. This image looks great colored, but I wanted a subtle image over my alcohol inked die cut. The white of the image goes well with the texture paste which looks to me like an old fishing net. My husband said it reminded him of fish scales!
If this is the first time visiting my blog, welcome and I hope you return. If you are a returning visitor, thank you so much for your support!
Should you have any questions or comments please leave them in the comments section. I'd love to hear from you and what you thought about today's card.
If you would like to be notified by email each time I post something new to my blog, you can click on the subscribe button at the top of the page. There is also a follow button that you can click on located below my profile if you would like to follow my blog.
Thank you for visiting and I hope you come back soon!
Happy Stamping and God bless!!
Jeannie
This is FABULOUS!! Your alcohol ink background is so cool. I love the effect of lifting the image... Heck I love the whole thing! And so will your FIL.
ReplyDeleteThank you Vicki!! My FIL and MIL love getting my cards and seeing what I come up with. Have a great day!
ReplyDelete