Hello, welcome to my blog!!
There has been SO MUCH interest in the Water Droplets I use on my cards that I wanted to start out by letting you know, they are BACK IN STOCK!!! Yay!
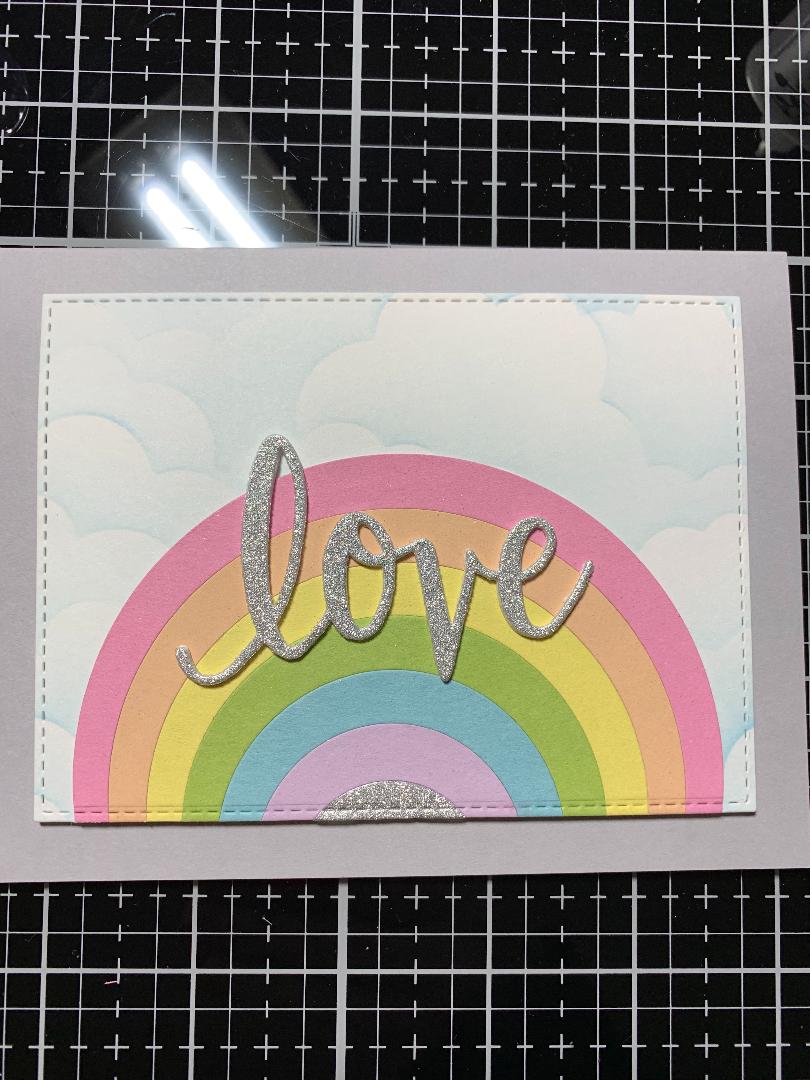
I thought we could all use a cheery, hopeful card today! I will be showing you how to create a rainbow with circle dies you may already have in your stash. I will be using Infinity Dies from Hero Arts. These dies have 18 circles in the set, ranging from .016" to 4.5" and have a great price point! I like to use these dies for not only cutting out circle windows, but to also create frames by taping different sizes together. These particular circle dies are smooth edged with no stitching. All of the cardstock I use for this card is from Gina K. Designs. Let's get started!!

I will be doing all of my work on my Tim Holtz Glass Media Mat.
To create my rainbow, I select dies from my Infinity Circle Dies set. I choose every other size, I chose 9 dies, but ended up only needing 7 of them. I lay the dies cut side down onto a Magnetic Storage Card. *keeping the dies on the magnetic card prevents them from moving while arranging. I pull all of the dies at an angle to create even spacing between each die. Using some blue painters tape, I tape the dies from the back side to adhere them together then carefully remove them from the magnetic card. I then trim off the tape overhang and pat my Anti Static Powder Bag onto the sticky part of the tape to prevent it from sticking to the cardstock. I choose Bubble Gum Pink, Peach Bellini, Lemon Drop, Jelly Bean Green, Ocean Mist and Lovely Lavender cardstock colors and run each color with the dies through my Big Shot Die Cut Machine.


I had an extra circle that needed to be filled at the center of my rainbow, so I decided to cut that size circle out of my Glitzy Silver Mat Stack. Taking a piece of copy paper large enough to hold the cardstock dies cuts, I adhere down my pieces, starting with the silver circle using Liquid Glue, I attach half of the silver circle and work my way up. Next, I add the purple, then blue, green, yellow, peach, ending with pink.


Using my Tim Holtz Guillotine Paper Trimmer, I trim off the overhang. To get a clean cut, I take the same large circle die that I used to cut my pieces, tape it over the pink cardstock piece and run the rainbow through my Big Shot Die Cut Machine.


Next, I cut a 4 1/4" x 5 1/2" panel out of White Cardstock using my Tim Holtz Guillotine Paper Trimmer. I now take my cloud stencil from my stash and a Blender Brush to create clouds on my panel using Tumbled Glass Distress Ink. I start my cloud blending at the top of the panel and work my way down. After my blending is finished, I attach the rainbow to the panel using Liquid Glue.


Taking my second biggest rectangle from my Stitched Rectangle Dies, I place it over the rainbow panel, tape it down using Purple Tape then run through my Big Shot Die Cut Machine. Looking at my panel, I decided I wanted to add some shimmer to my rainbow but not to the sky. I used the same size die as the pink part of the rainbow was cut with and cut out of a piece of copy paper to make a quick mask. I lay the copy paper cut out over the sky then lightly spray with Pixie Dust to give my rainbow a soft shimmer. I remove the copy paper and let the rainbow dry while I work on my greeting.


For my greeting, I take the love die from my Love Die & Stamp Set and cut out of white cardstock three times, and once out of Glitzy Silver Mat Stack, running them through my Big Shot Die Cut Machine. I then stack and glue the three white die cuts together with the silver on top using Liquid Glue.
I choose a sentiment from the same Love Die & Stamp Set, place a scrap piece of white cardstock into my MISTI Stamp Positioner and stamp the sentiment using Versafine Clair Nocturn Ink. I then trim the sentiment down and cut both ends at an angle.


I adhere a slightly smaller piece of Double Sided Adhesive Foam to the back of my rainbow panel and adhere it to a Soft Stone Cardstock card base. Using Liquid Glue, I adhere the love die. I add Foam Tape to the end of the right side of my sentiment strip and add Liquid Glue the rest of the strip, then attach over the bottom portion of the love die. I add Water Droplets using Liquid Glue and this completes my card.


This card consists of all die cutting, with the exception of a little bit of ink blending and one small stamp. This is not my normal style of card making but it was fun to try something a little different. Everyone could use a rainbow, reminding them that there is hope and beauty at the end of the storm!
If this is the first time visiting my blog, welcome and I hope you return. If you are a returning visitor, thank you so much for your support!
Should you have any questions or comments please leave them in the comments section. I'd love to hear from you and what you thought about today's card.
If you would like to be notified by email each time I post something new to my blog, you can click on the subscribe button at the top of the page. There is also a follow button that you can click on located below my profile if you would like to follow my blog.
Thank you for visiting and I hope you come back soon!
Happy Stamping!!
Jeannie
There has been SO MUCH interest in the Water Droplets I use on my cards that I wanted to start out by letting you know, they are BACK IN STOCK!!! Yay!
I thought we could all use a cheery, hopeful card today! I will be showing you how to create a rainbow with circle dies you may already have in your stash. I will be using Infinity Dies from Hero Arts. These dies have 18 circles in the set, ranging from .016" to 4.5" and have a great price point! I like to use these dies for not only cutting out circle windows, but to also create frames by taping different sizes together. These particular circle dies are smooth edged with no stitching. All of the cardstock I use for this card is from Gina K. Designs. Let's get started!!

I will be doing all of my work on my Tim Holtz Glass Media Mat.
To create my rainbow, I select dies from my Infinity Circle Dies set. I choose every other size, I chose 9 dies, but ended up only needing 7 of them. I lay the dies cut side down onto a Magnetic Storage Card. *keeping the dies on the magnetic card prevents them from moving while arranging. I pull all of the dies at an angle to create even spacing between each die. Using some blue painters tape, I tape the dies from the back side to adhere them together then carefully remove them from the magnetic card. I then trim off the tape overhang and pat my Anti Static Powder Bag onto the sticky part of the tape to prevent it from sticking to the cardstock. I choose Bubble Gum Pink, Peach Bellini, Lemon Drop, Jelly Bean Green, Ocean Mist and Lovely Lavender cardstock colors and run each color with the dies through my Big Shot Die Cut Machine.


I had an extra circle that needed to be filled at the center of my rainbow, so I decided to cut that size circle out of my Glitzy Silver Mat Stack. Taking a piece of copy paper large enough to hold the cardstock dies cuts, I adhere down my pieces, starting with the silver circle using Liquid Glue, I attach half of the silver circle and work my way up. Next, I add the purple, then blue, green, yellow, peach, ending with pink.


Using my Tim Holtz Guillotine Paper Trimmer, I trim off the overhang. To get a clean cut, I take the same large circle die that I used to cut my pieces, tape it over the pink cardstock piece and run the rainbow through my Big Shot Die Cut Machine.


Next, I cut a 4 1/4" x 5 1/2" panel out of White Cardstock using my Tim Holtz Guillotine Paper Trimmer. I now take my cloud stencil from my stash and a Blender Brush to create clouds on my panel using Tumbled Glass Distress Ink. I start my cloud blending at the top of the panel and work my way down. After my blending is finished, I attach the rainbow to the panel using Liquid Glue.


Taking my second biggest rectangle from my Stitched Rectangle Dies, I place it over the rainbow panel, tape it down using Purple Tape then run through my Big Shot Die Cut Machine. Looking at my panel, I decided I wanted to add some shimmer to my rainbow but not to the sky. I used the same size die as the pink part of the rainbow was cut with and cut out of a piece of copy paper to make a quick mask. I lay the copy paper cut out over the sky then lightly spray with Pixie Dust to give my rainbow a soft shimmer. I remove the copy paper and let the rainbow dry while I work on my greeting.


For my greeting, I take the love die from my Love Die & Stamp Set and cut out of white cardstock three times, and once out of Glitzy Silver Mat Stack, running them through my Big Shot Die Cut Machine. I then stack and glue the three white die cuts together with the silver on top using Liquid Glue.
I choose a sentiment from the same Love Die & Stamp Set, place a scrap piece of white cardstock into my MISTI Stamp Positioner and stamp the sentiment using Versafine Clair Nocturn Ink. I then trim the sentiment down and cut both ends at an angle.


I adhere a slightly smaller piece of Double Sided Adhesive Foam to the back of my rainbow panel and adhere it to a Soft Stone Cardstock card base. Using Liquid Glue, I adhere the love die. I add Foam Tape to the end of the right side of my sentiment strip and add Liquid Glue the rest of the strip, then attach over the bottom portion of the love die. I add Water Droplets using Liquid Glue and this completes my card.

This card consists of all die cutting, with the exception of a little bit of ink blending and one small stamp. This is not my normal style of card making but it was fun to try something a little different. Everyone could use a rainbow, reminding them that there is hope and beauty at the end of the storm!
If this is the first time visiting my blog, welcome and I hope you return. If you are a returning visitor, thank you so much for your support!
Should you have any questions or comments please leave them in the comments section. I'd love to hear from you and what you thought about today's card.
If you would like to be notified by email each time I post something new to my blog, you can click on the subscribe button at the top of the page. There is also a follow button that you can click on located below my profile if you would like to follow my blog.
Thank you for visiting and I hope you come back soon!
Happy Stamping!!
Jeannie
Comments
Post a Comment