Hello, welcome to my blog!!
Today's card project focuses on the ink smooshing technique and today, I thought I would go for a masculine look. I've been wanting to do this technique with different browns and earth tones for a while now and thought this would be the perfect time as I needed a birthday card for my Father in-law! I will be using Distress Oxide inks for today's card. Oxide inks are perfect for this technique as they layer well on top of each other and give a chalky/oxidized look. I think these inks are often over looked when choosing which inks to use on a card. Not only are these inks fabulous for ink blending, but when water droplets are added it creates a different look that only Oxides can provide. Let's get started!!

I will be doing all of my work on my Tim Holtz Glass Media Mat.
To start, using my Outside In Stitched Rectangle Dies, I cut a panel out of Kraft Cardstock, running them through my Big Shot Die Cut Machine. Next, I lay down my nonstick mat (that comes with the glass media mat) and using my Blender Brushes, I blend Vintage Photo Distress Oxide Ink around my panel to add a light base color. Next, I blend Walnut Stain Distress Oxide Ink around the edges and corners of my panel. *Sorry about the glare on a few of my pictures, I'm not sure what happened? The pictures look fine on my phone, but when I downloaded them to my computer, they show funky lines.


I now take my ink pads and press them onto my white nonstick mat. I use Peeled Paint Distress Oxide Ink and Brushed Corduroy Distress Oxide Ink along with the Walnut Stain Distress Oxide Ink that was left from my blending. I take my Distress Sprayer filled with clean water and lightly spray over the colors. Taking my panel, I press it into the ink. I then take my Ranger Heat Tool and dry my panel.


I repeat the process using Vintage Photo Distress Oxide Ink, Brushed Corduroy Distress Oxide Ink, Peeled Paint Distress Oxide Ink and Weathered Wood Distress Oxide Ink. I continue this process adding different colors to build up on my panel. Between each inking, I dry my panel using my Ranger Heat Tool. I continue this process until I am satisfied with the coverage on my panel.


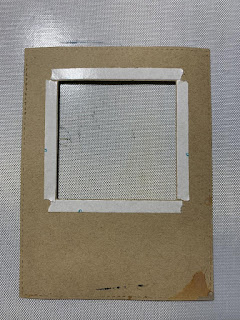
Once the inking of my panel is complete, I take a square from my Outside In Stitched Square Dies and cut a window out from my panel, running them through my Big Shot Die Cut Machine.

Taking a piece of Heavy Base Ivory Cardstock, I do a blotchy blend using Weathered Wood Distress Oxide Ink on the the top section, blending toward the center and Brushed Corduroy Distress Oxide Ink onto the bottom leaving a highlighted area in the very center. I take a square die from my stash and cut the inked panel a little bigger than the window using my Big Shot Die Cut Machine.


Next, I place the inked square into my MISTI Stamp Positioner to stamp my image. I choose an image from the My Anchor Stamp Set, lining it up so that the lake or water is over the highlighted area. I then stamp the image using Versafine Clair Nocturn Ink. Once the ink is dry, I blend more Brushed Corduroy Distress Oxide Ink to the bottom of the image to create a bit of a shadow.


I now add Double Sided Tape the the back of the window, remove the release paper and position over my image square, then press down to adhere. I then adhere my window panel onto a Stormy Sky Cardstock card base.


Next, I take a scrap of Kraft Cardstock and blend Peeled Paint Distress Oxide Ink and Brushed Corduroy Distress Oxide Ink onto it. I then place into my MISTI Stamp Positioner and stamp a greeting from the same My Anchor Stamp Set using Versafine Clair Nocturn Ink. I use my Sentiment Banners Dies to cut out my sentiment, I also cut a banner out of Stormy Sky Cardstock, running them through my Big Shot Die Cut Machine. To create my banner shadow, I cut the gray banner in half and glue each piece to the ends of my sentiment using Liquid Glue.


I add Foam Tape to the back and adhere it to the front of my panel, below the window. I add Water Droplets using Liquid Glue and this completes my card.


I hope you enjoyed today's card. I love making Oxide ink backgrounds, no two are the same and it's fun seeing the background come together. This technique works great for all color of Oxide inks, even colors you would never think of mixing together. If you've never tried this technique, I encourage you to give it a try!!
If this is the first time visiting my blog, welcome and I hope you return. If you are a returning visitor, thank you so much for your support!
Should you have any questions or comments please leave them in the comments section. I'd love to hear from you and what you thought about today's card.
If you would like to be notified by email each time I post something new to my blog, you can click on the subscribe button at the top of the page. There is also a follow button that you can click on located below my profile if you would like to follow my blog.
Thank you for visiting and I hope you come back soon!
Happy Stamping!!
Jeannie
Today's card project focuses on the ink smooshing technique and today, I thought I would go for a masculine look. I've been wanting to do this technique with different browns and earth tones for a while now and thought this would be the perfect time as I needed a birthday card for my Father in-law! I will be using Distress Oxide inks for today's card. Oxide inks are perfect for this technique as they layer well on top of each other and give a chalky/oxidized look. I think these inks are often over looked when choosing which inks to use on a card. Not only are these inks fabulous for ink blending, but when water droplets are added it creates a different look that only Oxides can provide. Let's get started!!

I will be doing all of my work on my Tim Holtz Glass Media Mat.
To start, using my Outside In Stitched Rectangle Dies, I cut a panel out of Kraft Cardstock, running them through my Big Shot Die Cut Machine. Next, I lay down my nonstick mat (that comes with the glass media mat) and using my Blender Brushes, I blend Vintage Photo Distress Oxide Ink around my panel to add a light base color. Next, I blend Walnut Stain Distress Oxide Ink around the edges and corners of my panel. *Sorry about the glare on a few of my pictures, I'm not sure what happened? The pictures look fine on my phone, but when I downloaded them to my computer, they show funky lines.


I now take my ink pads and press them onto my white nonstick mat. I use Peeled Paint Distress Oxide Ink and Brushed Corduroy Distress Oxide Ink along with the Walnut Stain Distress Oxide Ink that was left from my blending. I take my Distress Sprayer filled with clean water and lightly spray over the colors. Taking my panel, I press it into the ink. I then take my Ranger Heat Tool and dry my panel.


I repeat the process using Vintage Photo Distress Oxide Ink, Brushed Corduroy Distress Oxide Ink, Peeled Paint Distress Oxide Ink and Weathered Wood Distress Oxide Ink. I continue this process adding different colors to build up on my panel. Between each inking, I dry my panel using my Ranger Heat Tool. I continue this process until I am satisfied with the coverage on my panel.


Once the inking of my panel is complete, I take a square from my Outside In Stitched Square Dies and cut a window out from my panel, running them through my Big Shot Die Cut Machine.

Taking a piece of Heavy Base Ivory Cardstock, I do a blotchy blend using Weathered Wood Distress Oxide Ink on the the top section, blending toward the center and Brushed Corduroy Distress Oxide Ink onto the bottom leaving a highlighted area in the very center. I take a square die from my stash and cut the inked panel a little bigger than the window using my Big Shot Die Cut Machine.


Next, I place the inked square into my MISTI Stamp Positioner to stamp my image. I choose an image from the My Anchor Stamp Set, lining it up so that the lake or water is over the highlighted area. I then stamp the image using Versafine Clair Nocturn Ink. Once the ink is dry, I blend more Brushed Corduroy Distress Oxide Ink to the bottom of the image to create a bit of a shadow.


I now add Double Sided Tape the the back of the window, remove the release paper and position over my image square, then press down to adhere. I then adhere my window panel onto a Stormy Sky Cardstock card base.


Next, I take a scrap of Kraft Cardstock and blend Peeled Paint Distress Oxide Ink and Brushed Corduroy Distress Oxide Ink onto it. I then place into my MISTI Stamp Positioner and stamp a greeting from the same My Anchor Stamp Set using Versafine Clair Nocturn Ink. I use my Sentiment Banners Dies to cut out my sentiment, I also cut a banner out of Stormy Sky Cardstock, running them through my Big Shot Die Cut Machine. To create my banner shadow, I cut the gray banner in half and glue each piece to the ends of my sentiment using Liquid Glue.


I add Foam Tape to the back and adhere it to the front of my panel, below the window. I add Water Droplets using Liquid Glue and this completes my card.


I hope you enjoyed today's card. I love making Oxide ink backgrounds, no two are the same and it's fun seeing the background come together. This technique works great for all color of Oxide inks, even colors you would never think of mixing together. If you've never tried this technique, I encourage you to give it a try!!
If this is the first time visiting my blog, welcome and I hope you return. If you are a returning visitor, thank you so much for your support!
Should you have any questions or comments please leave them in the comments section. I'd love to hear from you and what you thought about today's card.
If you would like to be notified by email each time I post something new to my blog, you can click on the subscribe button at the top of the page. There is also a follow button that you can click on located below my profile if you would like to follow my blog.
Thank you for visiting and I hope you come back soon!
Happy Stamping!!
Jeannie
Comments
Post a Comment