Hello, welcome to my blog!!
I hope everyone had a good weekend! Today, I will be making a baby shaker card. We have another grandchild coming in September (our third <3) and I feel that it may be a little boy. (They will find out in a couple of weeks!) I may just have to hang on to this one if my feeling is correct!
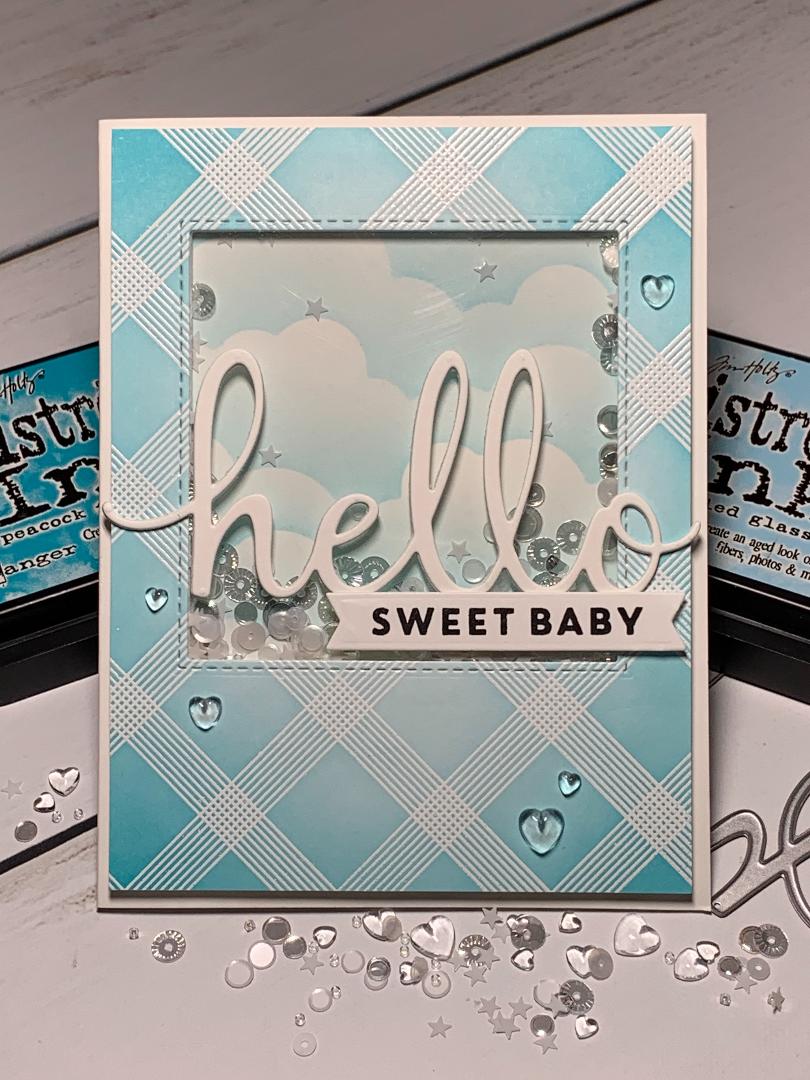
For today's project, I will be using regular Distress Inks for my ink blending. I will also be using a stitched square die for my shaker window. This die is very versatile as it leaves stitching along the window edge, and also along the edges of the square it cuts out. There is a picture below in the instructions to show this. I will also be using heart shaped droplets for the first time in place of my water droplets. Let's get started!!

I will be doing all of my work on my Tim Holtz Glass Media Mat.
To start, I cut a 4" x 5 1/4" panel out of Neenah White Cardstock using my Tim Holtz Paper Trimmer. I then place my panel into my MISTI Stamp Positioner and prep using my Anti Static Powder Bag. Taking my Diamond Tiles Background Stamp, I ink up with Versamark Embossing Ink and stamp my panel. I add Detail White Embossing Powder then heat set with my Heat Tool.


Using my Blender Brushes, I blend Tumbled Glass Distress Ink onto the center portion of my panel, fading out to almost the edges. Next, I blend Peacock Feathers Distress Ink around the edges and corners of the panel, fading into the previous color. I take a soft dry cloth and gently rub over the embossing to remove any ink sitting on top. Finally, I go back with Tumbled Glass Distress Ink to even out my blending.


I now take my Stitched Square Die and cut out a window toward the top center of my panel, running them through my Big Shot Die Cut Machine. This die leaves stitching around the cut out window frame as well as the square, which I will save for a future project. Turning my window panel over, I add Double Sided Tape around the window. Next, I cut a 4" x 4" piece of Acetate, remove the release paper from the tape and adhere the acetate over the window.


Next, I cut a 3 3/4" x 5" piece of fun foam. I take the same Stitched Square Die and cut a window at the top center of the foam, running them through my Big Shot Die Cut Machine. I then adhere over the acetate window using Liquid Glue, centering so that the foam doesn't show through the window.


I now create a background for my window. Taking a white card base, I use Purple Tape and add to the two sides and top. Next, I take a cloud stencil from my stash. Starting at the top of the taped off area, I take my Blender Brush and blend using Tumbled Glass Distress Ink. Keeping the stencil in place I then take Peacock Feathers Distress Ink and blend just up against the edges of the stencil. I then move the stencil down a bit and repeat the process until the taped off area is full of clouds. Once the blending is complete, I carefully remove the tape.


Taking a mix of sequins, stars and beads from my stash I create a mix for my shaker window. I take and glue down a few stars onto my card base then add the rest of my mix. I add Double Sided Tape to the fun foam, remove the release paper then adhere over the sequin mix, centering on all four sides of the card base.


I take my Mega Hello Die and cut out of white cardstock three times running through my Big Shot Die Cut Machine. I then stack and glue the dies using Liquid Glue.


I now take a sentiment from the Darling Petals Turnabout Stamp Set, these two words are stacked but I want to make it into a single lined sentiment. Taking a scrap of white cardstock, I place it into my MISTI Stamp Positioner. Taking the sentiment, I add Purple Tape to cover the bottom word. I then ink up the sentiment with Versafine Clair Nocturn Ink then remove the tape and stamp the sentiment. I clean off my stamp then position it to line up the bottom word to the one I just stamped. I now tape off the top word and ink up the sentiment. I remove the tape and stamp the sentiment, I now have the sentiment in a single line. *There are a lot of pictures of this step, but I wanted to show you the process.


Now, I take my Sentiment Banner Die and cut out the sentiment running it through my Big Shot Die Cut Machine.


Using Liquid Glue, I adhere my die cut greeting over the window of my card. I add Foam Tape to the sentiment and adhere just below my greeting.


I use Liquid Glue to adhere some Heart Droplets and this completes my card.
I hope you enjoyed today's card and picked up a few tips along the way. You can change the orientation of any word stamp by taping off certain areas like I did. This card could easily be made for a little girl by changing the colors, or even using a neutral color like yellow or green.
If this is the first time visiting my blog, welcome and I hope you return. If you are a returning visitor, thank you so much for your support!
Should you have any questions or comments please leave them in the comments section. I'd love to hear from you and what you thought about today's card.
If you would like to be notified by email each time I post something new to my blog, you can click on the subscribe button at the top of the page. There is also a follow button that you can click on located below my profile if you would like to follow my blog.
Thank you for visiting and I hope you come back soon!
Happy Stamping!!
Jeannie
Comments
Post a Comment