Hello, welcome to my blog!!
There has been SO MUCH interest in the Water Droplets I use on my cards that I wanted to start out by letting everyone know that they are now BACK IN STOCK!!! Yay!
I pray everyone is doing well and staying healthy. We are doing good and staying busy, my husband with work and me with my cards!!
For today's card, I wanted to focus on some of my Gina K. Designs products including her inks and cardstock. I will be doing some ink blending using a stencil, then add some sparkle using Glitter Glitz Gel. If you've never used this product, you are missing out! Glitter Glitz Gel adds sparkle to any project, you can use it on a full panel, or Gina also sells smaller stencils that coordinate with stamp sets to add subtle sparkle. I was thinking of using only part of my panel on today's card, but could not bring myself to cutting into it!! It's that beautiful! Let's get started!!

I will be doing all of my work today on my Tim Holtz Glass Media Mat.
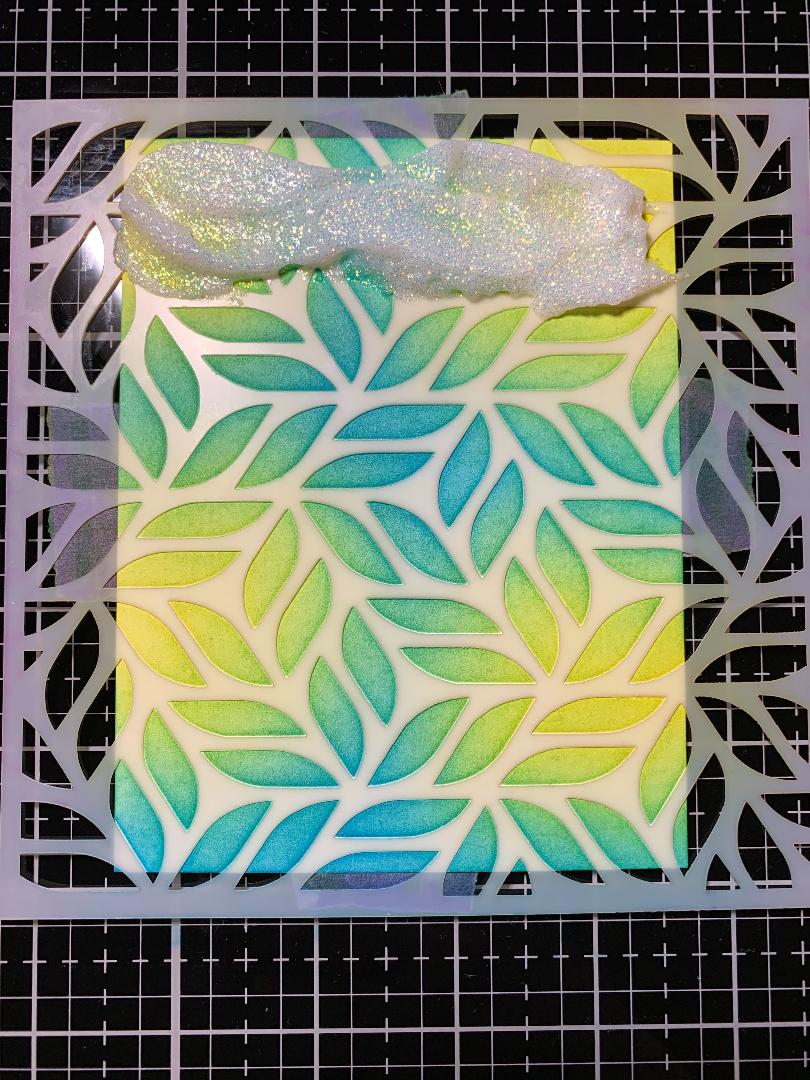
To start, I cut a 4" x 5 1/4" panel out of Heavy Base White Carstock using my Tim Holtz Guillotine Paper Trimmer. Taking my Thick Brush Stencil, using Purple Tape I adhere my cardstock panel to the back of the stencil. Using my Blender Brush, I blend Wild Dandelion Ink in a few random areas over the stencil, fading out a bit. Next, I blend Blue Raspberry Ink to the rest of the panel, fading into the previous color to create some green areas. I then go back with the yellow to create a seamless blend. Leaving the panel still attached to the stencil, I run it through my Big Shot Die Cut Machine. While my panel is still attached to the stencil, I take Iridescent Glitter Glitz Gel and apply to the top of the panel. I then take my Stencil Pal and drag it down my panel being sure to cover all areas of the stencil. Immediately after applying, I carefully remove my stencil and place it along with my Stencil Pal into a container of warm soapy water to soak until I can clean it up. I set my panel aside to completely dry. *This gel will dry onto the stencil so you will want to have a container filled with warm soapy water to soak in for easy removal.


I wanted to show you a before and after picture of my Glass Media Mat from working with the Glitter Glitz Gel. It was almost completely dried on my mat by the time I got back to cleaning it up. I added a little Dawn dish soap over the gel the sprayed a little water over it. I took a paper towel to rub into it then took a plastic scraper to loosen the gel. I then picked it up with a dry paper towel. To finish, I took a damp cloth to wash up the remaining soap and dried it off. Clean up was a breeze!


While my panel is drying, I create my sentiment. Taking my Scripty Love Stamp Set, I choose a sentiment. I then take a strip of Heavy Base White Cardstock and place it into my MISTI Stamp Positioner. I position my sentiment onto the strip of cardstock and close my MISTI door to pick up the stamp. I ink up the stamp using Amalgam Ink and stamp it onto my cardstock strip. Next, I cut a strip of Tranquil Teal Cardstock to be about an 1/8" wider than my sentiment strip. I then add Terrific Tape to the back of my sentiment and adhere to the Tranquil Teal Cardstock strip and trim off the ends so that the strip is 4" long.


After my panel was completely dry, I trimmed off all the rough edges and mounted onto a Tranquil Teal Cardstock card base using Terrific Tape. Next, I added Liquid Glue to the back of my sentiment and adhered it to the lower section of the front of my card. I thought about adding embellishments to the card, but with all of the sparkle already there, there was no need and I didn't want to cover any of the beautiful color and sparkle! My card is finished.


This was such a fun card to make! I first tried using three different colors of ink, blue, green and yellow. The blue got lost trying to fit in three colors. I decided to only use blue and yellow, and let those two colors create my green! I cannot say enough about Gina's products, from her inks and cardstock to her stamps, products and amazing customer service, this is one of my top companies! For an added bonus, Gina herself is so down to earth and so sweet!!
If this is the first time visiting my blog, welcome and I hope you return. If you are a returning visitor, thank you so much for your support!
Should you have any questions or comments please leave them in the comments section. I'd love to hear from you and what you thought about today's card.
If you would like to be notified by email each time I post something new to my blog, you can click on the subscribe button at the top of the page. There is also a follow button that you can click on located below my profile if you would like to follow my blog.
Thank you for visiting and I hope you come back soon!
Happy Stamping!!
Jeannie
I love the card and the colour. However, I cannot figure out the purpose of running the inked cardstock with the stencil through the BigShot. Can you tell me?
ReplyDeleteThank you for your kind words Grace! I like to run my stenciled panels through my die cut machine to "dry emboss it", which raises the design through the stencil a bit. This isn't necessary to add the gel, but I do like effect it gives. Also, with the design raised through the stencil a bit, it helps keep the gel from oozing under the stencil. I love the dry embossed look even when not adding gel, it makes the design stand out a little more, in my opinion.
DeleteLovely! The way the yellow and blue blended to create green too is great! TFS!
ReplyDelete