
Shadow Stamping - Dramatic Look


Hello, welcome to my blog!!

I want to start out by thanking everyone for the support and nice comments you all leave for me. I truly appreciate the support of this blog!! I enjoy card making and bringing my creations to you, this wouldn't be possible without your support, so again, thank you!!!

Scrapbookcom continues their Christmas In July sales. To check out the sales, click on the "coupons" tab located on their home page. They have great sales and free gifts... sales change every couple of days so be sure to check back often. I have a banner located on the lower right side of my blog that takes you directly to their store. *Affiliate links used at no additional charge to you, thank you for your support!

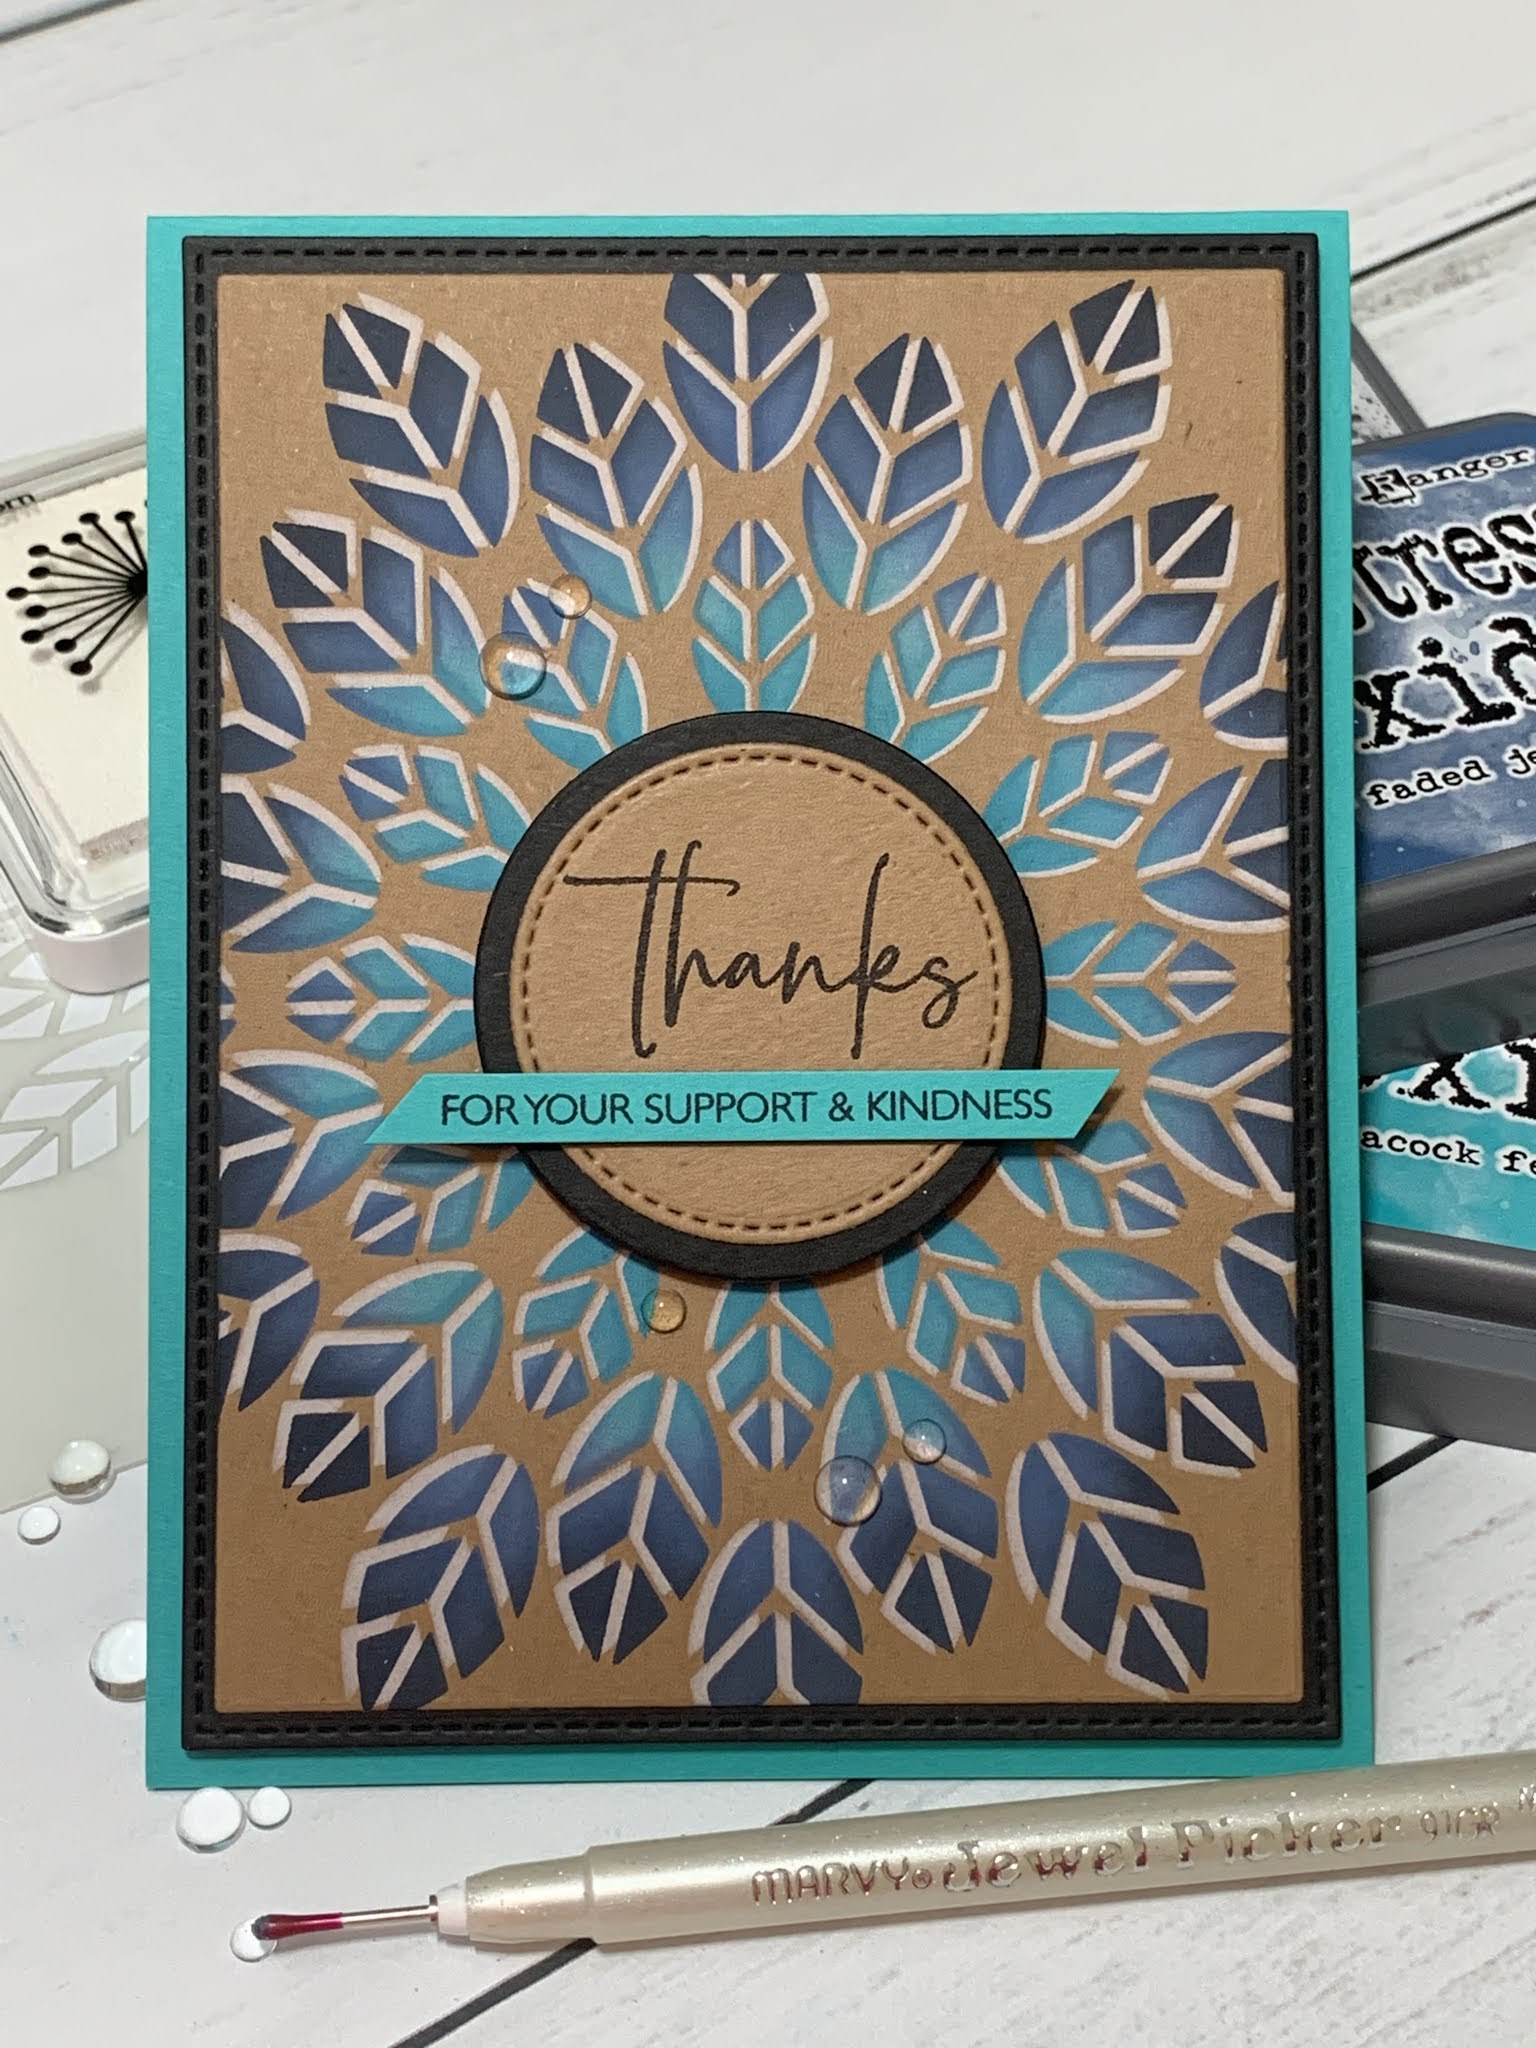
Today, I will be showing you the shadow stamping technique on colored cardstock. The key to getting color to show up on colored cardstock is to first lay down a layer of white pigment ink. You can then stamp or blend colored ink on top of it which gives the colored ink a base, allowing it to show. I will be using a stencil on my card and doing some ink blending. For my blending I will be using Distress Oxide Inks. Oxide Inks have pigment properties which also helps the ink to show up on colored cardstock. I will be using colors that give bold, dramatic results. I like to experiment with different color combinations, sometimes using colors one would never think of using together. Today however, I wanted a gradient blend within the same color family, starting lighter and ending with my darkest color. The three colors I chose ended up working beautifully together! Let's get started!!


I will be doing all of my work today on my Tim Holtz Glass Media Mat.

To start, I cut a 4 1/4" x 5 1/2" panel out of Paper Bag Cardstock using my Tim Holtz Guillotine Paper Trimmer. Next, I spray my Leaf Burst Stencil with Pixie Spray and let it dry for a few minutes. I then place the stencil over my cardstock panel and press to adhere. *Pixie Spray is a low tack adhesive that holds stencils in place over cardstock, eliminating the need for tape. I do like to use tape to hold my stencil onto my work surface while blending.


Taking my Blender Brush, I blend White Pigment Ink over the entire panel. After inking my brush, I like to tap off a couple of times onto my Glass Mat. This helps to remove excess ink so it doesn't pool up around the edges of the stencil design. *The great thing about the glass mat is you can pick up the tapped off ink again with the brush and use it so it doesn't go to waste!


Once my inking is done, I carefully remove the stencil. I let my panel dry for about ten minutes and clean off the stencil with a damp cloth. I then cut my panel down using the smaller rectangle from the Master Layouts 1 Die Set, running them through my Big Shot Die Cut Machine.


Next, I take the stencil and line it up over my image then slightly turn it to the left until I can see a little bit of the cardstock color show. Once I'm happy with my placement, I press the stencil down, again adhering it to the cardstock. *The second photo shows a close up of the offset.


Using my Blender Brush, I blend Peacock Feathers Distress Oxide Ink around the center area of the stencil fading out a bit, keeping in mind that my greeting will cover up most of it so I want to make sure I go out far enough so it will be seen.


The next color I blend is Faded Jeans Distress Oxide Ink. I blend around the remainder of the panel fading back into the previous color a bit. 


I now blend my third and final color. Using Black Soot Distress Oxide Ink I blend around the very outside of my design, blending onto the tips of the outer leaves. I want to create that third color, without covering up the second color. After my blending is complete, I carefully remove the stencil to reveal the beauty!


Taking the biggest die from my Stitched Rectangle Die Set I cut out of Black Cardstock, running them through my Big Shot. I then adhere my blended panel onto the black panel using Double Sided Tape.


To give my panel some dimension, I cut a 3 3/4" x 5" piece of Double Sided Adhesive Foam using my Guillotine Paper Trimmer. I remove the release paper and adhere to the back of my panel then mount onto a Peacock Cardstock card base.


Using a die from the Stitched Circles Die Set I cut out of Paper Bag Cardstock, running them through my Big Shot. I add Adhesive Dot Runner to the back of the die cut then place it into my MISTI Stamp Positioner. I choose a greeting from the Million Thanks Stamp Set and stamp it onto my die cut using Versafine Clair Nocturn Ink.


Next, I choose a slightly bigger die from the Infinity Circles Die Set and cut out of Black Cardstock, running them through my Big Shot. I then use Liquid Glue and adhere the die cuts together.


Now I add the leftovers of my Foam Circles (that way nothing goes to waste!) to the back of my greeting and adhere to the center of my card front.


Placing a scrap piece of Peacock Cardstock into my MISTI, I choose a sentiment from the Million Thanks Stamp Set and stamp using Versafine Clair Nocturn Ink. I trim down to a thin strip and angle cut each end. I glue two thin strips of cardstock to the back of my sentiment then mount just under my greeting using Liquid Glue. I use my Jewel Picker to adhere Water Droplets to the front of my card using Liquid Glue and this completes my card.


I hope you enjoyed today's card. Using stencils to create a blended background is one of the easiest ways to achieve a colorful background. Whether you choose a rainbow of colors or contrasting colors, stencils give a beautiful unique look. I really love the look of colored ink on dark cardstock, adding offset stamping really steps it up! Be sure to come back next week for Christmas In July! I will be posting Christmas cards throughout the week!!


If this is the first time visiting my blog, welcome and I hope you return. If you are a returning visitor, thank you so much for your support!

Should you have any questions or comments please leave them in the comments section. I'd love to hear from you and what you thought about today's card.

If you would like to be notified by email each time I post something new to my blog, you can click on the subscribe button at the top of the page. *Be sure to verify your subscription through the email link to activate. There is also a follow button that you can click on located below my profile if you would like to follow my blog.

Thank you for visiting and I hope you come back soon!

Happy Stamping and God bless!!

Jeannie

Comments

Post a Comment

Popular posts from this blog

Shadow Stamping With Stencils

Hello, welcome to my blog!! ***I wanted to let everyone know that Scrapbook.com has kicked off Freebie February!! Every couple of days they will be offering free items along with great sales! Check often as the sales will be frequently changing. I have placed a store logo on the front page of my blog just down below my profile that brings you directly to their store!    *I know die cut machines can be a bigger investment, but if you are in need of one and looking for a good price, Scrapbook.com has some really good prices on Big Shots -  stand alone  machines and bundles.   Today's card project is similar to yesterday's blog post using the shadow stamping technique, but today, I will be using a stencil. I will be using kraft cardstock as well as black cardstock. This is a fun technique to use on any color of cardstock. I wanted to show the look on a light colored cardstock vs a dark color. The key to using any color of cardstock is to first lay down white pigment ink follo

Love & Birthday Wishes - A Little Love Layering Stencils

  Hello, welcome to my blog!!  I want to start out by thanking everyone for the support and nice comments you all leave for me. I truly appreciate the support of this blog!! I enjoy card making and bringing my creations to you, this wouldn't be possible without your support, so again, thank you!! *Affiliate links are used at no additional cost to you. When you purchase products through my links I receive a small commission from these sales, thank you so much for your support, it is greatly appreciated!! For everyone that has been waiting for the A Little Love Layering Stencil Bundle - from Gina K. Designs, it is now back in stock!!! ***This "Love die" is also available for purchase on it's own! Love And Shadow Die Also back in stock are the Blending Brushes !! I used the stencil bundle to create today's card by doing simple blending and adding dimension with stacked die cuts. I love the many color combinations that can be used with this set! I love using gray to

Embossing With Stencils

Hello, welcome to my blog! Today's card project focuses on heat embossing with stencils. Stencils are great for ink blending and are economical. Did you know you can also heat emboss with your stencils? I am showing an example of white heat embossing, but you could also ink blend your stencil then heat emboss with clear embossing powder, if you don't mind getting your embossing pad dirty. Some people have a clean embossing pad dedicated for embossing only, and another embossing pad that they use for different techniques that may get the pad dirty. Let's get started!! To start, I cut a 4 1/4" x 5 1/2" white Neenah cardstock panel using my Tim Holtz Guillotine paper trimmer. I add Gina K. Designs Adhesive Dot Runner  to the corners on the back side of my white card panel to temporarily hold it down onto my Tonic Studios Tim Holtz Glass Media Mat . Next, I prep my panel with my Anti Static powder bag. I then place my Gina K. Designs Water Droplets stencil