
Gray Tone Coloring W/Zig Markers


Hello, welcome to my blog!!

I want to start out by thanking everyone for the support and nice comments you all leave for me. I truly appreciate the support of this blog!! I enjoy card making and bringing my creations to you, this wouldn't be possible without your support, so again, thank you!!!

***Scrapbookcom continues their Christmas In July celebration! Right now they are offering 15% - 50% off of all card making supplies, but hurry... this sale ends tonight, July 13th at midnight (MST). I have a Scrapbookcom banner located towards the bottom right side of my blog that takes you directly to their site. *Affiliate links used at no additional cost to you.
*Re-Design, Rina K, Gina K, Lawn Fawn, My Sweet Petunia (MISTI), and Scrapbook.com 'Handmade Essentials' Stamp Set (SKU sbc-ds19-7) are excluded from all discounts and promotions.

For today's card, I will be doing some water coloring using my Zig Clean Color Real Brush Markers. I own the 36 piece set which includes a few gray tone colors so I thought I would use the blue/gray, green/gray and brown/gray for my coloring. I will be using Strathmore Bristol Smooth cardstock for my coloring. This is the best cardstock I have found for blending my Zig Markers. The smooth finish on this cardstock allows the ink to move and blend with ease. The stamp I will be using is from the Statement Flowers stamp set from Altenew. This stamp has big open petals that are great for coloring. Let's get started!!


I will be doing all of my work today on my Tim Holtz Glass Media Mat.

To start, I take the biggest die from my Stitched Rectangle Dies Set and cut out of Bristol Smooth Cardstock, running them through my Big Shot Die Cut Machine. Next, I place the panel into my MISTI Stamp Positioner and prep using my Anti Static Powder Bag. I then stamp an image from the Statement Flowers Stamp Set across the top of my panel using Versamark Embossing Ink. I add Detail Silver Embossing Powder and heat set with my Heat Tool.


For my water coloring, I will be using the Zig Clean Color Real Brush Markers 36 Piece Set along with a Water Brush filled with clean water to blend my colors. I start with 091-Light Gray and add to the base of my first petal as well as the lined areas. I then take my Water Brush to pull and blend the color out towards the end of the petal. I repeat this process with all of the petals on both flowers. I like to choose a very light or pale color, this creates a light wash for my base.


While the first layer of color on my flowers dry, I add 093-Green Gray to the base of my first leaf as well as the lined areas then take my Water Brush to pull and blend the color out towards the end of the leaf. I repeat this process for all of the leaves.


I now go back to the petals using 092- Blue Gray and add to the base of the petal as well as the areas of overlapping petals and any folded over petal. I then use my Water Brush to pull out and blend the color. For this darker color, I like to keep the ink more concentrated to the base and edges, fading out a bit. I repeat this process for each petal on both flowers. *The light gray is my main color, the blue gray is to create depth and shadows.


For the very center of my flower I add 096-Mid Gray to several areas then take my Water Brush to blend. I then add 095-Dark Gray to several areas as well as the center opening and blend with my Water Brush.


Next, I scribble 092-Blue Gray and 095-Dark Gray onto the white area of my Glass Mat. I then take a small paintbrush, wet it with water and pick up the dark blue ink the spatter it onto my panel. I clean off my brush and repeat using the dark gray ink.


To create a greeting for my card I take the Friend Layered Die and cut out of Storm Cloud Cardstock three times, running them through my Big Shot. Using Liquid Glue, I stack and glue the die cuts together.


Next, I place the panel into my MISTI and lay out the greeting die cut to figure out my stamp placement. I choose a sentiment from the Sentiment Strips 2 Stamp Set and line it up under the die cut. I then remove the die cut and stamp the sentiment onto my panel using Versafine Clair Nocturn Ink.


I trim down a piece of Double Sided Adhesive Foam to be 3 3/4" x 5" using my Tim Holtz Guillotine Paper Trimmer. I remove the release paper and adhere to the back of my panel and mount onto a Blue Denim Cardstock Card Base.


Using Liquid Glue I adhere my greeting above the sentiment and use my Jewel Picker to add Water Droplets also using Liquid Glue and this completes my card.


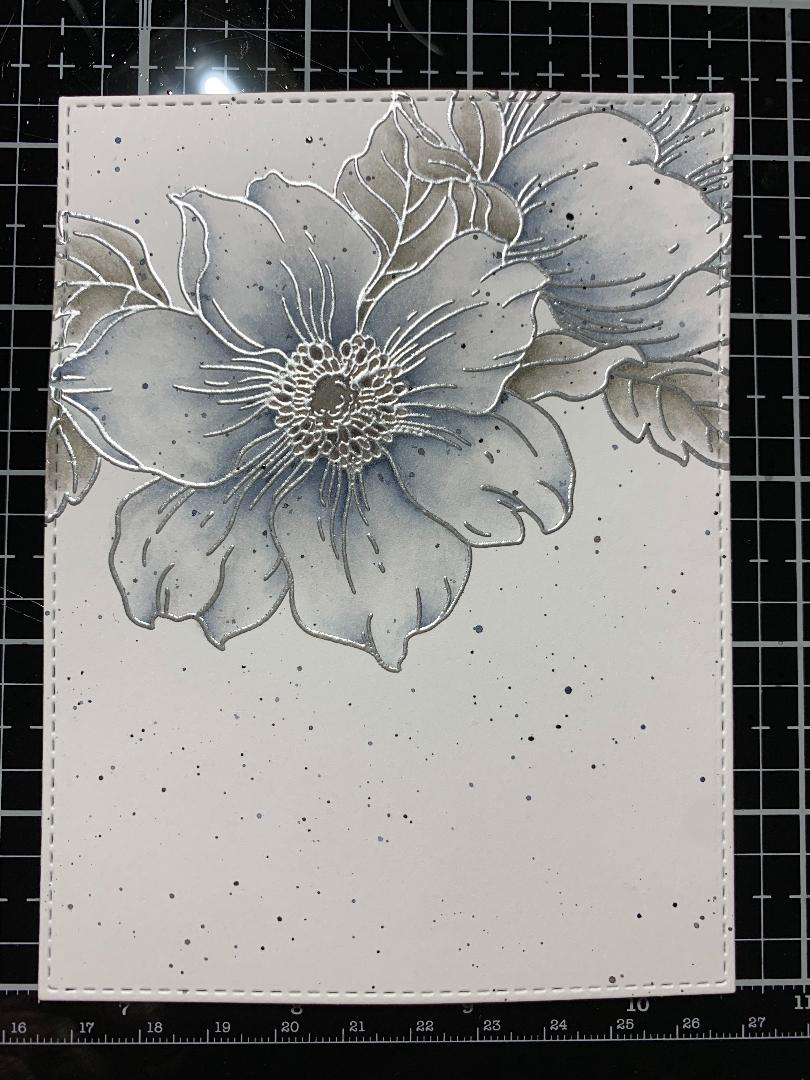
I hope you enjoyed today's card. I was going for muted colors for my card, and these gray toned colors from my Zig Markers set were just the colors I was looking for! I love bold, vibrant colors but there is just something about pale, muted colors that give off such a soft, beautiful look!!


If this is the first time visiting my blog, welcome and I hope you return. If you are a returning visitor, thank you so much for your support!

Should you have any questions or comments please leave them in the comments section. I'd love to hear from you and what you thought about today's card.

If you would like to be notified by email each time I post something new to my blog, you can click on the subscribe button at the top of the page. There is also a follow button that you can click on located below my profile if you would like to follow my blog.

Thank you for visiting and I hope you come back soon!

Happy Stamping and God bless!!

Jeannie

Comments

  1. As always, your coloring is beautiful!

    ReplyDelete
  2. This card is gorgeous! I really appreciate your well-written instructions!

    ReplyDelete
    Replies
    1. Thank you Bobby!! I'm glad the instructions are helpful.

      Delete

Post a Comment

Popular posts from this blog

Shadow Stamping With Stencils

Hello, welcome to my blog!! ***I wanted to let everyone know that Scrapbook.com has kicked off Freebie February!! Every couple of days they will be offering free items along with great sales! Check often as the sales will be frequently changing. I have placed a store logo on the front page of my blog just down below my profile that brings you directly to their store!    *I know die cut machines can be a bigger investment, but if you are in need of one and looking for a good price, Scrapbook.com has some really good prices on Big Shots -  stand alone  machines and bundles.   Today's card project is similar to yesterday's blog post using the shadow stamping technique, but today, I will be using a stencil. I will be using kraft cardstock as well as black cardstock. This is a fun technique to use on any color of cardstock. I wanted to show the look on a light colored cardstock vs a dark color. The key to using any color of cardstock is to first lay down white pigment ink follo

Embossing With Stencils

Hello, welcome to my blog! Today's card project focuses on heat embossing with stencils. Stencils are great for ink blending and are economical. Did you know you can also heat emboss with your stencils? I am showing an example of white heat embossing, but you could also ink blend your stencil then heat emboss with clear embossing powder, if you don't mind getting your embossing pad dirty. Some people have a clean embossing pad dedicated for embossing only, and another embossing pad that they use for different techniques that may get the pad dirty. Let's get started!! To start, I cut a 4 1/4" x 5 1/2" white Neenah cardstock panel using my Tim Holtz Guillotine paper trimmer. I add Gina K. Designs Adhesive Dot Runner  to the corners on the back side of my white card panel to temporarily hold it down onto my Tonic Studios Tim Holtz Glass Media Mat . Next, I prep my panel with my Anti Static powder bag. I then place my Gina K. Designs Water Droplets stencil

Love & Birthday Wishes - A Little Love Layering Stencils

  Hello, welcome to my blog!!  I want to start out by thanking everyone for the support and nice comments you all leave for me. I truly appreciate the support of this blog!! I enjoy card making and bringing my creations to you, this wouldn't be possible without your support, so again, thank you!! *Affiliate links are used at no additional cost to you. When you purchase products through my links I receive a small commission from these sales, thank you so much for your support, it is greatly appreciated!! For everyone that has been waiting for the A Little Love Layering Stencil Bundle - from Gina K. Designs, it is now back in stock!!! ***This "Love die" is also available for purchase on it's own! Love And Shadow Die Also back in stock are the Blending Brushes !! I used the stencil bundle to create today's card by doing simple blending and adding dimension with stacked die cuts. I love the many color combinations that can be used with this set! I love using gray to