Hello, welcome to my blog!!
I want to start out by thanking everyone for the support and nice comments you all leave for me. I truly appreciate the support of this blog!! I enjoy card making and bringing my creations to you, this wouldn't be possible without your support, so again, thank you!!!
***It is Christmas in July over at Scrapbookcom and they have lots of new Christmas products from many different companies! They also have sales going on through the month of July. Right now, they have deep discounts on their branded storage items. If you are looking for new storage ideas, I encourage you to check them out as they have some really big discounts! Also, with any purchase you will receive a free stamp set while supplies last. Click on the "coupon" section of the website and add it to your order. I have a banner located at the lower right side of my blog that takes you directly to the website. *Affiliate links used at no additional cost to you.
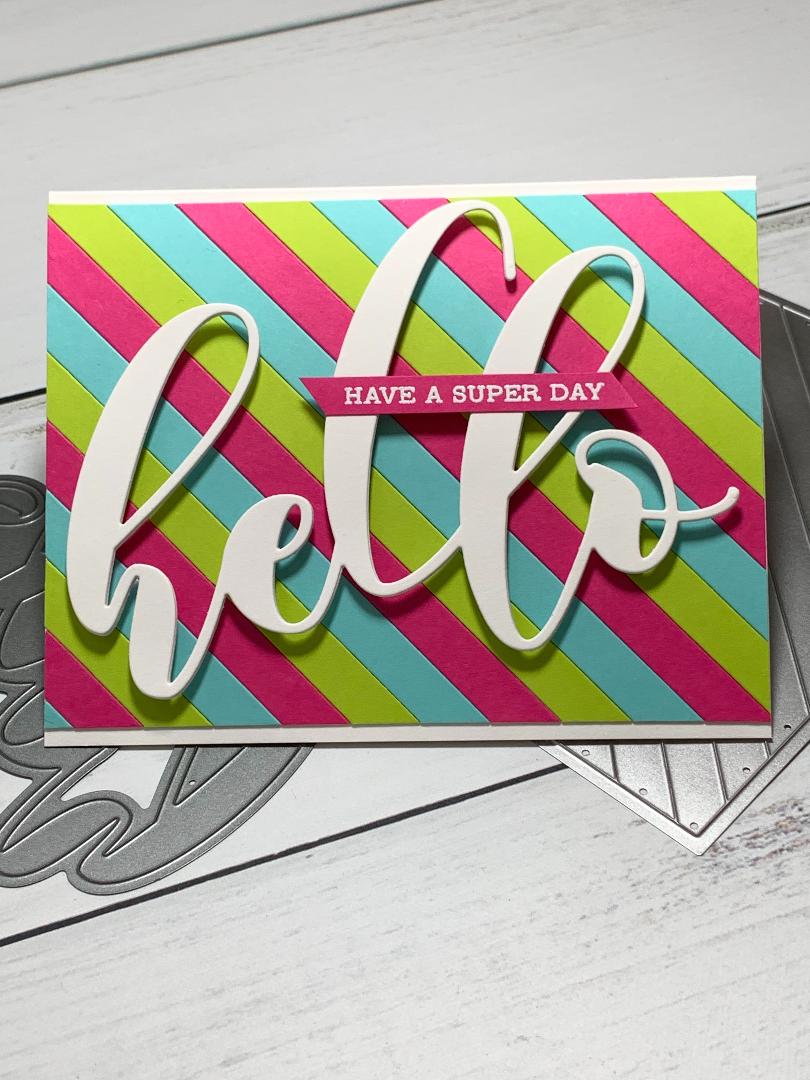
Today's card is a simple, colorful card to brighten anyone's day! I will be using a color block stripes die from Pinkfresh Studio to create a colorful background as well as a huge, bold greeting die from Altenew. The color block stripes die can be used with white cardstock to create a clean background and can give a wood, plank like look to a background which is great for beach or nautical themes. The stripes can be ink blended (which I've done in a previous post), cut out of glitter cardstock, patterned paper or solid, plain cardstock like I will use today. Another great look would be to use a large frame die to cut out of the diagonal stripes... so many possibilities! Let's get started!!

I will be doing all of my work today on my Tim Holtz Glass Media Mat.
To start, I use my Color Block Diagonal Stripes Die to cut out of Sea Glass Cardstock, Passionate Pink Cardstock and Key Lime Cardstock, running them through my Big Shot Die Cut Machine. *when removing the strips from the die, I keep them in order which makes it easy to adhere onto my card panel. You could add a strip of Purple Tape diagonally across the back of the pieces before removing them from the die to help hold them together.

Next, I cut a 4 1/4" x 5 1/2" panel out of Neenah White Cardstock with my Tim Holtz Guillotine Paper Trimmer. Using Liquid Glue, I start with one of the corner piece strips and glue down, making sure each end is flush with the edge of the white panel. I continue gluing down my strips rotating the colors until the panel is complete. *I use liquid glue for adhering the strips as it makes it easier to shift the strips into place while the glue is still wet.


I trimmed 1/8" off the top and bottom of my panel making it 4 1/4" x 5 1/4". Using Double Sided Tape, I adhere my panel onto a white card base leaving a white edge on top and bottom.

Taking my Mega Hello Die, I cut three times out of Neenah White Cardstock, running them through my Big Shot. I then stack and glue the die cuts together using Liquid Glue.


For added dimension, I add Foam Tape to the thick parts of the die cut and mount onto the front of my card.

Next, I place a scrap piece of Passionate Pink Cardstock into my MISTI Stamp Positioner and prep with my Anti Static Powder Bag. I then stamp a sentiment from the Sentiment Strips 2 Stamp Set using Versamark Embossing Ink. I add Detail White Embossing Powder and heat set with my Heat Tool.


I trim my sentiment down and cut the ends at an angle then mount over my greeting using Liquid Glue and this completes my card.
This was a quick card to put together and the colors could be changed to fit any occasion. I think different shades of pink or blue would be great for a baby card or even school colors for a grad card. Adding foam tape to every other strip would also give a nice look. Remember, I cut out of three different panels of cardstock, that means I have enough strips left to make two more cards!!
If this is the first time visiting my blog, welcome and I hope you return. If you are a returning visitor, thank you so much for your support!
Should you have any questions or comments please leave them in the comments section. I'd love to hear from you and what you thought about today's card.
If you would like to be notified by email each time I post something new to my blog, you can click on the subscribe button at the top of the page. There is also a follow button that you can click on located below my profile if you would like to follow my blog.
Thank you for visiting and I hope you come back soon!
Happy Stamping and God bless!!
Jeannie
Comments
Post a Comment