Hello, welcome to my blog!!
For today's card, I will be using Ken Oliver's Color Bursts to watercolor my image. To showcase this image, I will be using a wood grain texture die with a scalloped frame to complete the card. I have a few other posts where I paint with Color Bursts. *If you are interested in how I store my Color Bursts and the palette I made, type "Majestic Peony With Color Bursts" into the search bar, there you can scroll to the bottom of the post for details. There is even a video linked, this is how I learned to set my palette up.
Let's get started!!

I will be doing all of my work today on my Tim Holtz Glass Media Mat.
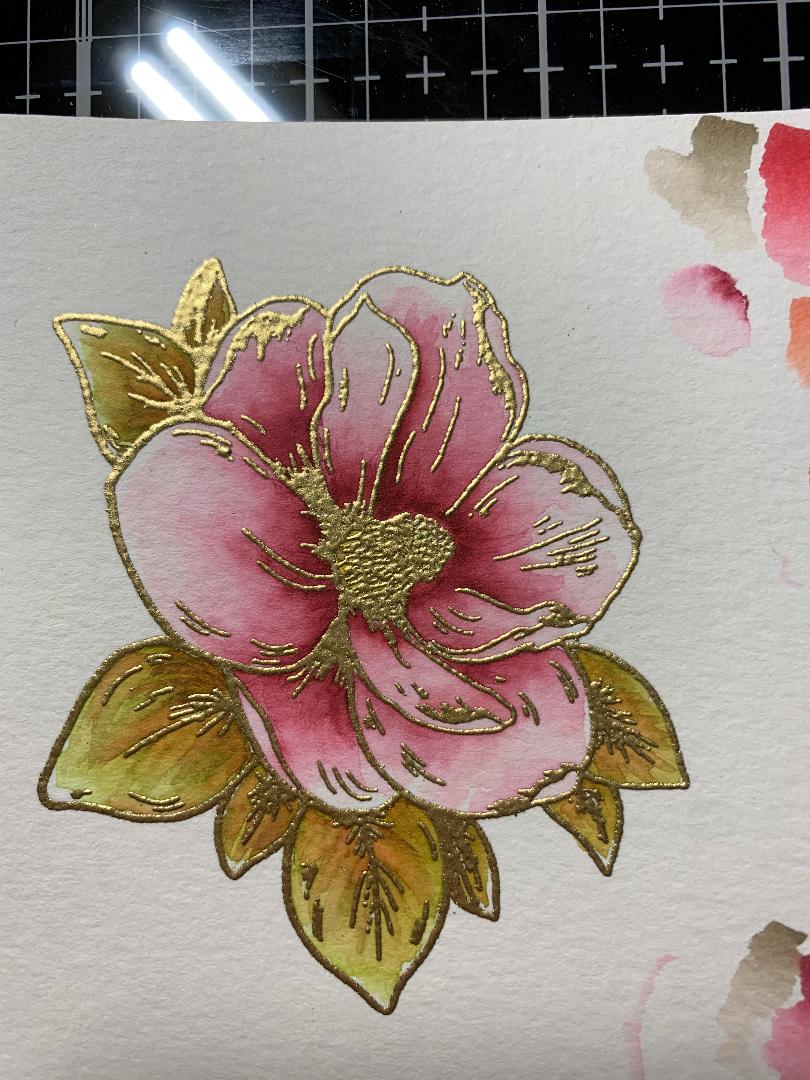
To start, I take a piece of Canson Watercolor Paper and place it into my MISTI Stamp Positioner. I prep the panel with my Anti Static Powder Bag before stamping my image from the Hero Florals - Magnolia Stamp Set using Versamark Embossing Ink. I add Detail Gold Embossing Powder and heat set with my Heat Tool.


Taking my Water Brush, I wet my first petal. I then take my other water brush and add a little Merlot Color Burst to the base of the petal. I pull the color out and fade out toward the end of the petal, keeping the color dark at the base and around where petals overlap. I repeat this process with all of the petals until the flower is complete. There is a very small area of the stamen that I add Gamboge Color Burst to, this finishes the flower.


Next, I color my leaves. I wet the leaf and add Olive Green Color Burst at the base then pull the color out toward the tip of the leaf. I repeat this process for all leaves. To add a little more color and contrast, I add Burnt Umber Color Burst to each leaf and blend in.


Next, I cut a 4 1/4" x 5 1/2" panel out of Kraft Cardstock using my Tim Holtz Guillotine Paper Trimmer. I take the Wood Grain Texture Die and run it with the kraft cardstock through my Big Shot Die Cut Machine. Using Double Sided Tape, I center and adhere the wood grain background onto a 4 1/2" x 4 1/2" white card base and trim off the overhang.


To create a shadow area on my panel, I blend Walnut Stain Distress Ink using my Blender Brush. I then take the biggest die from my Reverse Stitched Scalloped Square Window Die Set and tape down to a 4 1/2" x 4 1/2" piece of Fresh Asparagus Cardstock using Purple Tape and run them through my Big Shot. I then use Liquid Glue to adhere the frame onto the card front.


I now take and fussy cut my floral image using my Razor Edge Sheers. I then use my Leafy Branch Die and cut out of Vellum and Dark Sage Cardstock two times each running them through my Big Shot. I then cut the die cuts in half, this helps to arrange them easier. Using Liquid Glue, I attach the leaves to the back of my floral image.


Using Foam Tape, I adhere my floral image over the inked area on the card front. For my sentiment, I place a strip of kraft cardstock into my MISTI and stamp a sentiment from the Hero Florals - Magnolia Stamp Set using Versafine Clair Nocturn Ink. I cut the end of the strip at an angle then glue down at the top right corner sliding the other end under the scalloped edge. With my Jewel Picker, I add a few Water Droplets using Liquid Glue and this finishes my card.


This image was fun to color and I really like how the wood grain backdrop turned out. Sometimes the idea I have in my head doesn't always look the same on cardstock! I was pleased with the final results.
If this is the first time visiting my blog, welcome and I hope you return. If you are a returning visitor, thank you so much for your support!
Should you have any questions or comments please leave them in the comments section. I'd love to hear from you and what you thought about today's card.
If you would like to be notified by email each time I post something new to my blog, you can click on the subscribe button at the top of the page. There is also a follow button that you can click on located below my profile if you would like to follow my blog.
Thank you for visiting and I hope you come back soon!
Happy Stamping and God bless!!
Jeannie
Comments
Post a Comment