
Wild Flora W/Altenew Watercolors


Hello, welcome to my blog!!

For today's card, I will be water coloring using a new stamp set from Altenew. Whether coloring with Zig Markers, Colorbursts, watercolor paints or Copic Markers, Altenew has a great selection of floral stamps to choose from. For my coloring, I will be using Altenew 36 Pan Watercolor Set along with water brushes to apply and blend the color. Let's get started!!


I will be doing all of my work today on my Tim Holtz Glass Media Mat.

I start by placing a panel of Distress Water Color Cardstock into my MISTI Stamp Positioner and prep it with my Anti Static Powder Bag. I choose an image from the Wild Flora Stamp Set, position it onto the cardstock then stamp it using Versamark Embossing Ink. I then add Detail Silver Embossing Powder and heat set with my Heat Tool.


For my coloring, I will be using the 36 Pan Watercolor Paint Set. Using my Water Brush filled with clean water, I wet my first petal. I then take my second water brush and add the color, Coral Berry to the base of the petal. Next, I take the clean water brush to pull and fade the color out towards the end of the petal. I repeat this process until all of the petals are colored. *I use a paper towel to clean off my brush between colors or to remove water if the brush gets too wet.


For the second flower I add the same color, Coral Berry using the same process from above.


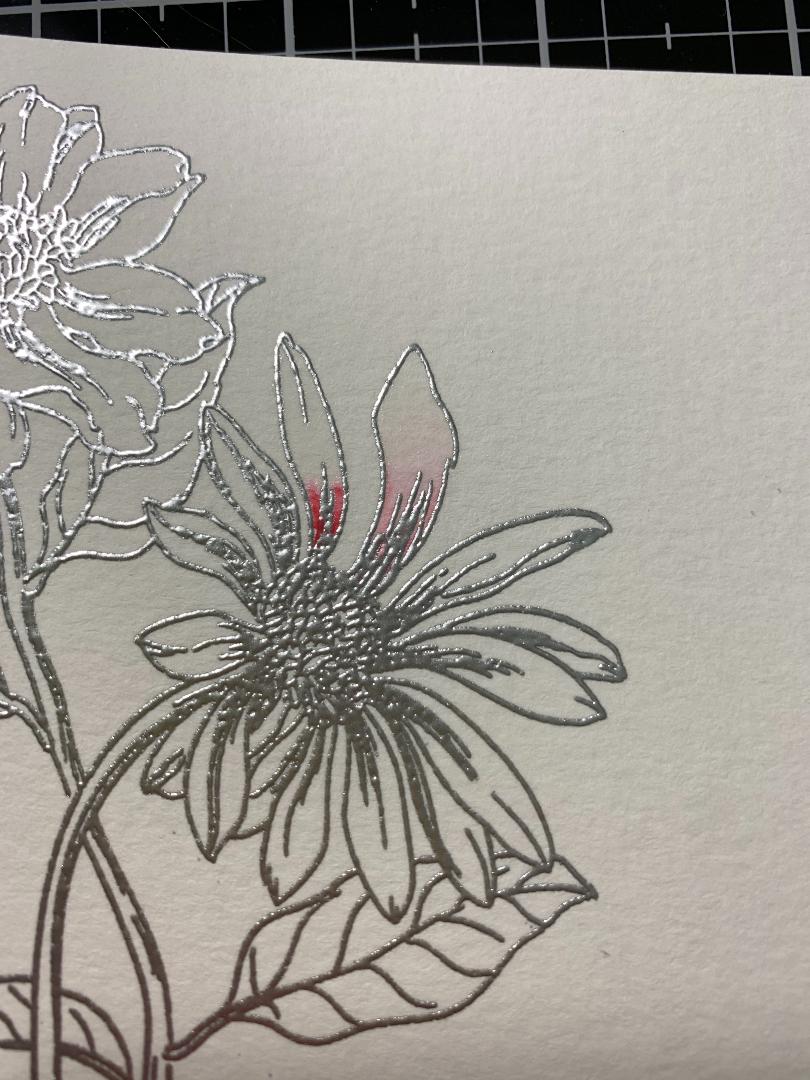
Going back to the first flower, I add the color Grape Vine to the base of each petal as well as any overlapping or upturned petals. I add color with one water brush, then pull and blend the color using my second water brush. I repeat the process for the second flower.
For the leaves and stems of each flower, I add the color Forest Green along the veins of each leaf then blend the color out. I add a thin line long the stems then blend out.


To darken the leaves and stems a bit, I add the color Evergreen then blend. For a little color variation I add the color Paper Bag to the middle of the veins and blend out. For the centers of my flowers I add the color Cosmic Berry.


Once my coloring is finished, I take the biggest die from my Stitched Rectangle Die Set and my panel and run them through my Big Shot Die Cut Machine. To give my card some dimension, I take a piece of Double Sided Adhesive Foam and adhere it onto the back of my painted panel then mount it to a Plum Punch card base.


I now take my Friend Layered Die and cut three times out of Plum Punch Cardstock, then take the shadow die and cut out of Vellum running them through my Big Shot. I then stack and glue the three die cuts together using Liquid Glue, then glue my stacked dies onto the vellum shadow die cut.


Rather than mount the vellum flat onto the card, I cut two more friend die cuts and glued them together, I then glued them to the back of my greeting lining up the letters. This is a great way to give dimension behind the vellum without having to cut slivers of foam tape to pop up the greeting.


I forgot to stamp a sentiment onto my panel before adhering to my card base. I started with my mini misti (pictured) but the card was too thick with the foam to get a good stamped impression, so I opened my card and place it into my original size MISTI. I set the die cut onto my card to plan my stamp placement then remove the die cut and stamp my sentiment from the Sentiment Strips 2 Stamp Set using Versafine Clair Nocturn Ink.


Finally, I add Liquid Glue to the back of my die cut and adhere just above the stamped sentiment. To finish, I use my Jewel Picker to add Water Droplets with Liquid Glue and this completes my card.


I hope you enjoyed today's card. This stamp set has two more images that I plan to create with in the near future.


If this is the first time visiting my blog, welcome and I hope you return. If you are a returning visitor, thank you so much for your support!

Should you have any questions or comments please leave them in the comments section. I'd love to hear from you and what you thought about today's card.

If you would like to be notified by email each time I post something new to my blog, you can click on the subscribe button at the top of the page. There is also a follow button that you can click on located below my profile if you would like to follow my blog.

Thank you for visiting and I hope you come back soon!

Happy Stamping and God bless!!
Jeannie

Comments

  1. Do you ever use other watercolor paper? I love Tim Holtz’ products, but find his papers little on the expensive side. If you prefer his watercolor paper, can you explain what you like better about it from the others?
    Thank you for your instructions, I’m going to try it!

    ReplyDelete
    Replies
    1. I have also used Canson XL Watercolor Paper. It is inexpensive and good quality. You can find it at a great price at Walmart. Have fun with your project!!

      Delete

Post a Comment

Popular posts from this blog

Shadow Stamping With Stencils

Hello, welcome to my blog!! ***I wanted to let everyone know that Scrapbook.com has kicked off Freebie February!! Every couple of days they will be offering free items along with great sales! Check often as the sales will be frequently changing. I have placed a store logo on the front page of my blog just down below my profile that brings you directly to their store!    *I know die cut machines can be a bigger investment, but if you are in need of one and looking for a good price, Scrapbook.com has some really good prices on Big Shots -  stand alone  machines and bundles.   Today's card project is similar to yesterday's blog post using the shadow stamping technique, but today, I will be using a stencil. I will be using kraft cardstock as well as black cardstock. This is a fun technique to use on any color of cardstock. I wanted to show the look on a light colored cardstock vs a dark color. The key to using any color of cardstock is to first lay down white pigment ink follo

Love & Birthday Wishes - A Little Love Layering Stencils

  Hello, welcome to my blog!!  I want to start out by thanking everyone for the support and nice comments you all leave for me. I truly appreciate the support of this blog!! I enjoy card making and bringing my creations to you, this wouldn't be possible without your support, so again, thank you!! *Affiliate links are used at no additional cost to you. When you purchase products through my links I receive a small commission from these sales, thank you so much for your support, it is greatly appreciated!! For everyone that has been waiting for the A Little Love Layering Stencil Bundle - from Gina K. Designs, it is now back in stock!!! ***This "Love die" is also available for purchase on it's own! Love And Shadow Die Also back in stock are the Blending Brushes !! I used the stencil bundle to create today's card by doing simple blending and adding dimension with stacked die cuts. I love the many color combinations that can be used with this set! I love using gray to

Embossing With Stencils

Hello, welcome to my blog! Today's card project focuses on heat embossing with stencils. Stencils are great for ink blending and are economical. Did you know you can also heat emboss with your stencils? I am showing an example of white heat embossing, but you could also ink blend your stencil then heat emboss with clear embossing powder, if you don't mind getting your embossing pad dirty. Some people have a clean embossing pad dedicated for embossing only, and another embossing pad that they use for different techniques that may get the pad dirty. Let's get started!! To start, I cut a 4 1/4" x 5 1/2" white Neenah cardstock panel using my Tim Holtz Guillotine paper trimmer. I add Gina K. Designs Adhesive Dot Runner  to the corners on the back side of my white card panel to temporarily hold it down onto my Tonic Studios Tim Holtz Glass Media Mat . Next, I prep my panel with my Anti Static powder bag. I then place my Gina K. Designs Water Droplets stencil