Hello, welcome to my blog!!
To end the week, I have three cards for you! I will be using two of Gina K. Designs Wreath Builder stamp sets, the original Wreath Builder and the Autumn Wreath Builder. I will be doing the shadow technique where I stamp the images with white pigment ink then offsetting with colored ink, which creates the "shadow". I will show this technique on my first card, then I will use the stamped image as a template and show you how to quickly reproduce the exact layout for the other two cards. I will be creating a looser wreath for all three of my cards by using only the square orientation with my turns, meaning I will only be turning my panel 4 times for each stamping instead of eight turns if I were to use the diamond orientation also. All of the cardstock, ink and stamps I will be using today are from Gina K. Designs.
Let's get started!!

I will be doing all of my work today on my Tim Holtz Glass Media Mat.
To start, I cut a 3 3/4" x 3 3/4" two times out of Kraft Cardstock and once out of Heavy Base White Cardstock using my Tim Holtz Guillotine Paper Trimmer. Taking my 3 3/4" x 3 3/4" Wreath Builder Template, I place it into the lower right corner of my MISTI Stamp Positioner. * I like to secure my template by taping the edges down with Purple Tape.

I will be using multiple stamps from the Wreath Builder Stamp Set and the Autumn Wreath Builder Stamp Set. * I like to add Adhesive Dot Runner to the back of my panel to be sure it doesn't move at all in case I need to stamp an image more than once. I place my cardstock into the template making sure I start out in the square orientation. I position my first stamp onto the panel then pick it up with the door of my MISTI. I then ink the stamp with White Pigment Ink and stamp it onto my panel. I pick up the panel and turn it two turns so that it is again in the square orientation. I again ink the stamp and stamp it onto the panel. I repeat this process until all four sides are stamped.


Because the white ink is pigment and stays wet longer, I take my Craft Tool to dry the ink before adding colored ink. I clean off my stamp and place it over the white image, slightly offsetting. I then ink up my stamp using Blue Lagoon Ink and stamp onto the panel. I repeat the stamping until all four sides are stamped. This process creates the "shadow" effect. Next, I choose another image and stamp with the white pigment ink, and stamp onto the panel.


I again stamp my image on all four sides. I dry the pigment ink the place the stamp over the white image then ink up with Lipstick Ink and stamp, turning the panel to the next square orientation. I repeat this process until all four sides are stamped. I then choose another stamp and stamp with the white pigment ink.


Again, I turn the panel and stamp all four sides, dry the pigment ink then place the stamp over the white image and offset. Next, I ink my image with Tranquil Teal Ink and stamp over the white image. I choose another image and stamp using the white pigment ink.


I again turn my panel and stamp all four sides. I then dry the pigment ink, clean off the stamp and position over the white image and slightly offset. I ink up the stamp again with Tranquil Teal Ink and stamp the panel, rotate and stamp all four sides. Next, I choose a small flower and stamp using the white pigment ink.


Rotating the panel I stamp using the white pigment ink until all four sides are stamped. I dry the pigment ink, clean off the stamp then position over the white image and slightly offset. I then ink up the stamp using Wild Lilac Ink and stamp over the white image. I again choose another image and stamp with white pigment ink.


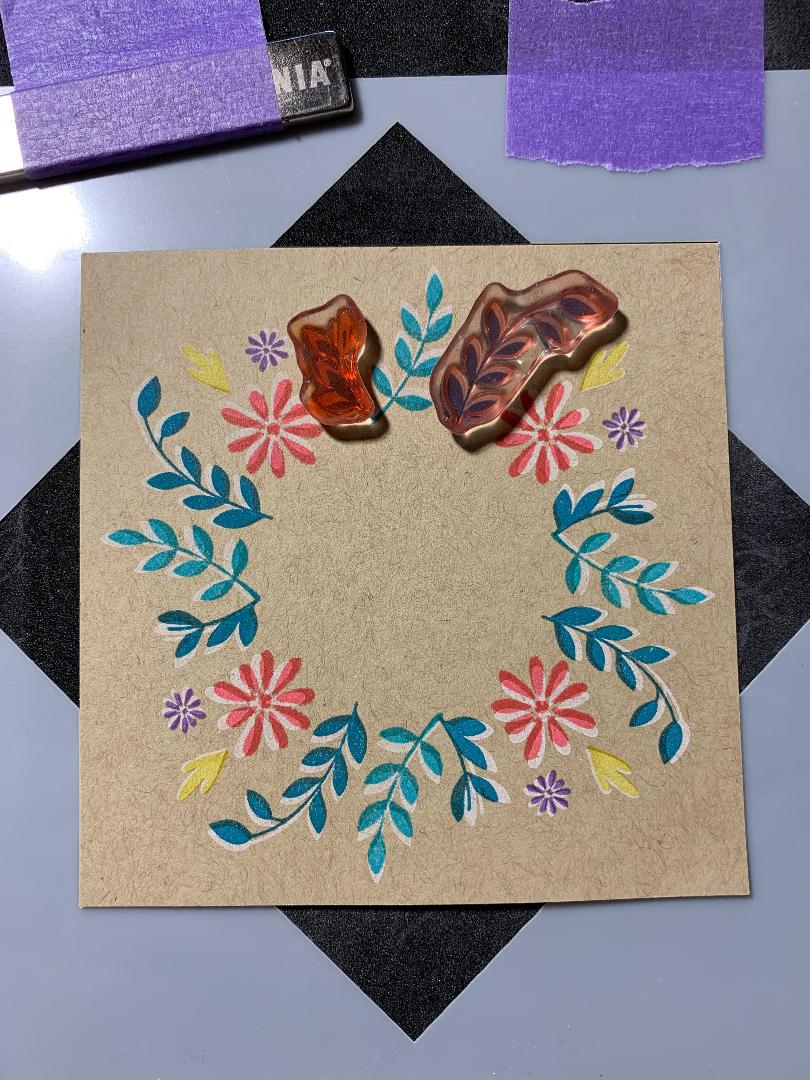
I turn the panel and stamp until all four sides are stamped. Next, I dry the white pigment ink, clean off the stamp and position of the image, slightly offsetting. I then ink up the stamp using Wild Dandelion Ink and stamp over the white image. This completes my first wreath.


I will now show you how to recreate this same wreath for my next two cards. I place four of my stamps over the matching stamped images and pick them up with the door of my MISTI. I ink them all up with white pigment ink and stamp them onto a new panel. I then rotate my panel, ink the stamps again and stamp onto the panel. I repeat this process until all four sides are stamped.


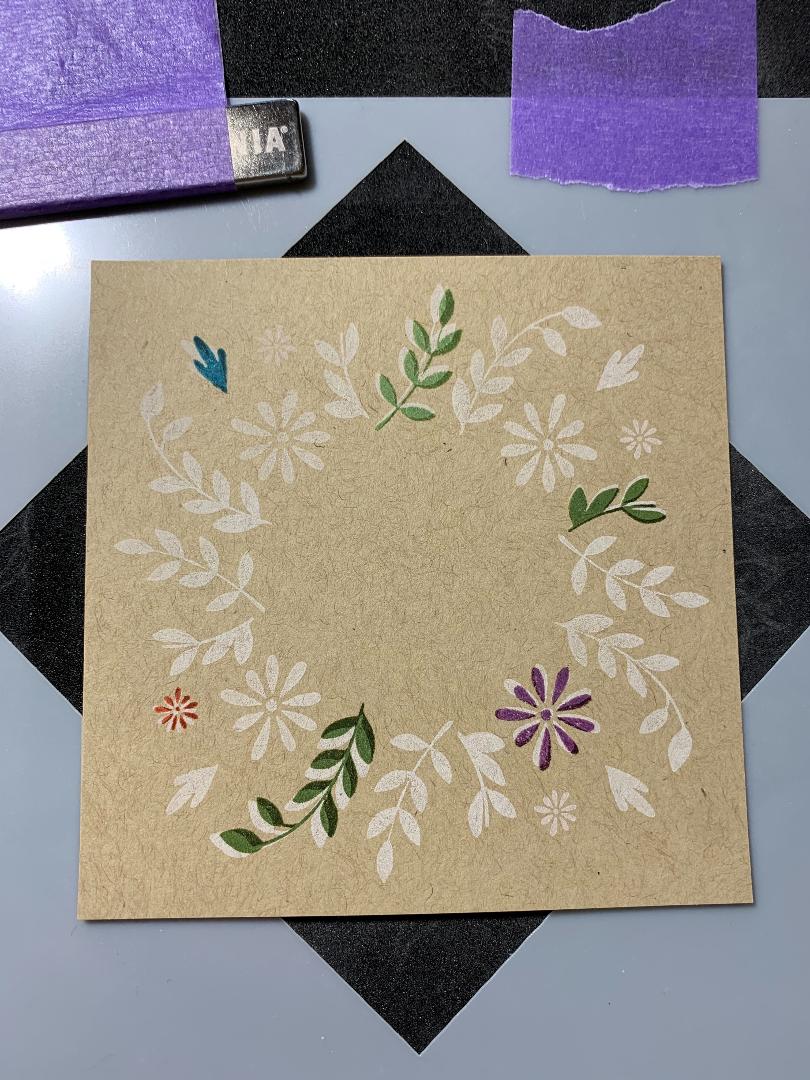
I now take my last two stamps from my first wreath and match them up to the images, pick them up with the door of my MISTI, ink them up with white pigment ink and stamp onto the panel. I repeat this process until all four sides are stamped, completing the first layer of my wreath.

I again dry all of the white pigment images and clean off the stamps. I now take all six of my stamps and place each of them over the matching white images, slightly offsetting them. I pick them up with the door of my MISTI and ink them up using Tranquil Teal Ink, Grass Green Ink, Plum Punch Ink, Fresh Asparagus Ink and Coral Reef Ink. *Ink cubes work great for this as they are small and easy to ink up the stamps. I then stamp them over the white images, rotate the panel and repeat this process until all four sides are stamped. This completes the wreath for my second card and it only took four turns to make this wreath!!
* I learned this trick from one of Rina K's videos. ** You can see that my stamps are stained but in no way affects the stamping quality. Ha, I think they look like gummy bears!!


While my stamps are still attached to the door of my MISTI, using the same colors of ink I thought I would make another card, this time using a white panel. Instead of using white pigment ink, I just stamped this wreath using the colored ink. I repeat the process inking the stamps and rotating the panel until I have a completed wreath. This wreath was created in only four turns! You can see how easy it would be to mass produce cards with this method, you could even change up the colors if you wanted to.


Using a stitched circle die from my stash, I cut out of Kraft Cardstock two times and once out of Heavy Base White Cardstock. I then take a panel of scrap cardstock and cut out of the center using my Big Shot Die Cut Machine. When stamping dies, I like to create this template that I can set my die cuts into for easy stamping. I place the die cut panel into my MISTI then set my circle die cut into the opening. I choose a sentiment from the Wreath Builder Stamp Set and stamp using Amalgam Ink. I stamp two of the circle die cuts and the other one using a sentiment from the Autumn Wreath Builder Stamp Set. Using a die from my Infinity Circle Dies, I created a mat for my sentiments cutting out of Slate Cardstock two times and once out of Black Onyx Cardstock.


I cut two 3 7/8" x 3 7/8" panels out of Slate Cardstock and one out of Black Onyx Cardstock using my Tim Holts Guillotine Paper Trimmer. I then adhered the stamped panels onto these using Terrific Tape then adhered to Kraft Cardstock, Tranquil Teal Cardstock and Edible Eggplant Cardstock card bases that measure 4 1/4" x 4 1/4". I added Foam Tape to the back of the sentiments and adhered over the center of each wreath. To finish off, I added Ivory Pearls and Snowball Pearls to the cards using Liquid Glue and this completes all three.


I hope you were able to follow along with my instructions. There was a lot of repetitive instructions, but I wanted to show you each step. Wreath Builder cards are so fun and addicting! The are the easiest cards to make and come together so quickly!
I hope everyone is doing well and getting through these times okay. Have a wonderful weekend and I will be back on Monday with another fun card project!
If this is the first time visiting my blog, welcome and I hope you return. If you are a returning visitor, thank you so much for your support!
Should you have any questions or comments please leave them in the comments section. I'd love to hear from you and what you thought about today's card.
If you would like to be notified by email each time I post something new to my blog, you can click on the subscribe button at the top of the page. There is also a follow button that you can click on located below my profile if you would like to follow my blog.
Thank you for visiting and I hope you come back soon!
Happy Stamping and God bless!!
Jeannie
Your cards are gorgeous! Thank you for the explanation and all of the pictures! I have to try this...gorgeous results!
ReplyDeleteThank you!! Have fun, the Wreath Builders are a lot of fun!
DeleteGreat tutorial and beautiful cards. I love my wreath builder and can't wait to try " mass producing".
ReplyDeleteThank you Ellen, have fun!!
DeleteI appreciate the step by step instructions and pictures. I am very much a visual learner.
ReplyDeleteThank you!!
DeleteThis is my first visit to your blog, but I know I'll be checking in often now. This tutorial was exactly what I needed. I've played with my wreath builder, but didn't love my results. I learned some really helpful tips here, and I really appreciate the time you took to write out these directions and share the photos step by step. Thank you so much!
ReplyDeleteThank you Melissa! I'm happy my instructions were helpful to you! I try to be as thorough as I can in explaining the process of each card I make. I post a new card to my blog every day, M - F. I hope you stop back soon!
Delete