Hello, welcome to my blog!!
I want to start out by thanking everyone for the support and nice comments you all leave for me. I truly appreciate the support of this blog!! I enjoy card making and bringing my creations to you, this wouldn't be possible without your support, so again, thank you!!!
Today, I will be creating a card using the Fabulous Florets stamp set from Altenew along with the coordinating masking stencils. Using the masking stencils will allow me to stamp my images on top of one another creating a layered look. These stencils are a huge time saver from having to manually cut my own masks. There is also a coordinating stencil included with this masking set. I will be using regular Distress Inks to water color my images. Let's get started!!

I will be doing all of my work today on my Tim Holtz Glass Media Mat.
To start I cut a 4 1/4" x 5 1/2" panel out of watercolor cardstock using my Tim Holtz Guillotine Paper Trimmer. I place the panel into my MISTI Stamp Positioner and prep it with my Anti Static Powder Bag. Taking the outline images from the Fabulous Florets Stamp Set I place the smaller flower towards the center and the larger flower towards the top corner, hanging off a bit. I then stamp the images with Versamark Ink, add Silver Embossing Powder and heat set with my Heat Tool. I place the panel back into my MISTI and again stamp the larger flower towards the bottom corner.


I now take the coordinating masks from the Fabulous Florets Mask Stencil and lightly spray the back sides with Pixie Spray. After letting the pieces dry for a few minutes, I cover the top and middle flowers. I again prep the area I am going to stamp with my Anti Static Powder Bag. Next, I place the two leaf stamps from the Fabulous Florets Stamp Set over the masks and onto the panel. I ink up the stamps using Versamark Ink and stamp my panel. I add Silver Embossing Powder then carefully remove the masks and heat set with my Heat Tool. I repeat this process for each stamping of the leaves, moving the flower masks around as needed.


Using the white area of my Glass Mat, I press my ink pads onto it. I will be using this as my palette. Taking a Water Brush filled with clean water, I pick up Weathered Wood Distress Ink and add it to the base of my first petal. I then use the Water Brush to pull and blend the color out towards the end of the petal. I repeat this process for each of the petals. After each of the petals is colored, I go back to the first flower and add another layer of ink using the same process.


For my second color I add Stormy Sky Distress Ink to the base of the first petal then take the Water Brush to pull and blend the color out towards the end of the petal. I repeat this process for each of the petals. I do go back and add another layer of ink to each flower. The more layers of ink that is added, the darker the shading will be.


For the leaves, I add Shabby Shutters Distress Ink to the base of my first leaf. Using my Water Brush, I pull and blend the color out towards the end of the leaf. I repeat this process for each of the leaves. Again, I go back and add another layer of ink to each of the leaves using the same process.


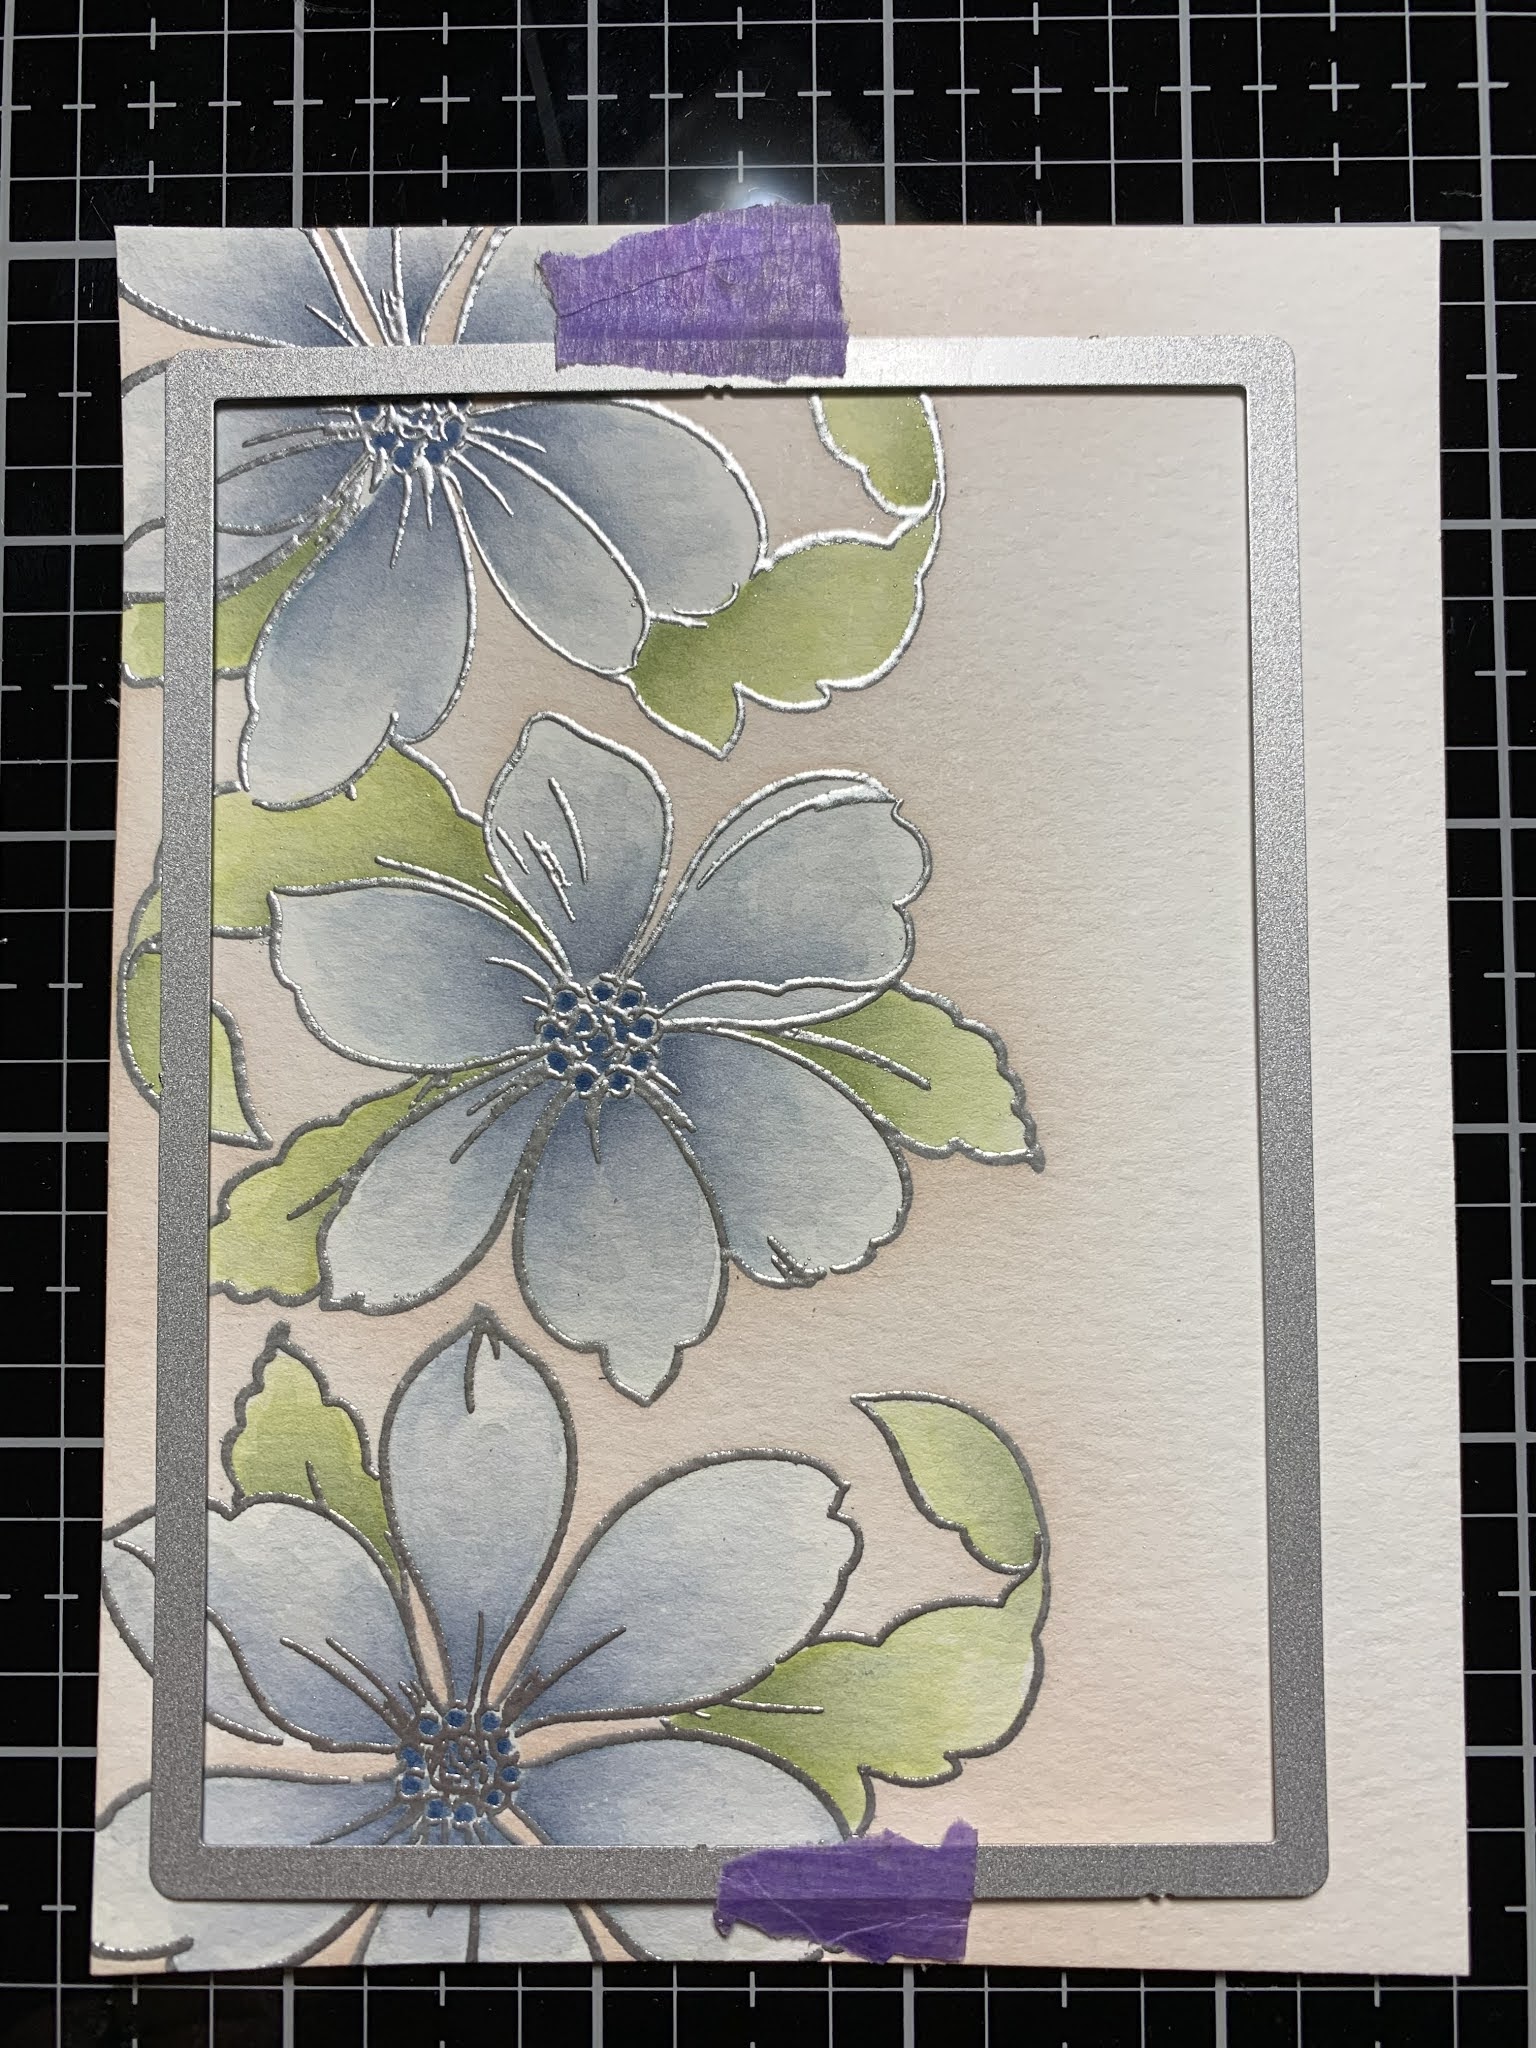
For my second color I add Bundled Sage Distress Ink to the base of the leaf then take the Water Brush to pull and blend the color out. I do this for all of the leaves and also add a second layer. To finish my coloring, I add Stormy Sky Distress Ink to the very centers of each flower by lightly taping the tip of my Water Brush to the small areas.


To add some light color to the backdrop of my images, I again place the masks over my stamped images. Using my Blender Brush I lightly blend Tattered Rose Distress Ink over the masked areas. When I complete the area over each mask, I move the masks to another area and repeat my blending until all of the areas under my images are blended. I don't blend the entire panel, just under the images and fade the color out into the white cardstock.


Taking the biggest die from the Master Layouts 2 Die Set I place it over my panel and adhere down using Purple Tape. I also cut out of Blue Denim Cardstock using the layering die from the Master Layouts 2 Die Set and run them through my Big Shot Die Cut Machine. I use Double Sided Tape and adhere the two panels together. I decided I didn't like the look of the centers of my flowers so I used the center stamps for each of the flowers and embossed them.


Using my Scor Buddy I place a 5 1/2" x 8 1/2" piece of Barely There Cardstock into it and score at 4 1/4" creating a side folding card base. I add Double Sided Adhesive Foam to the back of my panel and mount it onto the card base.


For my greeting I choose a die from the Phrase Builder - Sending Die Set and cut out of Blue Denim Cardstock four times. I also use the coordinating shadow die from the same set and cut out of Vellum once, running them through my Big Shot. *When cutting with intricate dies I place a Metal Adapter Plate (back in stock!!) under the bottom cutting plate of my die cut machine.

Using Liquid Glue and stack and glue two sets of the die cut greetings. I then glue one set onto the vellum die cut, the other two I glue onto the back side of the vellum, lining up the letters. *When using vellum shadows, I like to add a couple of die cuts to the back side before mounting onto my card for a little dimension.


I use Liquid Glue to the back of my greeting and adhere onto my card front. I use my Jewel Picker to add some Water Droplets with Liquid Glue and this completes my card.

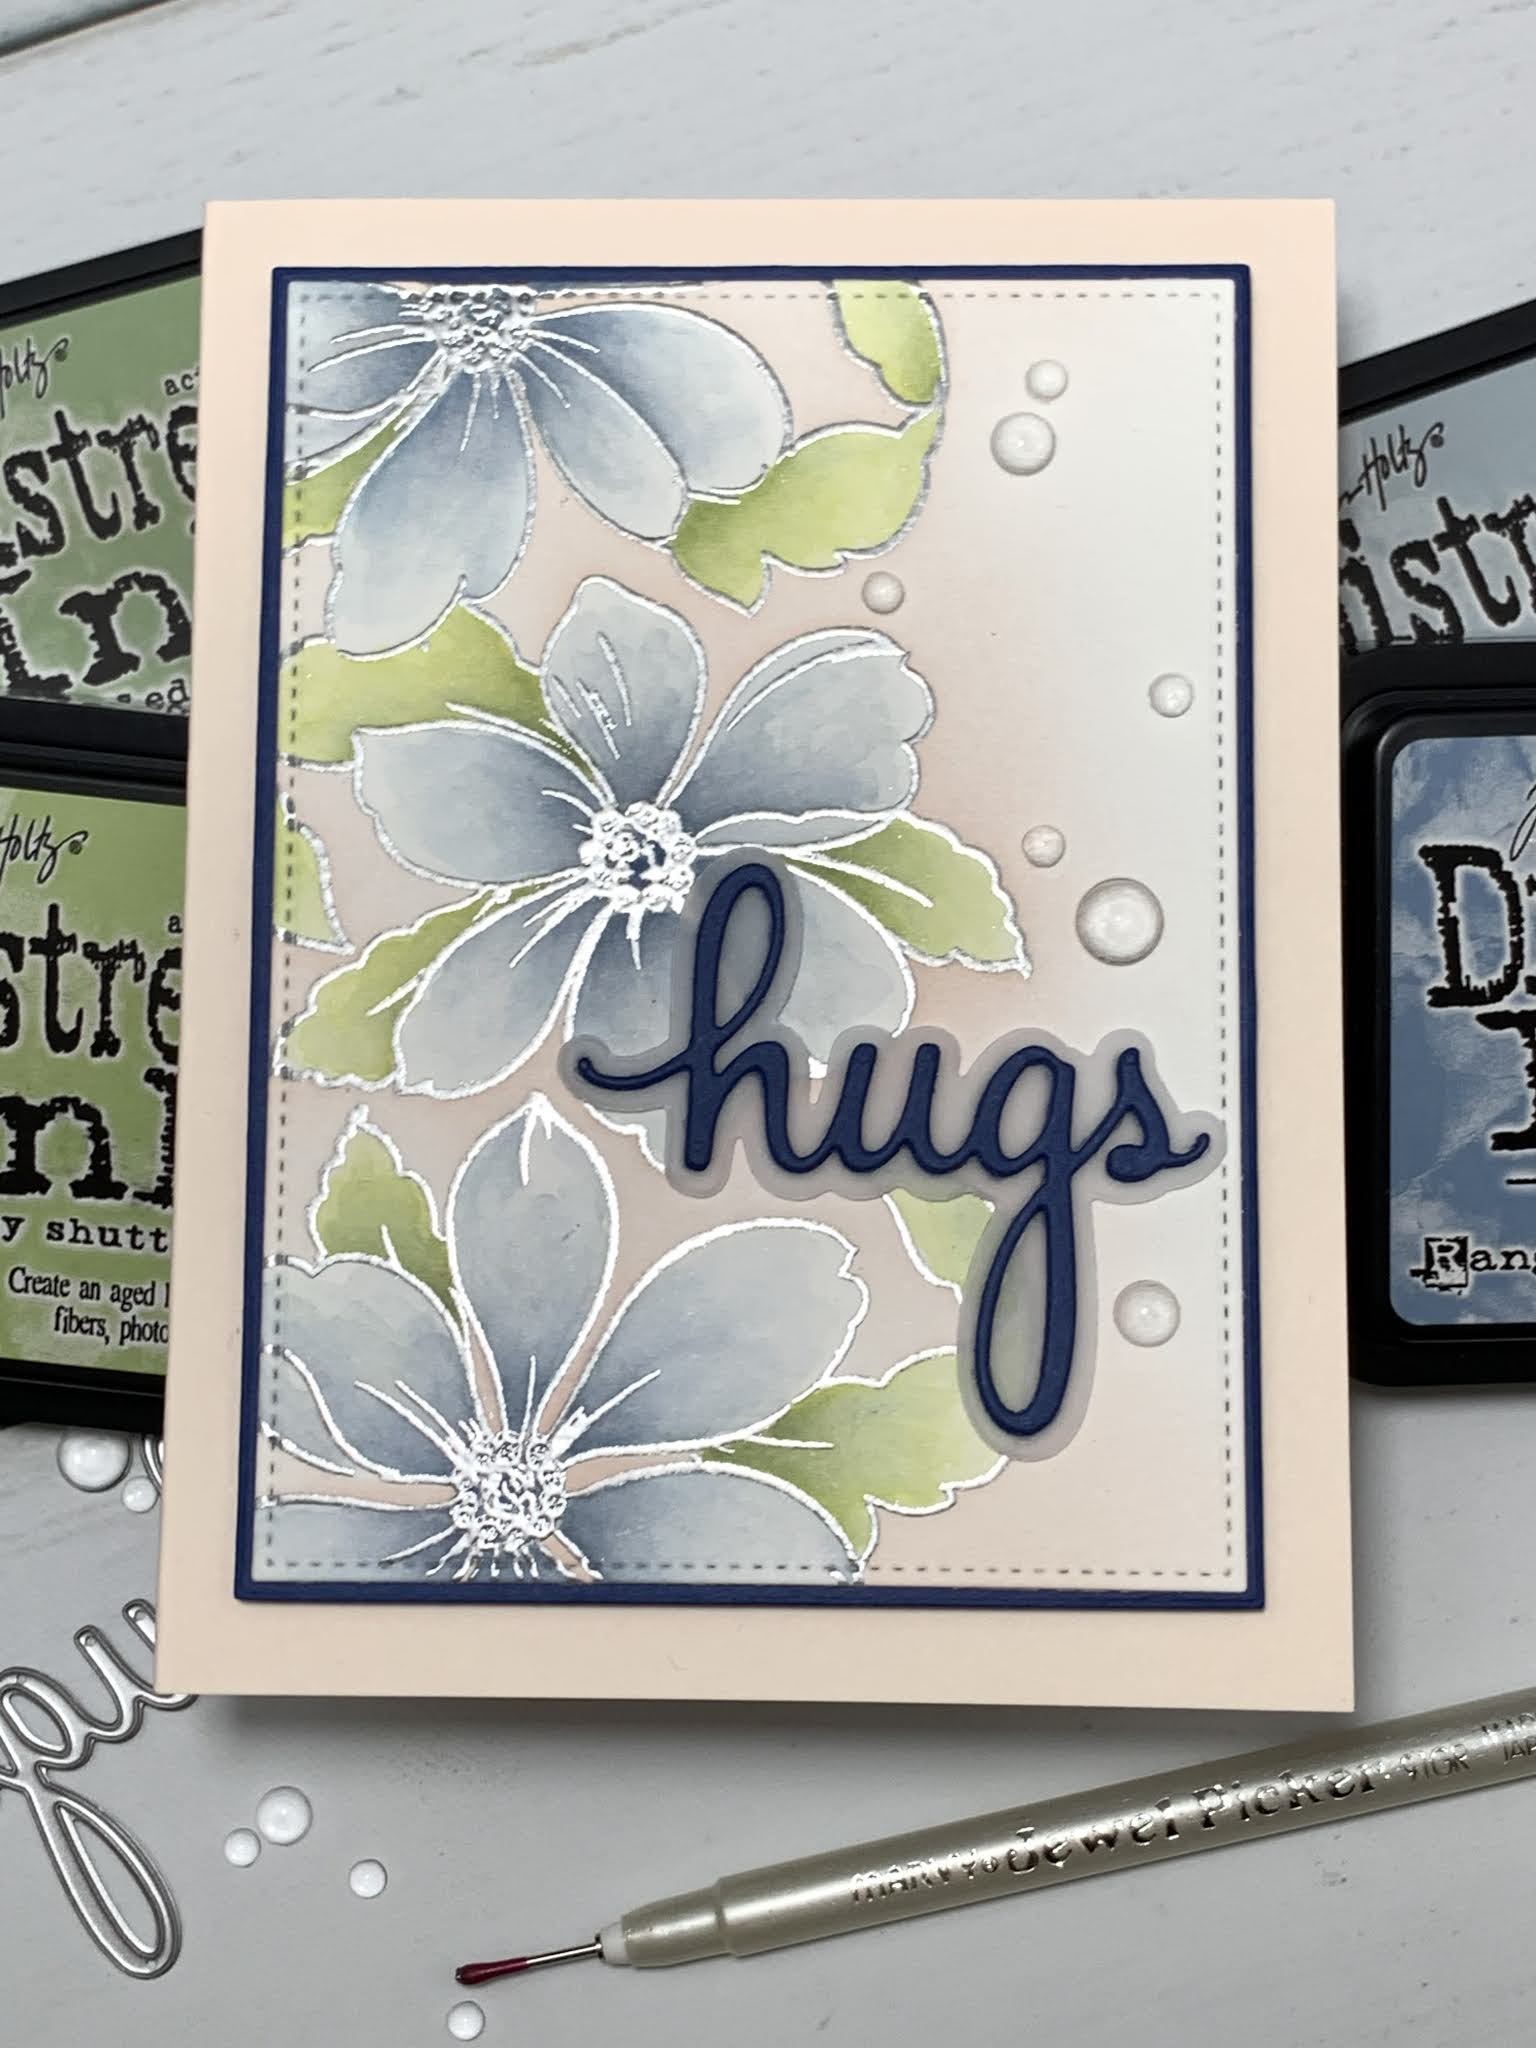
I hope you enjoyed seeing how layering masks can be used. These masks are cut to fit each image without leaving a "halo" around the edges when ink blending. Altenew has a good selection of these masking stencils that coordinate with other sets. If you enjoy layering floral images I suggest you check these out!
If this is the first time visiting my blog, welcome and I hope you return. If you are a returning visitor, thank you so much for your support!
Should you have any questions or comments please leave them in the comments section. I'd love to hear from you and what you thought about today's card.
If you would like to be notified by email each time I post something new to my blog, you can click on the subscribe button at the top of the page. *Be sure to verify your subscription through the email link to activate. There is also a follow button that you can click on located below my profile if you would like to follow my blog.
Thank you for visiting and I hope you come back soon!
Happy Stamping and God bless!!
Jeannie
This is such a beautiful card! I love your color choices as well. Could be used for many occassions. Thank you for sharing step by step process. I can see those masks are a good item to add to my wish list!
ReplyDeleteThank you Nancy! I have other masks added to my wish list as well!
DeleteBeautiful card and such detailed instructions and links. Thank you
ReplyDeleteThank you Flo!!
DeleteWhat a lovely soft card. Thank you for sharing such detailed instructions.
ReplyDeleteThank you Carole!!
DeleteI just discovered your blog, from pinterest. I'm not the best at water coloring so I appreciate your detailed instructions. I will be back!
ReplyDeleteWelcome!! Just lay some color down, the great part about water coloring is it doesn't have to be perfect. Have fun and enjoy! =)
Delete