Hello, welcome to my blog!!
I want to start out by thanking everyone for the support and nice comments you all leave for me. I truly appreciate the support of this blog!! I enjoy card making and bringing my creations to you, this wouldn't be possible without your support, so again, thank you!!!
I've had so much fun being a guest designer this month for Gina K. Designs new release. There are so many different types of stamps and dies in this release, from floral sets to large handwritten greetings, block greeting dies, and best of all a new kit!! Gina has also given us a new Master Layouts 2 Die Set! This new layering die set has multiple layering dies with stitched detail! Nothing gives cards a nice finished look the way stitched dies do. I have mine ordered and cannot wait to bring you cards created with them! If you haven't had a chance to check out these new products you can click on the Gina K. Designs banner located at the bottom right side of my blog which takes you directly to her store. You can then click on the shop button, then the "what's new" category. *Affiliate links used at no additional cost to you, thank you for your support!!
I have created two cards using the Wildflowers & Weeds stamp set from Lisa Hetrick for Gina K. Designs. This is a beautiful set that includes a bicycle tire with many floral images that can be used to create arrangements and bouquets. There is also a coordinating die set available for purchase. For my first card, I used some of the smaller images to create a card using Gina's Wreath Builder template, using both solid and open lined stamps. For my second card, I will be doing some no line water coloring. I use stamps, coordinating dies and a stencil to create an inset stamped card. I wanted this card to give the feel of an old bicycle tire sitting out in a field with wildflowers growing around it. Let's get started!!

I will be doing all of my work today on my Tim Holtz Glass Media Mat.
To start, I cut a 4" x 4" piece out of White Cardstock using my Tim Holtz Guillotine Paper Trimmer. Using the 4" Wreath Builder Template, I place it into my MISTI Stamp Positioner and use Purple Tape to keep it secure. I then place my white cardstock panel into the template starting in the square position and place my magnet over the corner to hold it into place. Next, I choose an image from the Wildflowers & Weeds Stamp Set and place it on the left side of my panel. I close the door of my MISTI to pick up the stamp and ink it using Fresh Asparagus Ink. I then stamp it onto the panel, then pick up the panel and rotate it to the diamond position and stamp again. I pick up the panel, rotate and stamp again, repeating this process until I've stamped all turns and have completed the greenery of my wreath. *It is important to always start your wreath in the square position and start your stamping on the side of the panel. This way all of your images will always fit on the panel evenly. **To use the wreath builder system, you will need a MISTI or other stamp positioner.


Next, I choose a flower image from the same stamp set and again starting in the square position I stamp using Blue Lagoon Ink this time stamping only in the square positions (skipping the diamond positions). I rotate my panel, stamping a total of four times.


Choosing another image, I start in the square position and stamp using Coral Reef Ink, stamping in each square position only.


I again start in the square position and stamp another image using Honey Mustard Ink, this time stamping in all positions, including the diamond position.


Next, I choose a leaf image and starting in the square position, I stamp using Jelly Bean Green Ink. I then turn the panel and stamp each turn, including the diamond position.


For my last image, I choose the tiny flower image and stamp it using Plum Punch Ink, stamping only the diamond positions. This completes my stamping, my wreath is now complete.


I now place a 5 1/2" x 8 1/2" piece of Plum Punch Cardstock into my Scor Buddy and score at 4 1/4", creating a side folding card base. Using Terrific Tape I adhere my panel onto the card base in a diamond position. I then cut off the overhang.


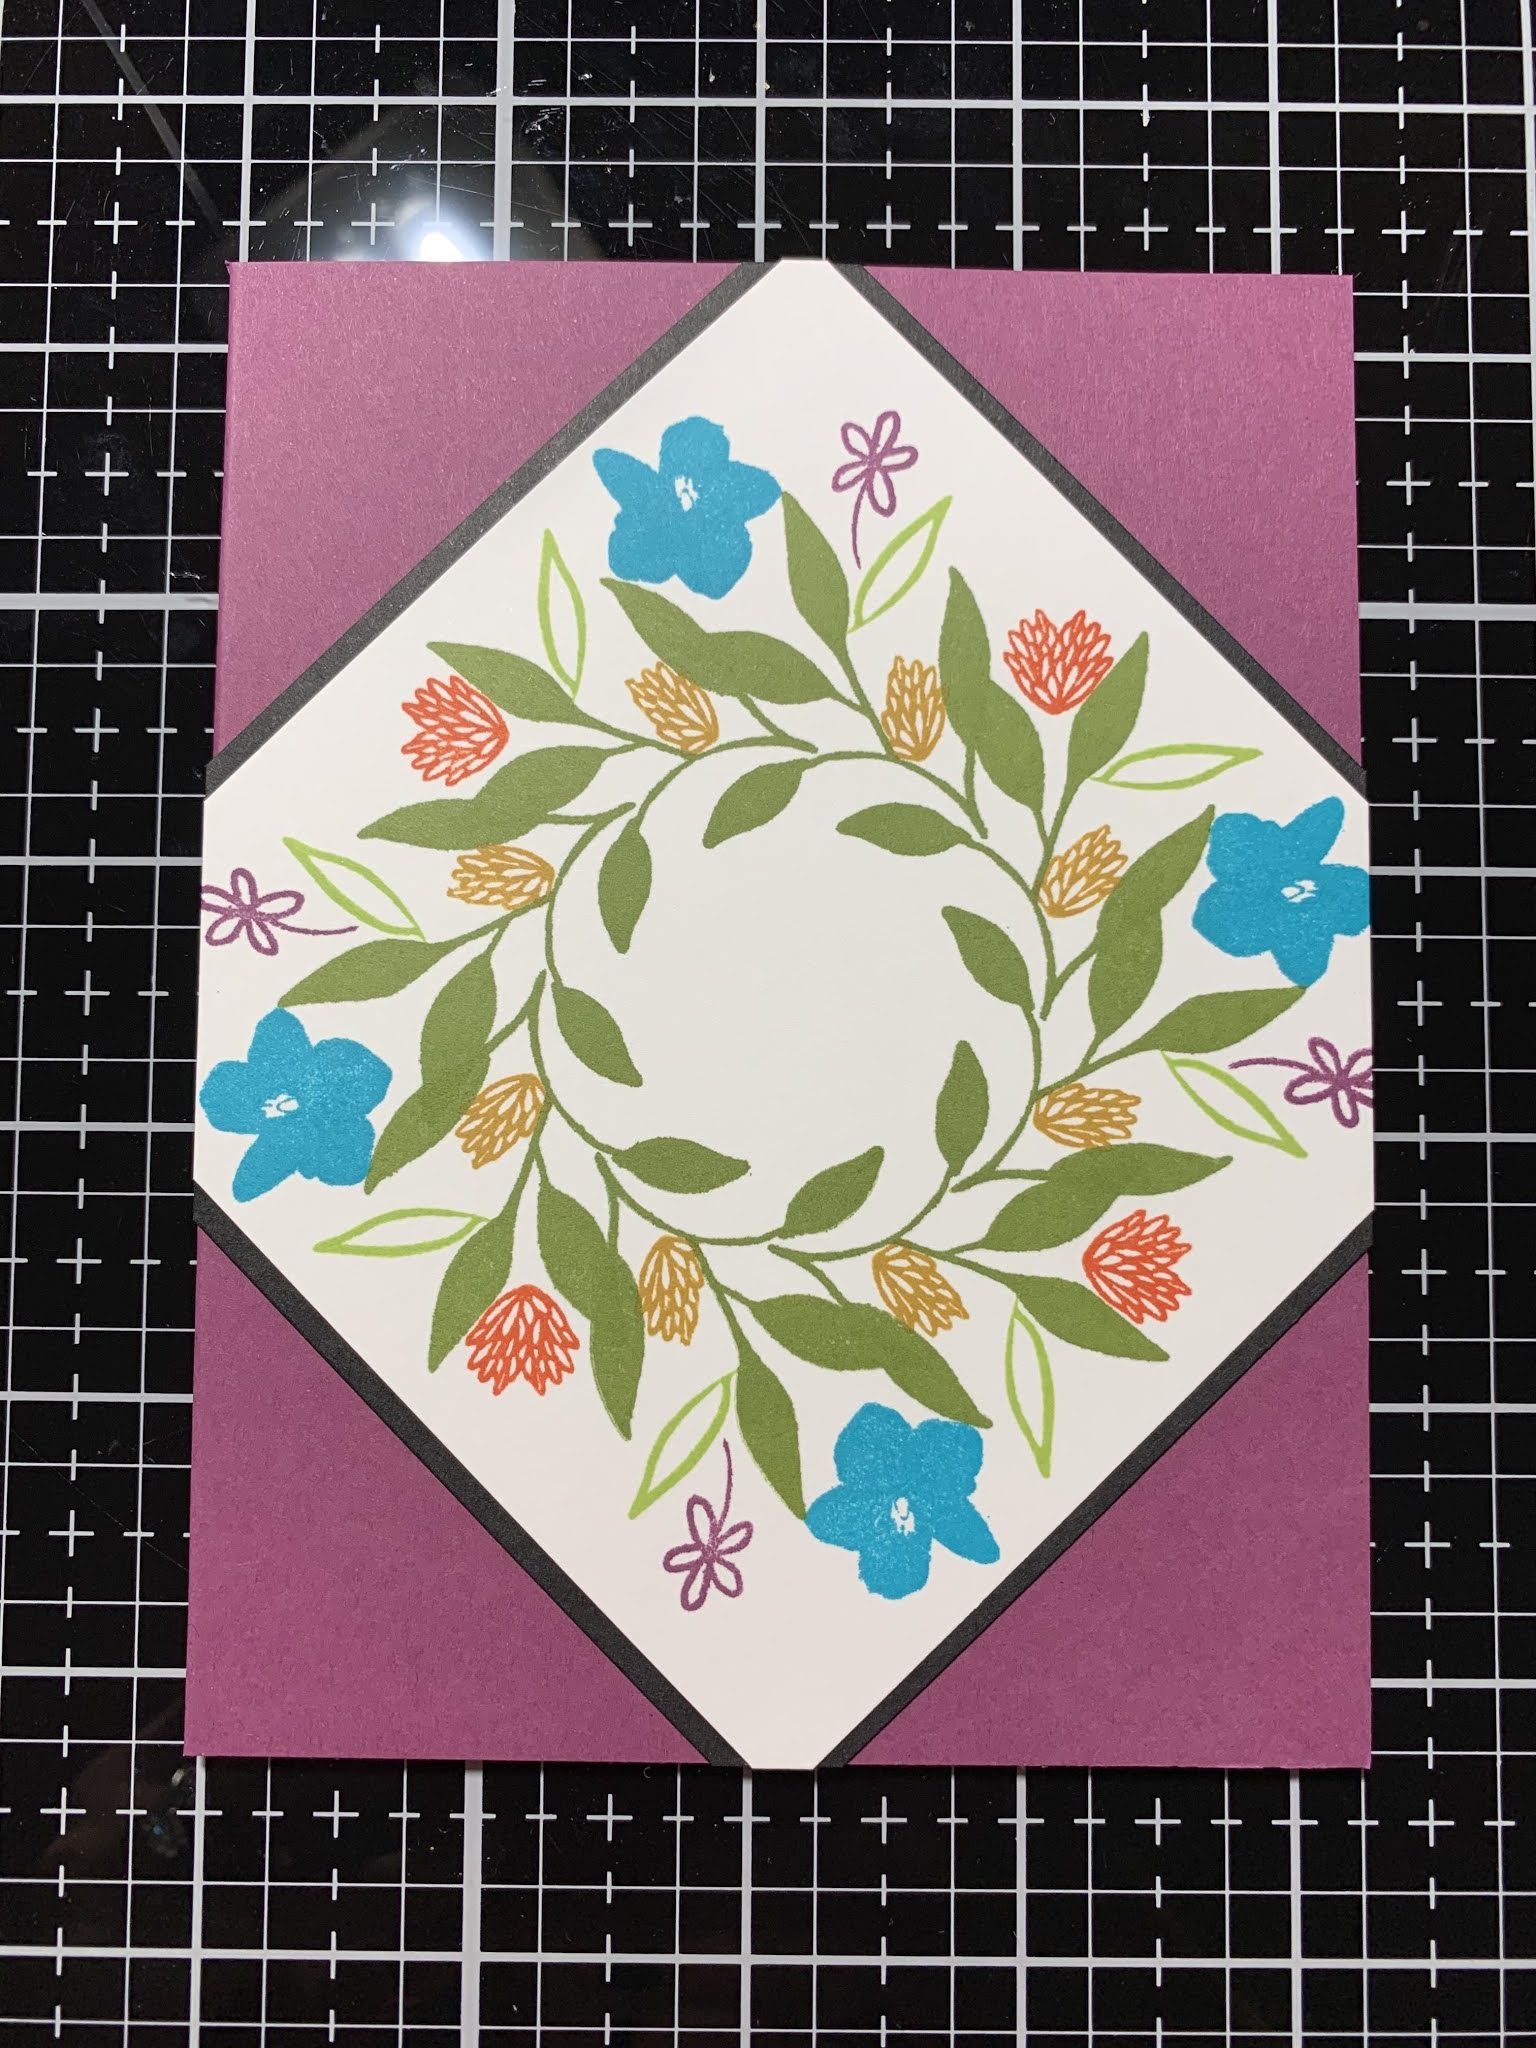
For my sentiment, I place a thin scrap of white cardstock into my MISTI and stamp a sentiment from the Wildflowers & Weeds Stamp Set using Amalgam Obsidian Ink then cut off each end at an angle.


I add Foam Tape to the back of my sentiment and mount onto the center of my card front and this completes my first card.

For my second card, I start by cutting a 4 1/4" x 5 1/4" panel out of White Cardstock using my Guillotine Paper Trimmer. I then take the large circle die from the Wildflowers & Weeds Die Set, position it onto the center of my panel and hold it into place using Purple Tape then run them through my Big Shot Die Cut Machine.


Next, I take my Water Droplets Stencil and adhere it over my panel using Purple Tape. I then use my Blender Brush to very lightly blend Soft Stone Ink over it fading out towards the edges and corners of the panel.


Using my Scor Buddy, I score a 5 1/2" x 8 1/2" piece of Soft Stone Cardstock at 4 1/4" creating a side folding card base.

Next, I place the card base into my MISTI and temporarily place the blended panel over it, leaving even spacing on each end. I then take the bicycle wheel stamp from the Wildflowers & Weeds Stamp Set and place it into the circle die cut area making sure it is centered. Once centered, I pick up the stamp with the door of my MISTI then remove the blended panel.


Using Amalgam Obsidian Ink, I stamp the image onto my card base. I then add Foam Tape to the back of my blended panel and mount onto the card base. My image is now centered through the circle die cut area, creating my inset stamped image.


Using the white area of my Glass Mat I press the colors of ink I will be using for my water coloring onto it. I will be using this as a palette for my water coloring.

Next, using my MISTI, I stamp several floral images from the Wildflowers & Weeds Stamp Set onto watercolor paper using Warm Glow Ink. Once I add ink to watercolor my images, the inked lines will disappear into the watercolor, creating the no line watercolor look.

Using a Water Brush filled with clean water, I dampen my first petal. I then pick up a small amount of Plum Punch Ink from my palette and add it to the edges of the petal then blend the ink. Once I have a layer of ink on the petal, I pick up a little more ink and add it to the base of the petal and blend out towards the end. I repeat this process a few times until I am satisfied with the look.


For my last layer of ink, I like to lightly tap my Water Brush as I am blending the ink which creates a bit more of a water colored look and texture.


I hope you enjoyed seeing the different creations made with these new stamp sets. It has been an absolute honor to be on Gina's guest design team this month and I am so thankful to have had the opportunity to create with these beautiful sets!! In the coming days and weeks, I will be creating more cards with the new release sets and kit. Like everyone else, I am anxiously waiting for my new products to arrive in the mail, including the new kit!!
If this is the first time visiting my blog, welcome and I hope you return. If you are a returning visitor, thank you so much for your support!
Should you have any questions or comments please leave them in the comments section. I'd love to hear from you and what you thought about today's card.
If you would like to be notified by email each time I post something new to my blog, you can click on the subscribe button at the top of the page. *Be sure to verify your subscription through the email link to activate. There is also a follow button that you can click on located below my profile if you would like to follow my blog.
Thank you for visiting and I hope you come back soon!
Happy Stamping and God bless!!
Jeannie
Very pretty cards! Thanks for sharing!
ReplyDeleteThank you!! They were fun to make!
DeleteGorgeous!!
ReplyDeleteThank you Mardi!!
DeleteBeautiful cards. Thanks for sharing.
ReplyDeleteThank you Della!!
Delete