Hello, welcome to my blog!!
I want to start out by thanking everyone for the support and nice comments you all leave for me. I truly appreciate the support of this blog!! I enjoy card making and bringing my creations to you, this wouldn't be possible without your support, so again, thank you!!!
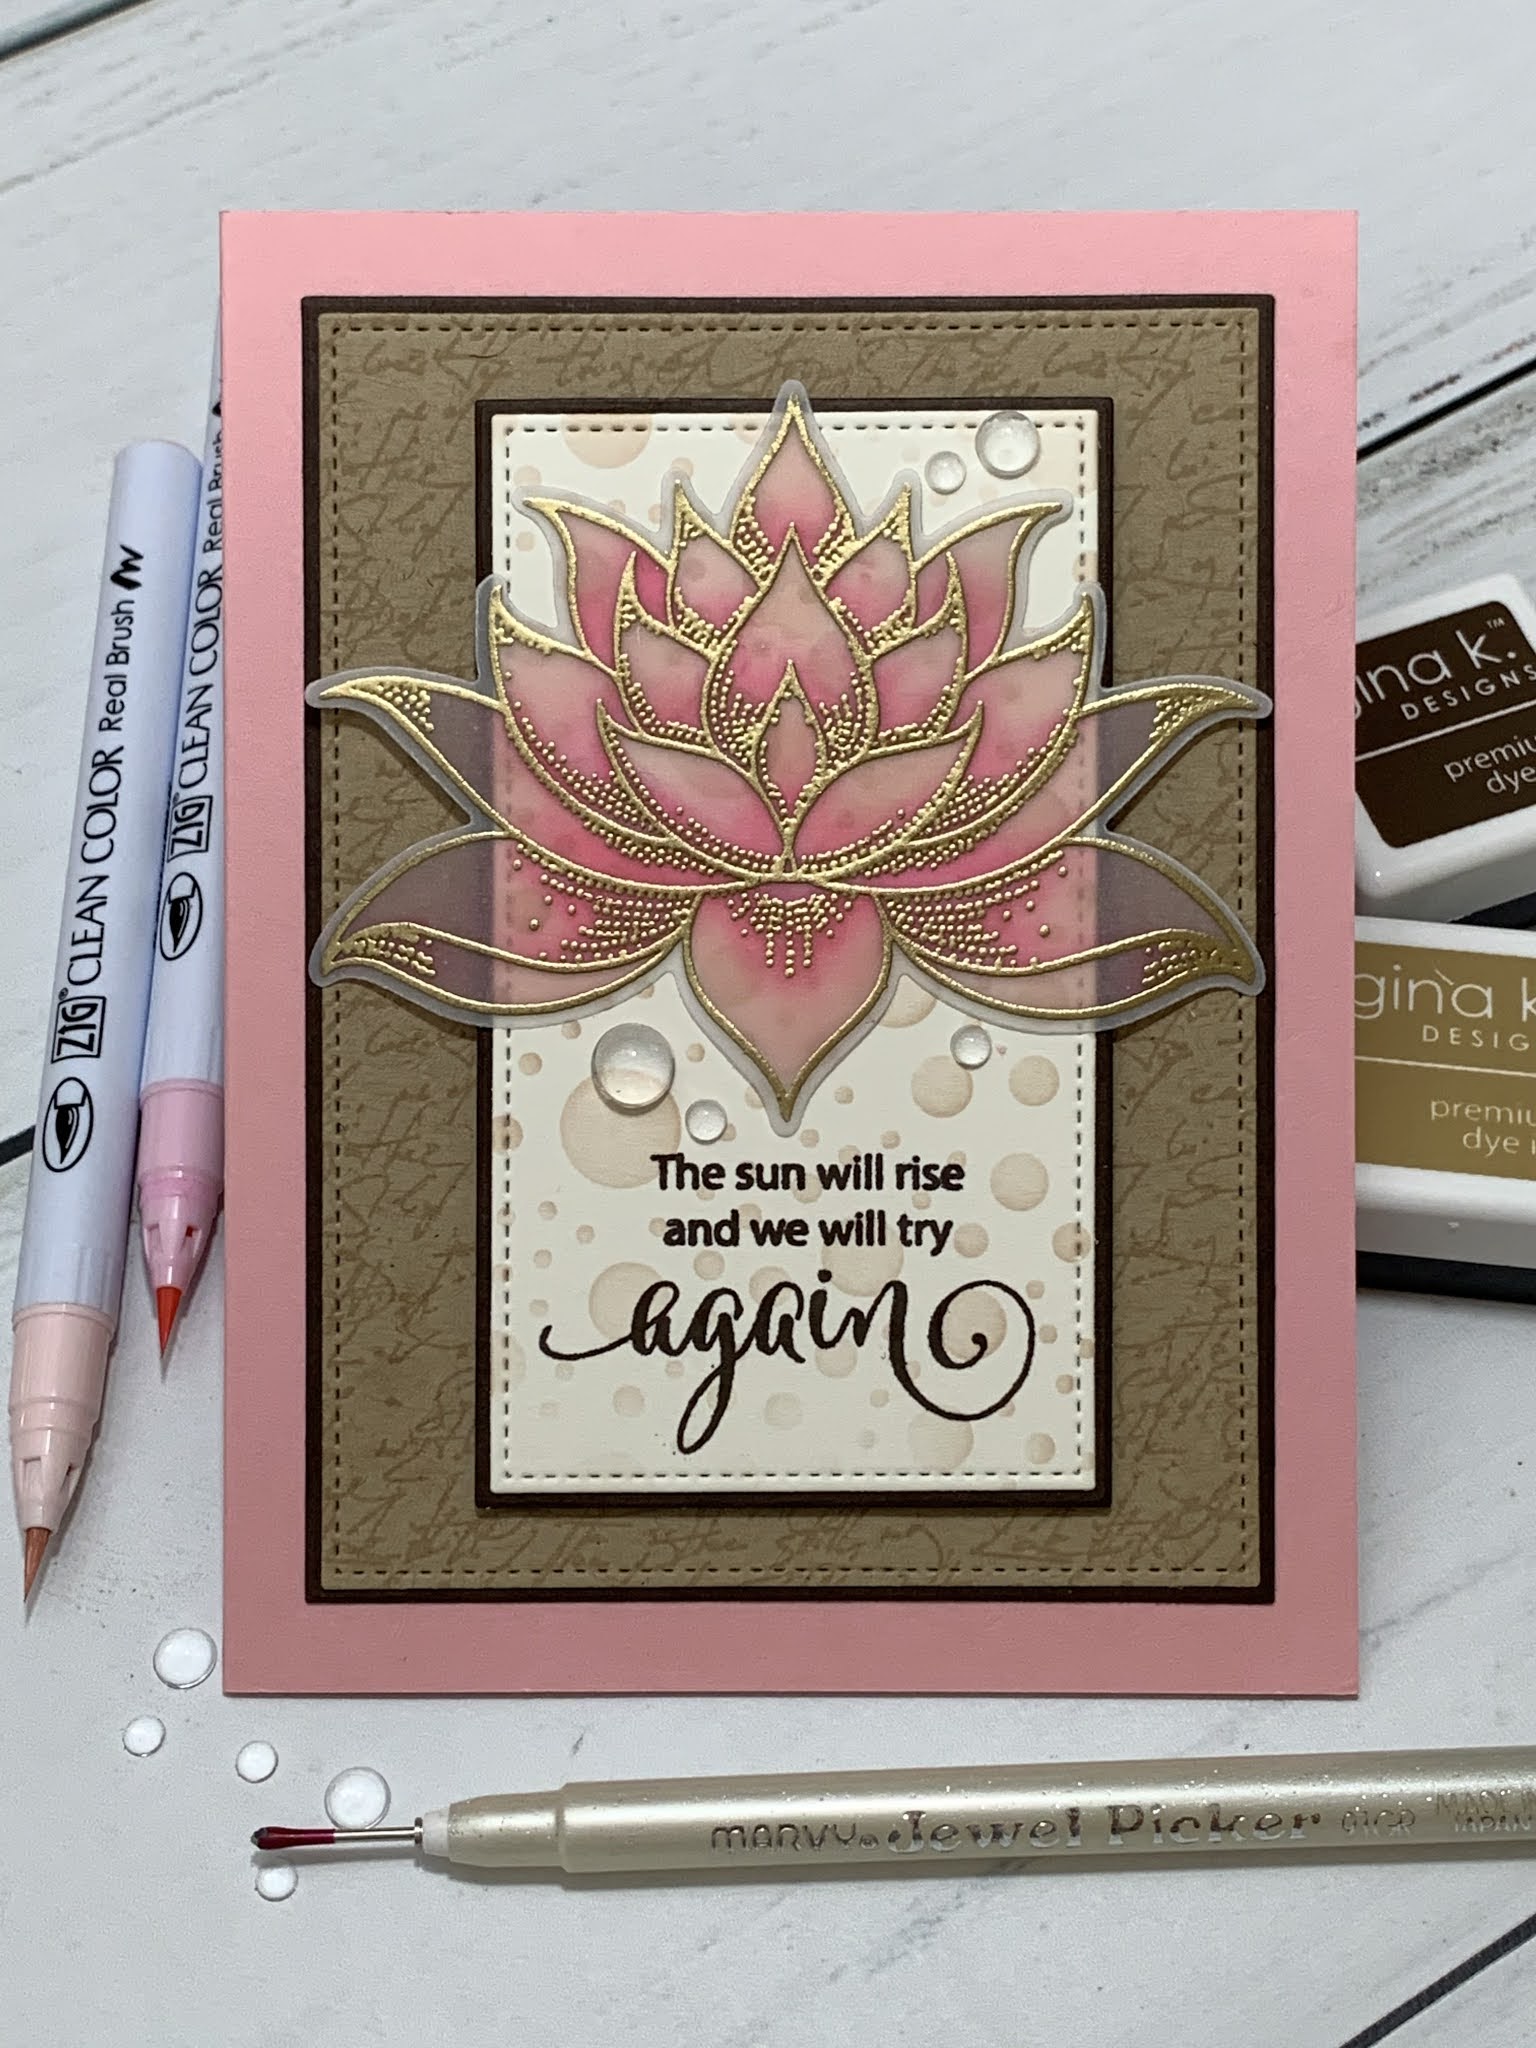
I hope everyone had a nice weekend! Today, I will be coloring on vellum using my Zig Clean Color Real Brush Markers. The set I will be using is the Lovely Lotus stamp set along with the coordinating dies that are both included in the August Kit from Gina K. Designs. This is just one of three stamp sets you will receive in this kit and the kit is still available! Also included in the kit is an awesome stencil that I will be using to create a soft background for my image. I will also be using Gina's Elegant Script background stamp. Let's get started!!
I will be doing all of my work today on my Tim Holtz Glass Media Mat.
To start, I take the biggest stitched die from the Master Layouts 2 Die Set and cut out of Kraft Cardstock, running them through my Big Shot Die Cut Machine. Next, I add a small amount of Adhesive Dot Runner onto the back of the panel and place it into my MISTI Stamp Positioner. I then ink up my Elegant Script Background Stamp with Kraft Ink and stamp it onto the panel. Next, I take the layering rectangle die for this panel from the Master Layouts 2 Die Set and cut out of Charcoal Brown Cardstock, running them through my Big Shot. Using Terrific Tape, I adhere my stamped panel onto it.


I now place the panel into my MISTI and stamp a sentiment from the Lovely Lotus Stamp Set using Charcoal Brown Ink. I then take the layering die for this panel from the Master Layouts 2 Die Set and cut out of Charcoal Brown Cardstock, running them through my Big Shot. Using Terrific Tape, I adhere my sentiment panel onto it.

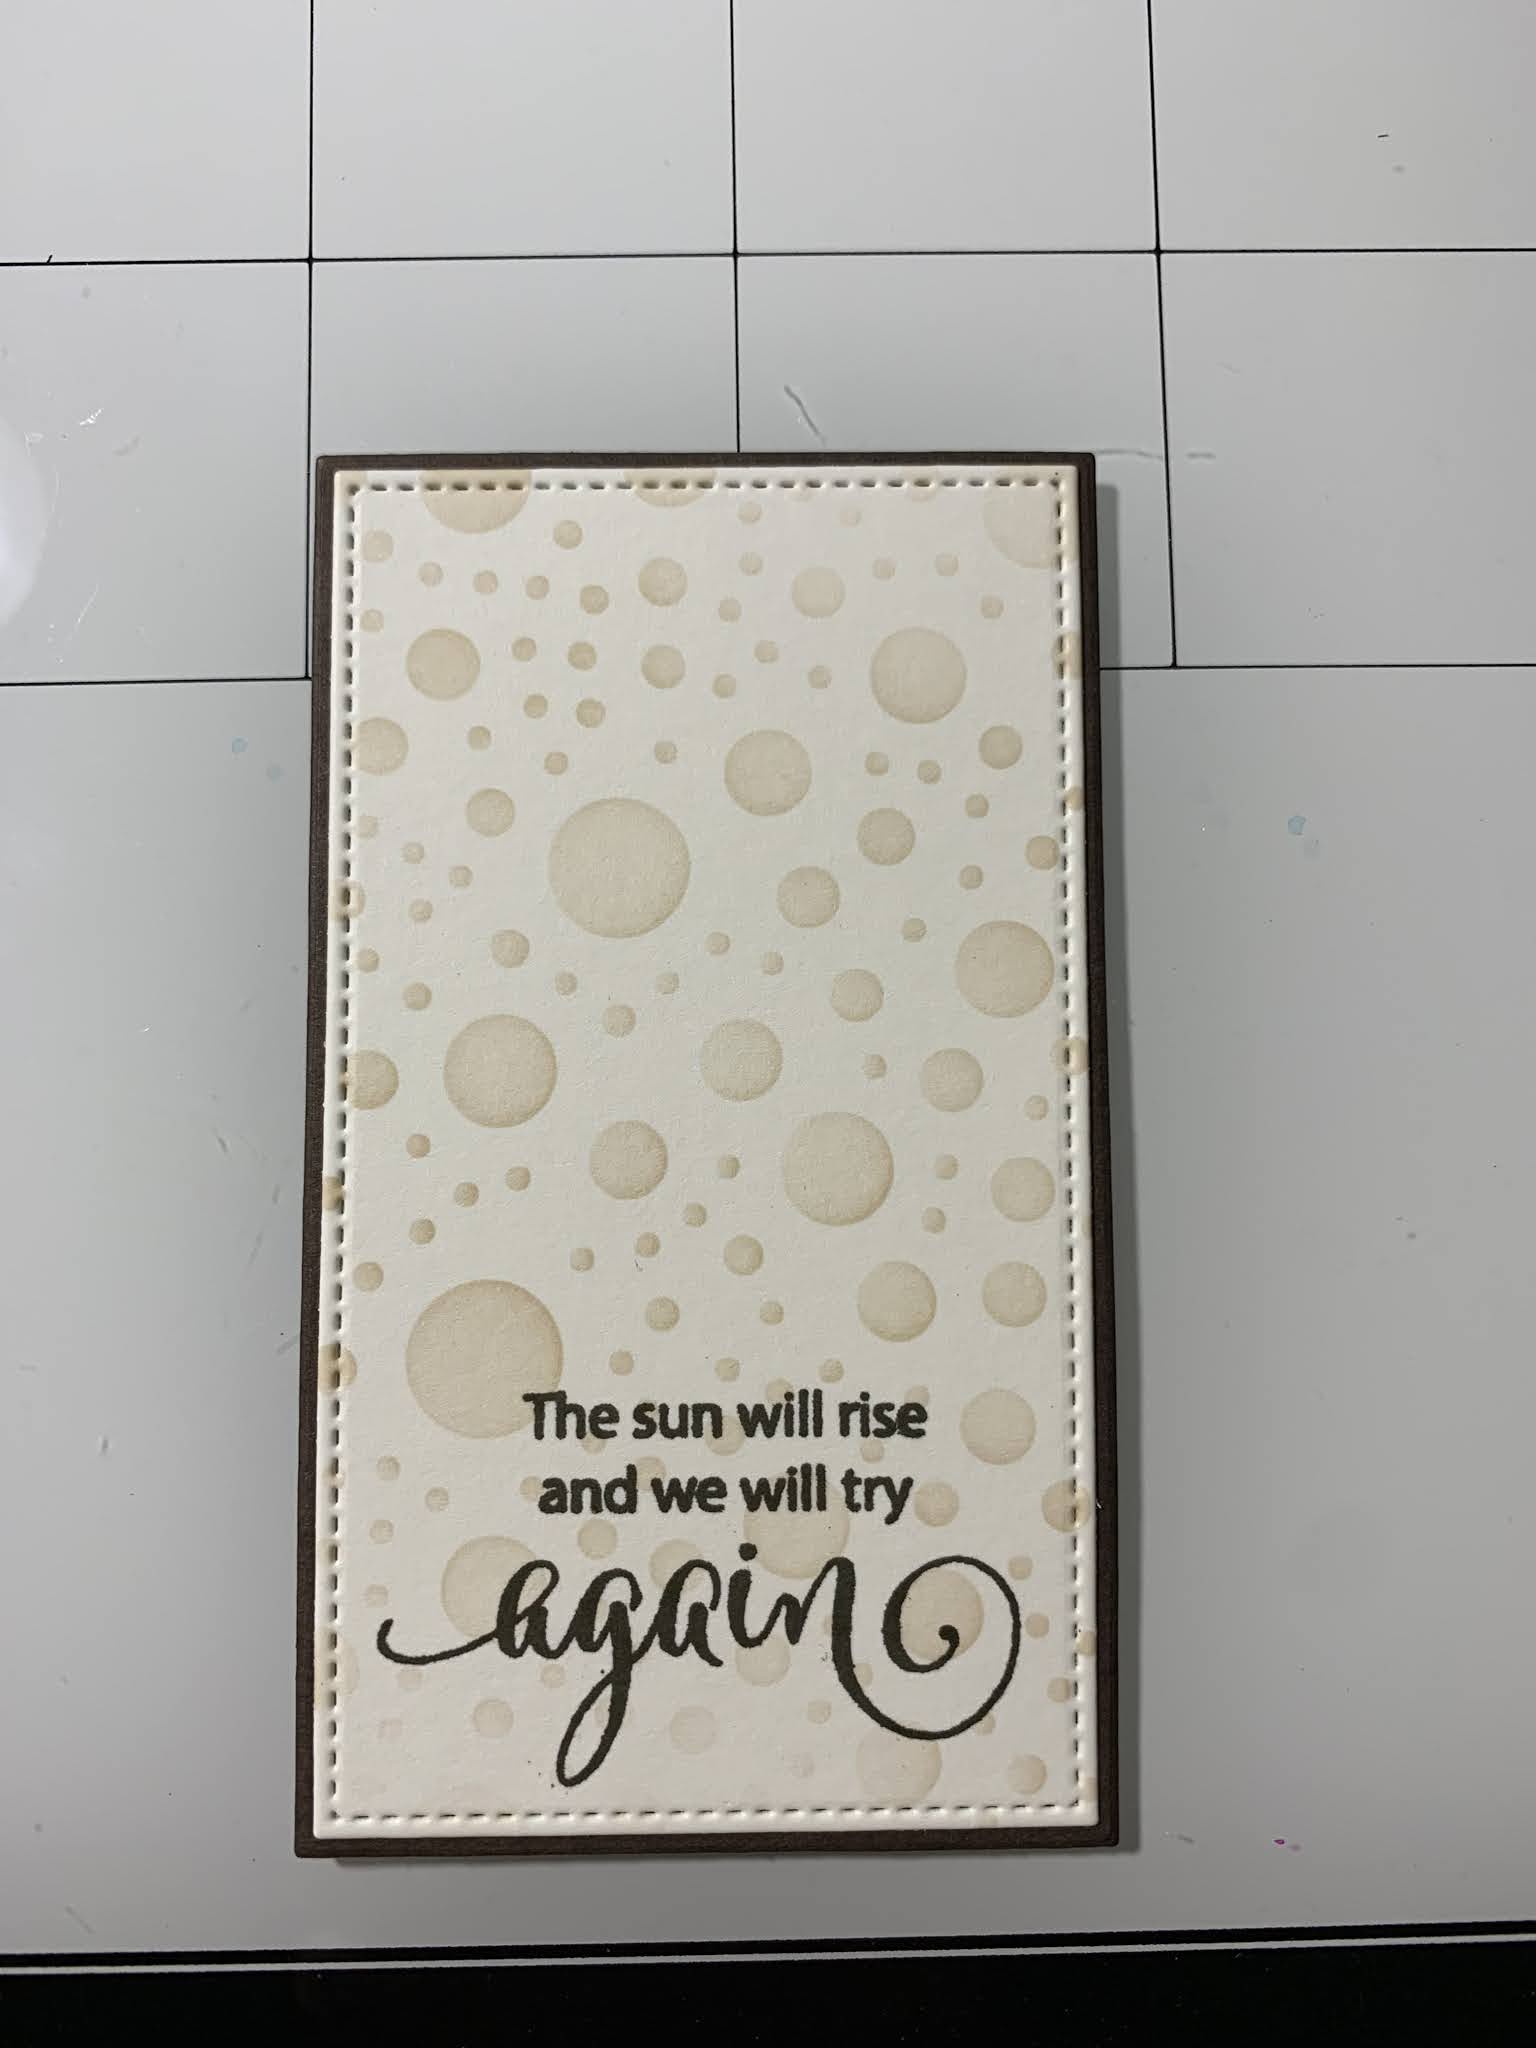
Next, I place a piece of 5 1/2" x 8 1/2" Innocent Pink Cardstock into my Scor Buddy and score it at 4 1/4" creating a side fold card base. Using Terrific Tape, I adhere my kraft panel onto the card base. I add Foam Tape to the back of the sentiment panel and mount it onto the kraft panel.


For my image, I place a piece of Vellum into my MISTI and prep it with my Anti Static Powder Bag. I then choose an image from the Lovely Lotus Stamp Set and stamp it onto the Vellum with Versamark Ink. I add Gold Embossing Powder and heat set with my Heat Tool (see *** at the end of this paragraph). I then place the vellum back into my MISTI and again prep with my Anti Static Powder Bag. I line up the detail stamp for this image from the same stamp set and stamp with Versamark Ink, add Gold Embossing Powder and heat set with my Heat Tool. ***Very important when embossing twice for the same image... I heat up my heat tool for a good 30 seconds so the heat is good and hot then heat my image in very short spurts, enough to melt the powder I am directing the heat at then pull the heat away, I am heating the powder just until it begins to melt. I do this until the entire image is embossed. I do the same method with my second embossing of the detail image. The reason I do this is so when I emboss the detail image I'm not overheating my previous embossed outline image. I hope this makes sense.


Using the coordinating dies from the Lovely Lotus Die Set, I cut out my embossed images, running them through my Big Shot. I must say that I am impressed with how easy these dies are to line up and cut out the images with even borders.* I end up not using the lily pad image on my final card.

Now it is time to color my image. I will be using my 36 Count Zig Clean Color Real Brush Markers, listing the color numbers. Coloring on the back side of the image, I add 025-Pink to the base of my first petal. I then take 021-Light Carmine to color in the rest of the petal then blend into the previous darker color. I repeat this process for each petal until my flower is completed. ***For the final card, I decided the color shades didn't look right for my card, so I embossed another image and colored with 026-Light Pink for the darker color and 028-Pale Pink for the lighter color. This color combo was a much better match for the final card. The pictures below show the darker shades which I ended up not using.


To adhere my vellum image to my card I use Zots Adhesive Dots. Normally adhesives show through vellum, but by using this tiny glue dots and placing them strategically behind the detailed embossed areas they are not visible. I use my Jewel Picker to add Water Droplets with Liquid Glue and this completes my card.


I hope you enjoyed today's card project. Coloring on vellum is another fun technique that produces color and also allows the image to be transparent when using light colors. I love the different layers created with soft colors giving both panels a subtle design without being too distracting. The more I use this stencil the more it is becoming my favorite!!
If this is the first time visiting my blog, welcome and I hope you return. If you are a returning visitor, thank you so much for your support!
Should you have any questions or comments please leave them in the comments section. I'd love to hear from you and what you thought about today's card.
If you would like to be notified by email each time I post something new to my blog, you can click on the subscribe button at the top of the page. *Be sure to verify your subscription through the email link to activate. There is also a follow button that you can click on located below my profile if you would like to follow my blog.
Thank you for visiting and I hope you come back soon!
Happy Stamping and God bless!!
Jeannie
This card is stunning! I have never embossed on vellum. Thanks for sharing
ReplyDeleteLinda Abel
I really enjoyed your detailed explanation. Do you find that Zig works better on Velum than Copic?
ReplyDeleteThank you Mel!! Yes, I do find that Zigs work better on the vellum. I just tried the Copics and they did not do well at all.
DeleteBeautiful card. I've never stamped or embossed on vellum, so thanks for the tips. I always appreciate your very detailed instructions.
ReplyDeleteThank you Judy!!
DeleteJust stunning! Love the Vellum great idea. Thanks for sharing.
ReplyDeleteThank you Patricia!!
DeleteFabulous card! SAw it on FB and had to come and take a closer look, Jo x
ReplyDeleteThank you Jo!! I appreciate you stopping by my blog!
DeleteGorgeous card, love the color combination. Thanks for sharing the directions on how you did it.
ReplyDeleteThank you!!
DeleteAwesome card and such wonderful instructions! Do you make any instruction videos?
ReplyDeleteThank you Sarah!! I do not make videos right now, but hope to in the future!
DeleteYour cards are so beautiful! This pink lotus is stunning. I love it! I have to ask, are you a professional artist or designer? You are very talented. Thank you for sharing your creations and great tutorials!
ReplyDeleteThank you Elaine!! The lotus stamp set is just beautiful! You are too kind... no, I am not a professional, it's been my hobby for over 20 years. I'm happy you enjoy my blog. :)
Delete