
Beautiful Butterflies


Hello, welcome to my blog!!

I want to start out by thanking everyone for the support and nice comments you all leave for me. I truly appreciate the support of this blog!! I enjoy card making and bringing my creations to you, this wouldn't be possible without your support, so again, thank you!!!

I am so excited to announce that I have been chosen this month as a guest designer for Gina K. Designs for their brand new release!! Just released tonight is a huge release of new products, including a brand new kit! Gina's kits are amazing, packed with stamp sets, dies, cardstock and more!! These kits are a great value and once they sell out, they will not be restocked. With the release of today's new kit, that means all of the items from last month's kit are now available individually!! I suggest that you get them now while you can before they sell out again. I have a banner located at the bottom right side of my blog that takes you directly to Gina's store if you are interested. *Affiliate links used at no additional cost to you. Thank you for your support!!

***This stamp set has sold out, which I am not surprised as it is an incredible set! If you missed out, you are in luck, Gina has more on order already!! Be sure to click on the "notify me" button for the Beautiful Butterflies stamp set and you will be the first to know when they are back in stock.

I have created two cards each for three of Gina's new stamp sets. For the next three days, I will be posting my cards. Tonight I start by making two cards from the Beautiful Butterflies stamp set using the coordinating dies. For my first card, I create a quick and simple card by using one of the butterfly images to stamp a rainbow of colors. I then pop up one of the butterflies for a sentiment focal image. For my second card, I will be doing some ink blending then adding white pigment ink using a stencil over the inked background. This adds soft detail to the background, giving it some interest. I will be using the Master Layouts 1 die set to layer my panels and also to create a layered look for my greeting. I will finish off my card with an ink blended die cut butterfly.  Let's get started!!


I will be doing all of my work today on my Tim Holtz Glass Media Mat.

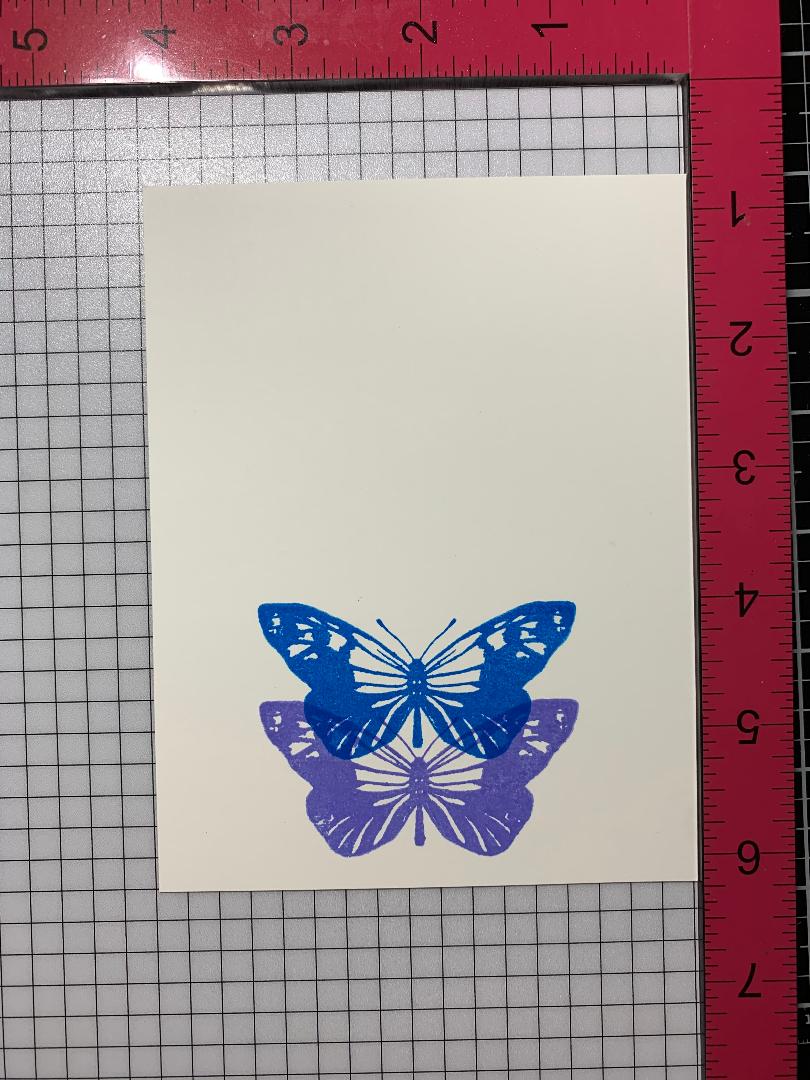
To start, I cut a 4 1/4" x 5 1/2" panel out of  White Cardstock using my Tim Holtz Guillotine Paper Trimmer. Next, I place the panel into the top right corner of my MISTI Stamp Positioner. Taking a stamp from the Beautiful Butterflies Stamp Set, I place it in the center, towards the bottom of the panel. I then stamp it using Wild Lilac Ink.


Leaving my stamp attached to my MISTI door, and before stamping my next color, I shift my panel down 3/4". I now stamp my imaging using Blue Raspberry Ink. 
I again shift my panel down 3/4" and stamp using Grass Green Ink.
I shift the panel down 3/4" and stamp using Wild Dandelion Ink.
I shift the panel down 3/4" and stamp using Sweet Mango Ink.
I shift the panel down 3/4" one more time and stamp using Passionate Pink Ink. My images are now overlapped and evenly stamped down the panel.

Using my Guillotine Paper Trimmer, I cut 1/2" off from each side of the panel. I then cut out of Black Cardstock a panel that measures 3 1/2" x 5 1/2" then adhere my stamped panel onto it using Terrific Tape.

Next, using my Scor Buddy, I take a 4 1/4" x 11" piece of Passionate Pink Cardstock and score at 5 1/2", this creates a top folding card base. I add Foam Tape to the back of my panel and mount onto the card base.

Next, using the same stamp, I stamp the butterfly in Wild Dandelion Ink. I then stamp a sentiment over the stamped image using Amalgam Obsidian Ink

I cut the image out using the coordinating die from the Beautiful Butterflies Die Set, running them through my Big Shot Die Cut Machine. I add Foam Tape and mount over the yellow stamped image on the front of my card. I use my Jewel Picker to add colored gems from my stash using Liquid Glue and this completes my first card.


For my second card, I start by taking the smaller rectangle die from the Master Layouts 1 Die Set and cut out of White Cardstock, running them through my Big Shot Die Cut machine. Using my Blender Brushes, I blend Wild Dandelion Ink onto the top third of my panel, fading out towards the middle.
Next, I blend Sweet Mango Ink onto the center of my panel blending back into the previous color and fading out towards the bottom of the panel.
For my third and final color, I blend Passionate Pink Ink onto the bottom of my panel blending back into the previous color. I then go back through each color and blend where each color meets to soften the blends.

Next, I take my Ornamental Fans Stencil and lightly spray with Pixie Spray, let it dry for a few minutes then adhere over my blended panel. I then tape the stencil down onto my work surface using Purple Tape.
With a Blender Brush, I blend White Pigment Ink over the entire stencil covering up the inked areas. I then carefully remove the stencil and allow the panel to dry while I work on the rest of my card.


Taking the biggest rectangle from the Master Layouts 1 Die Set, I cut out of Black Onyx Cardstock, running them through my Big Shot. Using Terrific Tape, I adhere my blended panel onto the black panel.
I now use the oval die from the Master Layouts 1 Die Set and cut out of White Cardstock and take the scalloped oval die from the same die set and cut out of Black Onyx Cardstock, running them through my Big Shot.
Using my Blender Brush, I blend Sweet Mango Ink around the oval die cut, fading out towards the center. I then place the oval die into my MISTI Stamp Positioner and stamp a greeting from the Fancy Greetings Stamp Set using Amalgam Obsidian Ink.


Using Liquid Glue, I adhere my stamped oval die cut onto the scalloped die cut. I then adhere my oval die cuts onto the blended panel. Sorry, I forgot to take a picture!
To create a top folding card base, I place a 4 1/4" x 11" piece of Sweet Mango Cardstock into my Scor Buddy and score at 5 1/2". I then mount my blended panel onto it using Terrific Tape.

Next, I take a piece of scrap white cardstock and using my Blender Brushes, I blend Wild Dandelion Ink towards the top and fade out towards the center of the panel. I then blend Sweet Mango Ink onto the center, blending back into the previous color and fade out towards the bottom. Finally, I blend Passionate Pink Ink onto the bottom, fading back into the previous color.


I place the blended piece into my MISTI and stamp an image from the Beautiful Butterflies Stamp Set using Amalgam Obsidian Ink.

Using the coordinating die from the Beautiful Butterflies Die Set, I line it up over my stamped image and hold it in place using Purple Tape. I then cut out the butterfly, running them through my Big Shot. I add Foam Tape to the back and mount onto my card front just below the greeting and this finishes my second card.


I hope you enjoyed these two cards using the Beautiful Butterflies stamp set. This set has so many different butterflies to choose from along with sweet sentiments which makes this set great from many occasions! There are also 11 coordinating dies available for this set . I hope you return tomorrow, when I will be creating two more cards using the Welcome Home stamp set!!

If this is the first time visiting my blog, welcome and I hope you return. If you are a returning visitor, thank you so much for your support!

Should you have any questions or comments please leave them in the comments section. I'd love to hear from you and what you thought about today's card.

If you would like to be notified by email each time I post something new to my blog, you can click on the subscribe button at the top of the page. *Be sure to verify your subscription through the email link to activate. There is also a follow button that you can click on located below my profile if you would like to follow my blog.

Thank you for visiting and I hope you come back soon!

Happy Stamping and God bless!!

Jeannie

Comments

Popular posts from this blog

Shadow Stamping With Stencils

Hello, welcome to my blog!! ***I wanted to let everyone know that Scrapbook.com has kicked off Freebie February!! Every couple of days they will be offering free items along with great sales! Check often as the sales will be frequently changing. I have placed a store logo on the front page of my blog just down below my profile that brings you directly to their store!    *I know die cut machines can be a bigger investment, but if you are in need of one and looking for a good price, Scrapbook.com has some really good prices on Big Shots -  stand alone  machines and bundles.   Today's card project is similar to yesterday's blog post using the shadow stamping technique, but today, I will be using a stencil. I will be using kraft cardstock as well as black cardstock. This is a fun technique to use on any color of cardstock. I wanted to show the look on a light colored cardstock vs a dark color. The key to using any color of cardstock is to first lay down white pigment ink follo

Love & Birthday Wishes - A Little Love Layering Stencils

  Hello, welcome to my blog!!  I want to start out by thanking everyone for the support and nice comments you all leave for me. I truly appreciate the support of this blog!! I enjoy card making and bringing my creations to you, this wouldn't be possible without your support, so again, thank you!! *Affiliate links are used at no additional cost to you. When you purchase products through my links I receive a small commission from these sales, thank you so much for your support, it is greatly appreciated!! For everyone that has been waiting for the A Little Love Layering Stencil Bundle - from Gina K. Designs, it is now back in stock!!! ***This "Love die" is also available for purchase on it's own! Love And Shadow Die Also back in stock are the Blending Brushes !! I used the stencil bundle to create today's card by doing simple blending and adding dimension with stacked die cuts. I love the many color combinations that can be used with this set! I love using gray to

Embossing With Stencils

Hello, welcome to my blog! Today's card project focuses on heat embossing with stencils. Stencils are great for ink blending and are economical. Did you know you can also heat emboss with your stencils? I am showing an example of white heat embossing, but you could also ink blend your stencil then heat emboss with clear embossing powder, if you don't mind getting your embossing pad dirty. Some people have a clean embossing pad dedicated for embossing only, and another embossing pad that they use for different techniques that may get the pad dirty. Let's get started!! To start, I cut a 4 1/4" x 5 1/2" white Neenah cardstock panel using my Tim Holtz Guillotine paper trimmer. I add Gina K. Designs Adhesive Dot Runner  to the corners on the back side of my white card panel to temporarily hold it down onto my Tonic Studios Tim Holtz Glass Media Mat . Next, I prep my panel with my Anti Static powder bag. I then place my Gina K. Designs Water Droplets stencil