Hello, welcome to my blog!
Sorry about my MIA, what I thought was a cold coming on last week ended up being the flu! After many days of rest, I think things are finally headed in the right direction.
***I wanted to let everyone know that Scrapbook.com has kicked off Freebie February!! Every couple of days they will be offering free items along with great sales! Check often as the sales will be frequently changing. I have placed a store logo on the front page of my blog just down below my profile that brings you directly to their store!
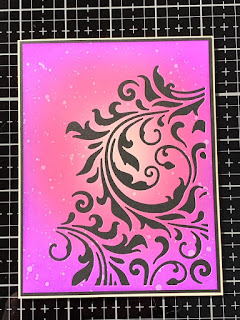
Today's card project is a simple ink blended panel with a large detailed flourish die that allows black cardstock to show through. I love using black cardstock against bright colors, it really makes the colors pop and gives a rich look. Let's get started on today's card!!

To start I take a 4" x 5 1/4" Neenah white cardstock panel to do my ink blending. I will be using Distress Oxide inks. Using my Blender Brushes, I start with Spun Sugar followed by Picked Raspberry then Wilted Violet. I blend into the previous color when adding another color. As you can see, the first layer of colors is pretty light and splotchy. The key to getting a good blend, whether it be with oxides or regular dye inks is to work in layers. I usually come back with each color 3 or 4 times until I achieve the vibrancy I am looking for. Also, I always start with a very light hand when blending ink to avoid harsh lines, being sure to blend into the previous colors.


Next, I add some water droplets using a small paintbrush with clean water. I then add some white gold metallic paint spatters using Gansai Tambi Starry paints.


Once the droplets are completely dry, I use the Sizzix Tim Holtz Alterations Mixed Media 2 die with my inked panel and run it through my Big Shot die cut machine. After removing all of the pieces from my cut panel, I use Gina K. Designs Connect liquid glue and attach onto a 4 1/8" x 5 3/8" black cardstock panel then attach to a 4 1/4" x 5 1/2" white card base.


Using my MISTI stamp positioner, I stamp a greeting from Simon Says Stamp Tiny Words using Versamark ink. I emboss using Ranger Super Fine white embossing powder and heat set with my Wagner heat tool. Next, I use Simon Says Stamp Sentiment Label dies to cut out my greeting. I attach the sentiment to the front of my card and add some Water Droplets for embellishment and this completes my card.

This was a simple, fun card to make. This is a great die that gives nice interest to a card and also works great to create a shaker card with all of the pretty bits shaking through the flourishes. The die can be used in both portrait or landscape orientations.
Sorry about my MIA, what I thought was a cold coming on last week ended up being the flu! After many days of rest, I think things are finally headed in the right direction.
***I wanted to let everyone know that Scrapbook.com has kicked off Freebie February!! Every couple of days they will be offering free items along with great sales! Check often as the sales will be frequently changing. I have placed a store logo on the front page of my blog just down below my profile that brings you directly to their store!
Today's card project is a simple ink blended panel with a large detailed flourish die that allows black cardstock to show through. I love using black cardstock against bright colors, it really makes the colors pop and gives a rich look. Let's get started on today's card!!

To start I take a 4" x 5 1/4" Neenah white cardstock panel to do my ink blending. I will be using Distress Oxide inks. Using my Blender Brushes, I start with Spun Sugar followed by Picked Raspberry then Wilted Violet. I blend into the previous color when adding another color. As you can see, the first layer of colors is pretty light and splotchy. The key to getting a good blend, whether it be with oxides or regular dye inks is to work in layers. I usually come back with each color 3 or 4 times until I achieve the vibrancy I am looking for. Also, I always start with a very light hand when blending ink to avoid harsh lines, being sure to blend into the previous colors.


Next, I add some water droplets using a small paintbrush with clean water. I then add some white gold metallic paint spatters using Gansai Tambi Starry paints.


Once the droplets are completely dry, I use the Sizzix Tim Holtz Alterations Mixed Media 2 die with my inked panel and run it through my Big Shot die cut machine. After removing all of the pieces from my cut panel, I use Gina K. Designs Connect liquid glue and attach onto a 4 1/8" x 5 3/8" black cardstock panel then attach to a 4 1/4" x 5 1/2" white card base.


Using my MISTI stamp positioner, I stamp a greeting from Simon Says Stamp Tiny Words using Versamark ink. I emboss using Ranger Super Fine white embossing powder and heat set with my Wagner heat tool. Next, I use Simon Says Stamp Sentiment Label dies to cut out my greeting. I attach the sentiment to the front of my card and add some Water Droplets for embellishment and this completes my card.

This was a simple, fun card to make. This is a great die that gives nice interest to a card and also works great to create a shaker card with all of the pretty bits shaking through the flourishes. The die can be used in both portrait or landscape orientations.
If this is the first time visiting
my blog, welcome and I hope you return. If you are a returning visitor, thank
you so much for your support!
Should you have any questions or
comments please leave them in the comments section. I'd love to hear from you
and what you thought about today's card.
If you would like to be notified by
email each time I post something new to my blog, you can click on the subscribe
button at the top of the page.
Thank you for visiting and I hope
you come back soon!
Happy Stamping!!
Jeannie
Comments
Post a Comment