Hello, welcome to my blog!!
***I wanted to let everyone know that Scrapbook.com has kicked off Freebie February!! Every couple of days they will be offering free items along with great sales! Check often as the sales will be frequently changing. I have placed a store logo on the front page of my blog just down below my profile that brings you directly to their store!
*I know die cut machines can be a bigger investment, but if you are in need of one and looking for a good price, Scrapbook.com has some really good prices on Big Shots - stand alone machines and bundles.
Today's card project focuses on alcohol inks on Yupo paper. I will be using three different colors of alcohol ink and also, a gold mixative. In place of blending solution, I will be using 91% isopropyl alcohol which can be found at any pharmacy and is very inexpensive. I will be laying down my ink on Yupo paper, which is a synthetic, plastic type of paper and is nonporous. Instead of an air aspirator type tool I will be using a hair dryer on the lowest speed to move my ink around.
***I watched a Jennifer McGuire video that had guest artist Mindy Eggen doing this technique. You can watch that video HERE.
Alcohol inks come in many colors. There are regular alcohol inks and pearl alcohol inks which have a shimmer mixed into them and are bright. Today, I will be using regular alcohol ink. I will also be using a gold mixative that when added with alcohol ink will mix into the ink. Just released is a metallic Alloy, that from my understanding breaks up and creates metallic "edges" to alcohol ink colors and gives a beautiful look. I haven't purchased the Alloys yet, but I am very excited to get my hands on them and give them a try!! You can go to YouTube and type in "Alcohol Alloy" and find videos of Tim Holtz demonstrating the Alloys and how they work.
Let's get started on today's project!!

To start, I take a panel of Yupo paper, isopropyl alcohol, alcohol inks and a gold mixative. I will be doing all of my work on my Tim Holtz Glass Media Mat. I love working on my glass mat as no matter what product I am using, clean up is a breeze! I start by dropping a couple of drops of Pool and a drop of Sailboat Blue alcohol ink onto the Yupo paper, I also add a couple of drops of isopropyl alcohol. I then take my hair dryer and blow the color around on low speed.


Next, I add a drop of Gold Mixative and also a drop or two of isopropyl alcohol. Again, I blow it around with my hair dryer on low speed.


The following pictures show this same process as above with the results. I also add in Mermaid alcohol ink.


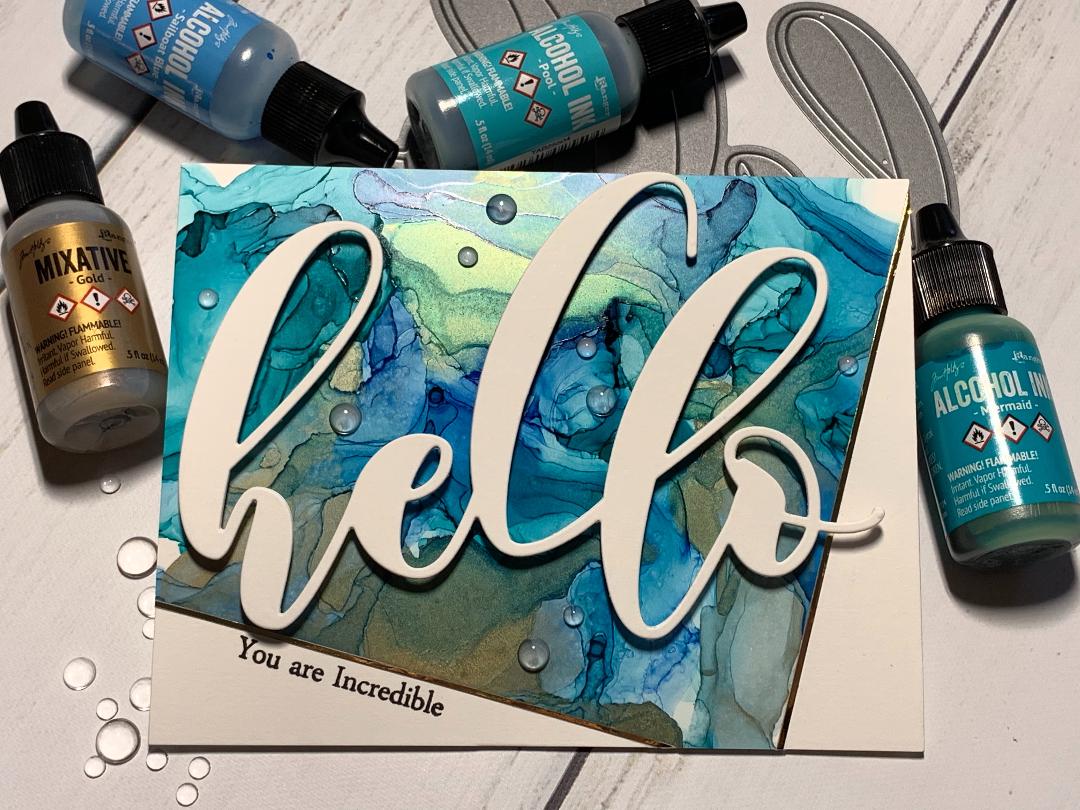
After I'm satisfied with the look of my panel, I decide how I want to mount it onto my card base and trim down the inked panel using my Tim Holtz Guillotine paper trimmer. I adhere the trimmed panel onto a Neenah white card base using Liquid Glue.


Next, I trim two very thin strips of Gold Mirror cardstock with my paper trimmer and run a thin line of liquid glue against the two edges of my inked panel and press the strips into place.


I now place the card into my MISTI stamp positioner to stamp a sentiment. Using a stamp from Persian Motifs, I line it up along the left edge of the inked panel and stamp with Versafine Clair Nocturn ink.

Lastly, I take my Mega Hello die with white cardstock and run them through my Big Shot two times. I then stack the two dies and glue together. I add thin Foam Strips to the back of the Hello die along the thick areas and mount onto my card front. I use liquid glue to attach Water Droplets and my card is finished.


I hope you enjoyed today's card. Making alcohol ink backgrounds is a lot of fun and no two are ever the same! Using metal dies of different shapes to cut from the inked backgrounds can give beautiful results also. If you own alcohol inks and haven't used them for a while, dig them out and have some fun! If you've never tried using alcohol inks I encourage you to give it a try, and see for yourself how easy it is to make beautiful backgrounds! ***One thing I'd like to mention... I used liquid glue to attach my water droplets, next time I may try using small amounts of Glossy Accents when adhering to Yupo. I think because they were mounted on Yupo paper, the glue isn't getting as much air to dry? The glue isn't drying as fast as being mounted on cardstock, 4 hours later and they are still a little cloudy. When the glue dries, they will be crystal clear.
If this is the first time visiting my blog, welcome and I hope you return. If you are a returning visitor, thank you so much for your support!
Should you have any questions or comments please leave them in the comments section. I'd love to hear from you and what you thought about today's card.
If you would like to be notified by email each time I post something new to my blog, you can click on the subscribe button at the top of the page.
Thank you for visiting and I hope you come back soon!
Happy Stamping!!
Jeannie
***I wanted to let everyone know that Scrapbook.com has kicked off Freebie February!! Every couple of days they will be offering free items along with great sales! Check often as the sales will be frequently changing. I have placed a store logo on the front page of my blog just down below my profile that brings you directly to their store!
*I know die cut machines can be a bigger investment, but if you are in need of one and looking for a good price, Scrapbook.com has some really good prices on Big Shots - stand alone machines and bundles.
Today's card project focuses on alcohol inks on Yupo paper. I will be using three different colors of alcohol ink and also, a gold mixative. In place of blending solution, I will be using 91% isopropyl alcohol which can be found at any pharmacy and is very inexpensive. I will be laying down my ink on Yupo paper, which is a synthetic, plastic type of paper and is nonporous. Instead of an air aspirator type tool I will be using a hair dryer on the lowest speed to move my ink around.
***I watched a Jennifer McGuire video that had guest artist Mindy Eggen doing this technique. You can watch that video HERE.
Alcohol inks come in many colors. There are regular alcohol inks and pearl alcohol inks which have a shimmer mixed into them and are bright. Today, I will be using regular alcohol ink. I will also be using a gold mixative that when added with alcohol ink will mix into the ink. Just released is a metallic Alloy, that from my understanding breaks up and creates metallic "edges" to alcohol ink colors and gives a beautiful look. I haven't purchased the Alloys yet, but I am very excited to get my hands on them and give them a try!! You can go to YouTube and type in "Alcohol Alloy" and find videos of Tim Holtz demonstrating the Alloys and how they work.
Let's get started on today's project!!
To start, I take a panel of Yupo paper, isopropyl alcohol, alcohol inks and a gold mixative. I will be doing all of my work on my Tim Holtz Glass Media Mat. I love working on my glass mat as no matter what product I am using, clean up is a breeze! I start by dropping a couple of drops of Pool and a drop of Sailboat Blue alcohol ink onto the Yupo paper, I also add a couple of drops of isopropyl alcohol. I then take my hair dryer and blow the color around on low speed.


Next, I add a drop of Gold Mixative and also a drop or two of isopropyl alcohol. Again, I blow it around with my hair dryer on low speed.


The following pictures show this same process as above with the results. I also add in Mermaid alcohol ink.


After I'm satisfied with the look of my panel, I decide how I want to mount it onto my card base and trim down the inked panel using my Tim Holtz Guillotine paper trimmer. I adhere the trimmed panel onto a Neenah white card base using Liquid Glue.


Next, I trim two very thin strips of Gold Mirror cardstock with my paper trimmer and run a thin line of liquid glue against the two edges of my inked panel and press the strips into place.


I now place the card into my MISTI stamp positioner to stamp a sentiment. Using a stamp from Persian Motifs, I line it up along the left edge of the inked panel and stamp with Versafine Clair Nocturn ink.

Lastly, I take my Mega Hello die with white cardstock and run them through my Big Shot two times. I then stack the two dies and glue together. I add thin Foam Strips to the back of the Hello die along the thick areas and mount onto my card front. I use liquid glue to attach Water Droplets and my card is finished.


I hope you enjoyed today's card. Making alcohol ink backgrounds is a lot of fun and no two are ever the same! Using metal dies of different shapes to cut from the inked backgrounds can give beautiful results also. If you own alcohol inks and haven't used them for a while, dig them out and have some fun! If you've never tried using alcohol inks I encourage you to give it a try, and see for yourself how easy it is to make beautiful backgrounds! ***One thing I'd like to mention... I used liquid glue to attach my water droplets, next time I may try using small amounts of Glossy Accents when adhering to Yupo. I think because they were mounted on Yupo paper, the glue isn't getting as much air to dry? The glue isn't drying as fast as being mounted on cardstock, 4 hours later and they are still a little cloudy. When the glue dries, they will be crystal clear.
If this is the first time visiting my blog, welcome and I hope you return. If you are a returning visitor, thank you so much for your support!
Should you have any questions or comments please leave them in the comments section. I'd love to hear from you and what you thought about today's card.
If you would like to be notified by email each time I post something new to my blog, you can click on the subscribe button at the top of the page.
Thank you for visiting and I hope you come back soon!
Happy Stamping!!
Jeannie
Comments
Post a Comment