Hello again, and welcome back!
I want to share with you today, a card using alcohol ink pearls. These inks work the same way as regular alcohol inks, but have the added pearl and shine that is just beautiful!! Playing with alcohol ink backgrounds can be so addicting!
Let's get started!!

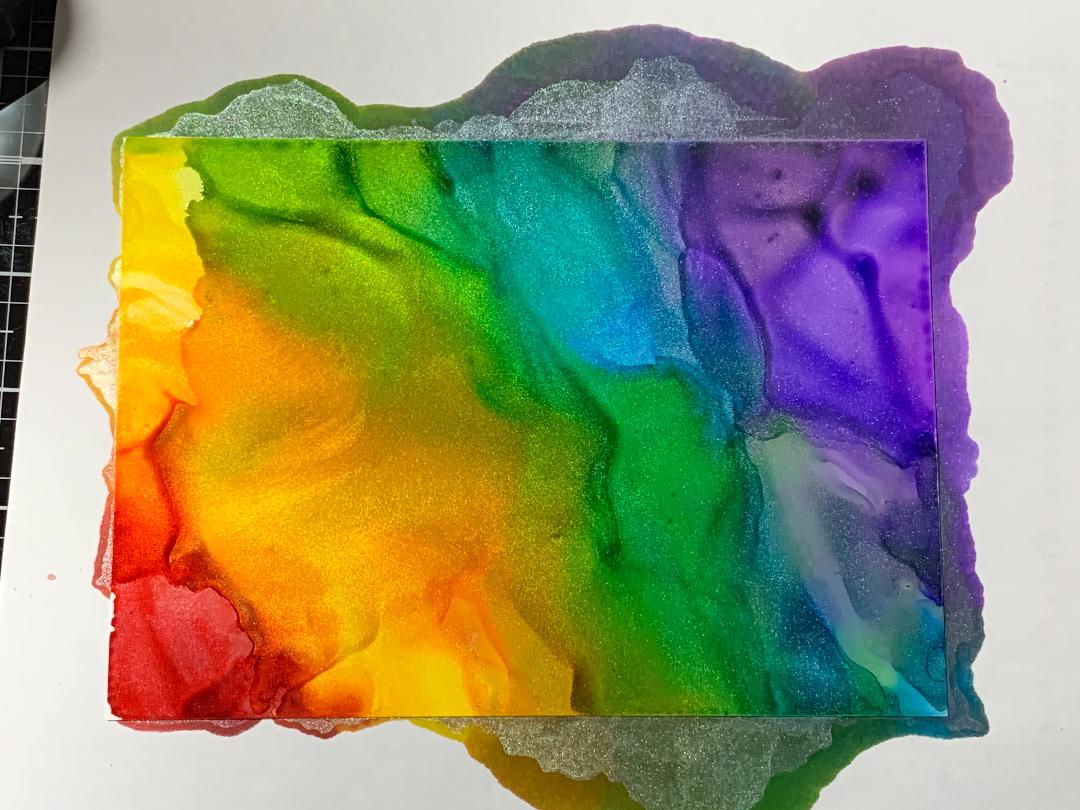
To start out, I need to create a background using the Alcohol Ink Pearls that I will later die cut out for my card. I will be using the inks, Blending Solution and Yupo paper. The blending solutions get the inks really moving on the paper. Yupo is the preferred paper for using alcohol inks. Yupo is actually a synthetic paper that is more of a plastic type paper and really allows the alcohol inks to blend and move beautifully. I will be working on my Tim Holtz Glass Media Mat. I will also put a piece of scrap paper down to help absorb any excess ink. I first apply the ink to the paper, in this case I am choosing to use rainbow order. (Ha! I just noticed I have the yellow and orange out of order, oops!) Next, I add some blending solution over the inks. I then use a marker spritzer to create airflow over the inks to get them moving. You can also use a straw or other air aspirators. After applying the ink and blending solution to the paper, you will want to move rather quickly to get the inks moving before they start to dry. More blending solution can be added to dry areas to get them moving again. Rubbing alcohol can also be used to move the inks. Once I have the look I want, I set the panel aside to completely dry. For any ink that gets onto the glass mat, I just use rubbing alcohol and cotton balls to clean it up.


Next, I cut a 3 3/4" x 5" white panel using Neenah cardstock. I also cut a 3 7/8" x 5 1/8" panel using Taylored Expressions Poppy Seed cardstock. Taking the white panel, I use an embossing folder and run it through my Big Shot die cut machine. *Check the sandwich order needed for your die cut machine to use embossing folders. I then attach the white panel onto the Poppy Seed panel, then attach to a white 4 1/4 " x 5 1/2" card base. ***Here is a link for a similar embossing folder like I used. Mine is a Cuttlebug, but the design looks to be the same on this Darice Burst embossing folder.


After the panel is completely dry, I take my Hero Arts Nesting Dies and cut out a medium sized heart for the back drop of my greeting. I then use Simon Says Stamp Love Shadow Wafer Die and cut the shadow using Poppy Seed cardstock. I then cut the word love out of white cardstock two times. I stack and glue the white love die cuts together using Gina K. Designs Connect Liquid Glue. I then glued them onto the shadow die cut.


Finally, I attach the heart die cut using foam tape to the upper portion of the white embossed panel. I glue the love sentiment onto the heart and white emboss the "You More" greeting onto the same Poppy Seed cardstock as the panel and trim into a strip, then glue down to complete the card.


I hope you enjoyed today's card using Alcohol Ink Pearls. These panels are so fun to make with a different look every time!
***This card idea came from watching different Jennifer McGuire videos. I encourage you to check out her videos, she has many on alcohol inks and is so knowledgeable and full of many tips and tricks!!
Thank you for stopping by and hope you come back soon! If you have any questions or comments, please leave them in the comments section.
Happy Stamping!
Jeannie
I want to share with you today, a card using alcohol ink pearls. These inks work the same way as regular alcohol inks, but have the added pearl and shine that is just beautiful!! Playing with alcohol ink backgrounds can be so addicting!
Let's get started!!

To start out, I need to create a background using the Alcohol Ink Pearls that I will later die cut out for my card. I will be using the inks, Blending Solution and Yupo paper. The blending solutions get the inks really moving on the paper. Yupo is the preferred paper for using alcohol inks. Yupo is actually a synthetic paper that is more of a plastic type paper and really allows the alcohol inks to blend and move beautifully. I will be working on my Tim Holtz Glass Media Mat. I will also put a piece of scrap paper down to help absorb any excess ink. I first apply the ink to the paper, in this case I am choosing to use rainbow order. (Ha! I just noticed I have the yellow and orange out of order, oops!) Next, I add some blending solution over the inks. I then use a marker spritzer to create airflow over the inks to get them moving. You can also use a straw or other air aspirators. After applying the ink and blending solution to the paper, you will want to move rather quickly to get the inks moving before they start to dry. More blending solution can be added to dry areas to get them moving again. Rubbing alcohol can also be used to move the inks. Once I have the look I want, I set the panel aside to completely dry. For any ink that gets onto the glass mat, I just use rubbing alcohol and cotton balls to clean it up.


Next, I cut a 3 3/4" x 5" white panel using Neenah cardstock. I also cut a 3 7/8" x 5 1/8" panel using Taylored Expressions Poppy Seed cardstock. Taking the white panel, I use an embossing folder and run it through my Big Shot die cut machine. *Check the sandwich order needed for your die cut machine to use embossing folders. I then attach the white panel onto the Poppy Seed panel, then attach to a white 4 1/4 " x 5 1/2" card base. ***Here is a link for a similar embossing folder like I used. Mine is a Cuttlebug, but the design looks to be the same on this Darice Burst embossing folder.


After the panel is completely dry, I take my Hero Arts Nesting Dies and cut out a medium sized heart for the back drop of my greeting. I then use Simon Says Stamp Love Shadow Wafer Die and cut the shadow using Poppy Seed cardstock. I then cut the word love out of white cardstock two times. I stack and glue the white love die cuts together using Gina K. Designs Connect Liquid Glue. I then glued them onto the shadow die cut.


Finally, I attach the heart die cut using foam tape to the upper portion of the white embossed panel. I glue the love sentiment onto the heart and white emboss the "You More" greeting onto the same Poppy Seed cardstock as the panel and trim into a strip, then glue down to complete the card.


I hope you enjoyed today's card using Alcohol Ink Pearls. These panels are so fun to make with a different look every time!
***This card idea came from watching different Jennifer McGuire videos. I encourage you to check out her videos, she has many on alcohol inks and is so knowledgeable and full of many tips and tricks!!
Thank you for stopping by and hope you come back soon! If you have any questions or comments, please leave them in the comments section.
Happy Stamping!
Jeannie
Gorgeous card! Now I have to get my inks out and start using them! This is just the nudge I needed, thanks for the step by step tutorial, it is fantastic!
ReplyDeleteThank you Crystal! :)
ReplyDeleteI looked back at this entry to find the name or brand of the embossing folder....
ReplyDeletePat, I didn't link the embossing folder, because I couldn't find it. Mine is by Cuttlebug that I purchased at Joanns years ago. :/
DeletePat!!! After searching around, I could not find the Cuttlebug folder that I used. However, I did find a Darice folder that looks to be the identical match. I have now linked it above in the instructions. I hope this helps. :)
Delete