Hello and welcome back!


Today's project is a simple, yet elegant embossed Christmas card. Using only a background stamp, greeting and ink! This is a card that can easily be mass produced by doing multi panels for each step. In this example I used a turquoise colored cardstock, but any color with somewhat of a lighter, bright hue would be beautiful. So let's get started!

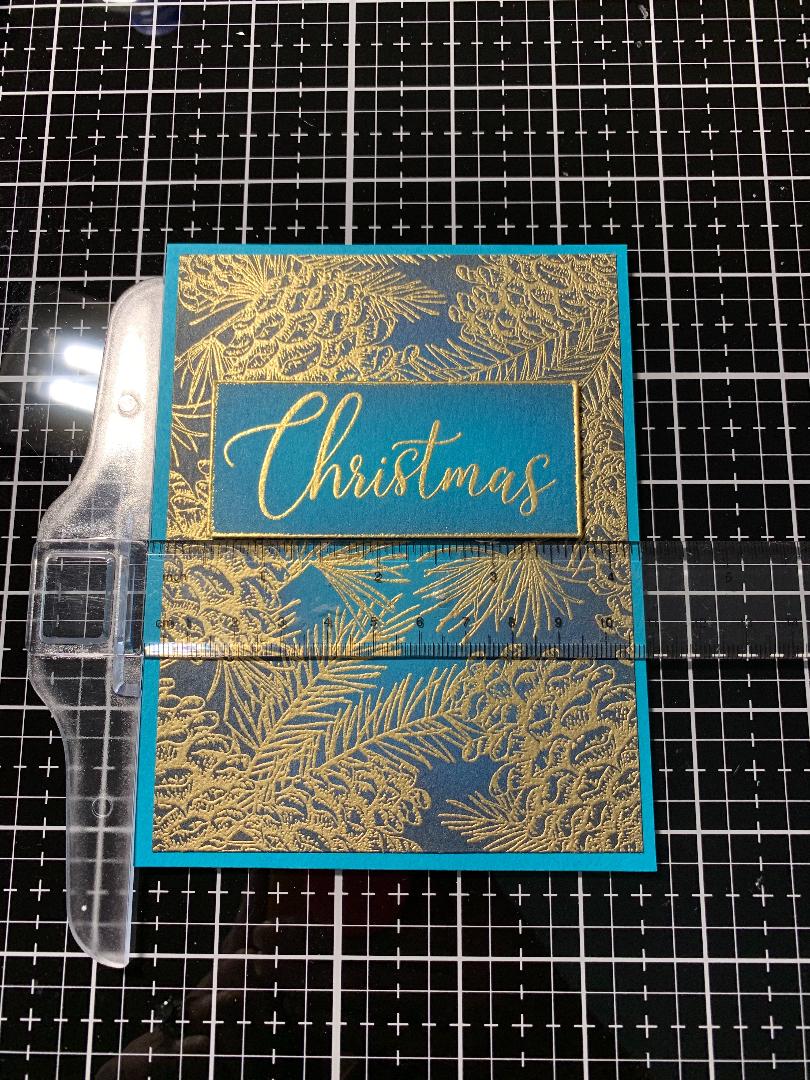
Our first step is to emboss our panel. Here, I used the Pinecone Background Cling Stamp from Simon Says Stamp. I prepped my panel, which measures 4" x 5 1/4" with my anti static powder bag. Using my MISTI stamp platform, I inked my stamp with Versamark embossing ink and stamped it on to my card base. I then poured Gilded embossing powder from Brutus Monroe onto the panel and heat set it with my Wagner heat tool.


Next, we need to add some color shading to our panel for extra depth. Using my Blender Brushes from Taylored Expressions, I use Peacock Feathers Distress Ink to blend my first color, starting on the edges working my way toward the center of the panel. I blend about 1 1/2 inches from each edge leaving the center the original cardstock color.

The second color I blend onto the panel is Chipped Sapphire Distress Ink. I blend this color about an inch from the edge working my way toward the center being careful to use a light hand to blend as this is a much darker color.

The third and final color is Black Soot Distress Ink. With a very light hand, I add the third color. I only want to blend the very edges as I do not want to take away the blue color, I only want to deepen the edges. After adding the Black Soot, I went back to my brush that had the Chipped Sapphire, using the ink that was left on the brush I blended back over the black ink creating a seamless blend.
After all ink blending is complete, I take a soft, dry cloth and gently buff over the embossed image to remove any ink that is sitting on the embossing. I then mounted the panel onto a 4 1/4" x 5 1/2" card base of the same turquoise cardstock.


Next, it's time to create our greeting. I cut the same turquoise colored cardstock down to 3 1/4" x 1 1/2". After treating with my anti static powder bag, I stamped the greeting Christmas and Blessings from the stamp set The Magic Of Christmas from Simon Says Stamp with Versamark ink and again added gold embossing powder and heat set. To add some interest I tapped each edge of the greeting panel onto my Versamark ink pad then poured the same gold embossing powder on all edges and heat set. I again took out my inked brushes and gently blended the Peacock Feathers and Chipped Sapphire around the edges. I took a soft, dry cloth and gently buffed the greeting to remove any ink sitting on the embossed image. Adding foam tape to the back of the greeting, I used my t-square ruler to line it up and placed it on the front of the card.


This completes today's project. I hope you found this card interesting and give it a try. Any background stamp would be good for this type of card and many different greetings can be used for any occasion!
Thank you for stopping by. If you have any questions or comments, please leave them in the comment section.
Have a great day and happy stamping!!
Jeannie
Gorgeous card! I never would have thought to put the Black Soot on the very edges for more depth, but I am definitely going to use that tip! Thanks for sharing!
ReplyDeleteThank you Crystal!
DeleteAwesome card. Thanks for the great details.
ReplyDeleteThank you Judy!!
DeleteBeautiful card!
ReplyDeleteThank you Crissy!
Delete