Hello, welcome back!!
In today's project, I'm going to use one die, making two birthday cards. This is a great way to use the extra die cut pieces and get two cards out of your project.
Let's get started!

To start, I take a 4 1/4" x 5 1/2" panel of white Neenah cardstock and do some ink blending. I use Picked Raspberry, Spiced Marmalade, Squeezed Lemonade, Twisted Citron, Mermaid Lagoon, and Wilted Violet Distressed Ink, applying with jumbo sponge daubers.

I then use the Taylored Expressions Ray Of Sunshine Cover Plate and cut out my ink blending panel and a black panel using Oreo cardstock, running them through my Big Shot die cut machine.
***A tip I suggest is to use a piece of wax paper between the cutting plate and cardstock so that the pieces pop right out - remember to remove the wax paper pieces from the cardstock after running it through your die cut machine.
Next, I remove all of the pieces from the die. To make it easier, I keep the pieces in the order of the die. This helps make it easier to piece them onto the card. I now have the ink blended frame and pieces as well as the black pieces.


Next, I need to create a template to evenly place my blended pieces onto a black panel. I take the black frame that I just cut and lightly spray the back with some Pixie Spray (to create some temporary tack) and line it up over a 4" x 5 1/4" black panel and press it down. Using Gina K. Designs Connect Liquid Glue, I add glue to each well, one at a time and press each blended piece into place. After all pieces are glued and pressed into place, I carefully remove the black frame from the panel. All of the blended pieces are now evenly glued onto our black panel. I now attach this to a 4 1/4" x 5 1/2" Taylored Expressions Lime Zest card base.


Next, I decided that I want to add a little texture and shimmer to my blended panel. I use a little water and Pixie Dust and spatter over the panel using a small paint brush. *This step could have been done in the beginning after creating the blended background, before die cutting.

Now it is time to make the greeting. Out of black cardstock, I die cut a circle frame with Lawn Fawn Stitched Circle Frames. Using Hero Arts Circle Dies, I cut a circle out of vellum that is slightly smaller than the black stitched frame. I then used a Cuttlebug Happy Birthday embossing folder and ran the vellum circle through my Big Shot. To make the word birthday stand out, I glued a blue piece of cardstock cut down to fit behind the vellum. I then glued the edges of the vellum circle and mounted it behind the black stitched frame To complete this card, I glued the greeting onto the front.


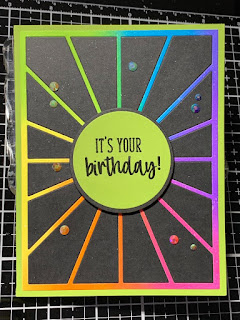
For the second card, I glued the blended frame onto a 4 1/4" x 5 1/2" Lime Zest card base. I then glued all of the black pieces from the previous cut black panel into the blended frame. I then spattered again with Pixie Dust.


Using the Hero Arts circle dies, I cut a circle out of my black cardstock and a slightly smaller circle out of the lime cardstock. I then stamped the greeting with Gina K. Designs Doodle Sayings stamp set using Versafine Clair Nocturne ink and embossed with clear embossing powder. I then glued the greeting to the black circle and using foam tape, attached to the front of the card. To finish off, I added some Jewels From Lucy's Cards.

This finishes off today's cards, I hope you enjoyed them. Using different shades of cardstock or patterned paper can also be used with this die cut and gives a beautiful look.
Thank you for stopping by my blog. If you have any questions or comments, please leave them in the comments section. I hope to see you back tomorrow!
Happy Stamping!!
Jeannie
In today's project, I'm going to use one die, making two birthday cards. This is a great way to use the extra die cut pieces and get two cards out of your project.
Let's get started!


To start, I take a 4 1/4" x 5 1/2" panel of white Neenah cardstock and do some ink blending. I use Picked Raspberry, Spiced Marmalade, Squeezed Lemonade, Twisted Citron, Mermaid Lagoon, and Wilted Violet Distressed Ink, applying with jumbo sponge daubers.

I then use the Taylored Expressions Ray Of Sunshine Cover Plate and cut out my ink blending panel and a black panel using Oreo cardstock, running them through my Big Shot die cut machine.
***A tip I suggest is to use a piece of wax paper between the cutting plate and cardstock so that the pieces pop right out - remember to remove the wax paper pieces from the cardstock after running it through your die cut machine.
Next, I remove all of the pieces from the die. To make it easier, I keep the pieces in the order of the die. This helps make it easier to piece them onto the card. I now have the ink blended frame and pieces as well as the black pieces.


Next, I need to create a template to evenly place my blended pieces onto a black panel. I take the black frame that I just cut and lightly spray the back with some Pixie Spray (to create some temporary tack) and line it up over a 4" x 5 1/4" black panel and press it down. Using Gina K. Designs Connect Liquid Glue, I add glue to each well, one at a time and press each blended piece into place. After all pieces are glued and pressed into place, I carefully remove the black frame from the panel. All of the blended pieces are now evenly glued onto our black panel. I now attach this to a 4 1/4" x 5 1/2" Taylored Expressions Lime Zest card base.


Next, I decided that I want to add a little texture and shimmer to my blended panel. I use a little water and Pixie Dust and spatter over the panel using a small paint brush. *This step could have been done in the beginning after creating the blended background, before die cutting.

Now it is time to make the greeting. Out of black cardstock, I die cut a circle frame with Lawn Fawn Stitched Circle Frames. Using Hero Arts Circle Dies, I cut a circle out of vellum that is slightly smaller than the black stitched frame. I then used a Cuttlebug Happy Birthday embossing folder and ran the vellum circle through my Big Shot. To make the word birthday stand out, I glued a blue piece of cardstock cut down to fit behind the vellum. I then glued the edges of the vellum circle and mounted it behind the black stitched frame To complete this card, I glued the greeting onto the front.


For the second card, I glued the blended frame onto a 4 1/4" x 5 1/2" Lime Zest card base. I then glued all of the black pieces from the previous cut black panel into the blended frame. I then spattered again with Pixie Dust.


Using the Hero Arts circle dies, I cut a circle out of my black cardstock and a slightly smaller circle out of the lime cardstock. I then stamped the greeting with Gina K. Designs Doodle Sayings stamp set using Versafine Clair Nocturne ink and embossed with clear embossing powder. I then glued the greeting to the black circle and using foam tape, attached to the front of the card. To finish off, I added some Jewels From Lucy's Cards.

This finishes off today's cards, I hope you enjoyed them. Using different shades of cardstock or patterned paper can also be used with this die cut and gives a beautiful look.
Thank you for stopping by my blog. If you have any questions or comments, please leave them in the comments section. I hope to see you back tomorrow!
Happy Stamping!!
Jeannie
Love these!! Very colorful cards!
ReplyDeleteThank you Crissy!
DeleteGreat tips & technique! Inspiring! Beautiful, gender neutral cards! 🙏🙌
ReplyDeleteThank you Susan! :)
DeleteI love the “twofer” cards. I totally CASEd this one. Hope you don’t mind!! I’m happy I discovered your blog and IG!
ReplyDeleteThank you Jen! I don't mind at all, I'm happy you enjoyed the cards. Thank you for visiting my blog!! :)
Delete