Hello, welcome to my blog.
As the year winds down, I hope you are enjoying time with family and friends and finding some time for yourself during this busy time of year. Today's project is an anniversary card for my husband that I thought I would share with you. I struggle with masculine cards and coming up with ideas. Today, I will create a wood floor background with a simple die cut greeting.
Let's get started!

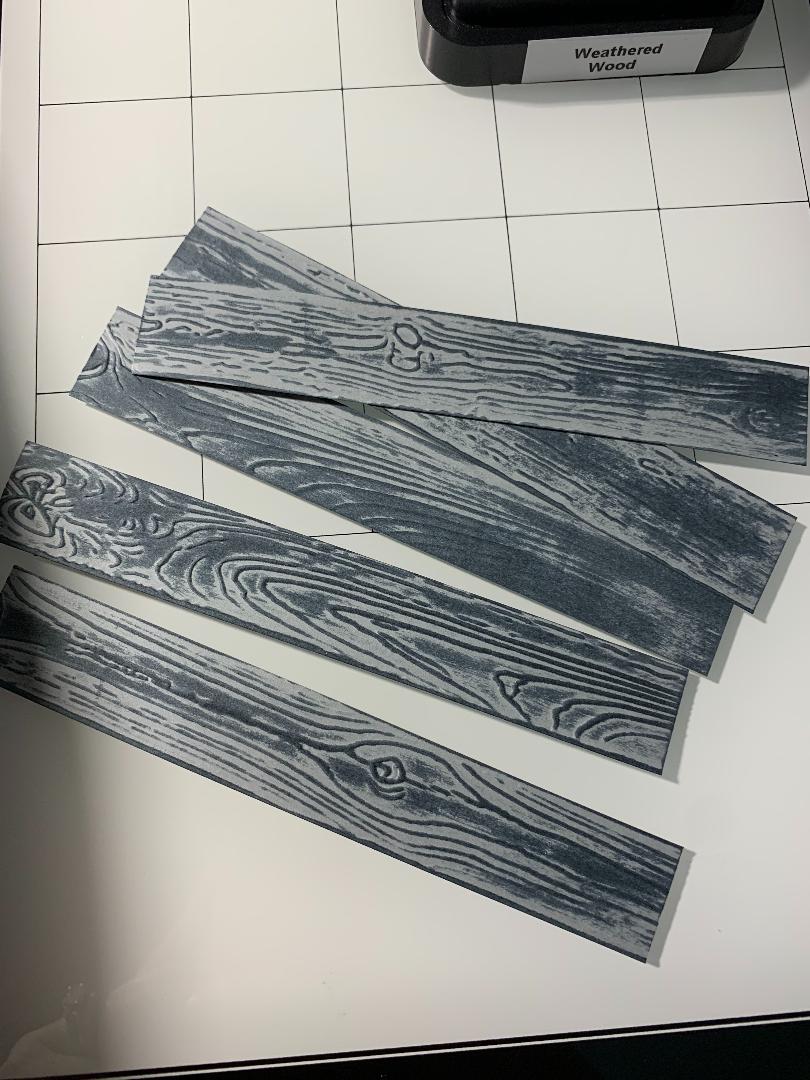
To start, I cut a 4 /1/4" x 5 1/2" panel out of Taylored Expressions Earl Grey cardstock and run it through my Big Shot, using the Pinewood Planks 3D embossing folder from Stampin' Up! ***check your sandwich order with your die cutting machine for 3D folders. Next, I take my Weathered Wood Distress Ink pad and starting at the top right side (I'm right handed) of the embossed panel, I lightly drag it down the length of the planks. You can add as much or as little ink to achieve the look you want. The more pressure you apply to the ink pad, the darker the ink will be. I repeat this process moving toward the left side until all planks have been inked.


For the next step, I use my Tim Holtz Tonic Guillotine paper trimmer and cut the planks apart on the lines at the edge of each plank. Next, I cut each plank into two or three pieces of different lengths to get a staggered look and set aside.


Now it's time to attach the pieces to our card base. I chose Taylored Expressions Poppy Seed cardstock for my card base and made this a side folding card. I chose a dark grey cardstock so that when the planks are mounted, the darker color would show through each area where the planks meet. I start to glue down each plank using Gina K. Designs Connect liquid glue so that I have a little wiggle room to get the planks lined up. I leave a little space between each section that meets, including the next row of planks. I use my T-Square Ruler to make sure each piece is mounted straight. After I have all of the pieces glued down, I use my trimmer to cut off any pieces that overhang.


Now it is time to work on our greeting. I die cut the word Happy from The Stamps Of Life Happy Statement Set two times using Earl Grey and once using Taylored Expressions Oreo cardstock. I use my Connect glue and glue the two Earl Grey dies together, then glue the Oreo die on top, slightly offsetting to create a shadow effect.


Next, using my Taylored Expressions Simple Strips Background and Simple Strips Die, I use the greeting Happy Anniversary. I then mount the Happy die onto my card with the Happy Anniversary strip over the top and my card is finished.

This completes today's project. This is a simple card that you could very easily use for any occasion by switching out the greeting or sentiment.
Come back tomorrow for the final project of 2019! If you have any questions, comments or future projects that you would like to see, please leave them in the comments section.
Thank you so much for visiting my blog, I greatly appreciate it. If you would like to know of future projects, you can subscribe (at the top) to this blog and be notified by email each time a new project is posted.
Happy Stamping!!
Jeannie
As the year winds down, I hope you are enjoying time with family and friends and finding some time for yourself during this busy time of year. Today's project is an anniversary card for my husband that I thought I would share with you. I struggle with masculine cards and coming up with ideas. Today, I will create a wood floor background with a simple die cut greeting.
Let's get started!

To start, I cut a 4 /1/4" x 5 1/2" panel out of Taylored Expressions Earl Grey cardstock and run it through my Big Shot, using the Pinewood Planks 3D embossing folder from Stampin' Up! ***check your sandwich order with your die cutting machine for 3D folders. Next, I take my Weathered Wood Distress Ink pad and starting at the top right side (I'm right handed) of the embossed panel, I lightly drag it down the length of the planks. You can add as much or as little ink to achieve the look you want. The more pressure you apply to the ink pad, the darker the ink will be. I repeat this process moving toward the left side until all planks have been inked.


For the next step, I use my Tim Holtz Tonic Guillotine paper trimmer and cut the planks apart on the lines at the edge of each plank. Next, I cut each plank into two or three pieces of different lengths to get a staggered look and set aside.

Now it's time to attach the pieces to our card base. I chose Taylored Expressions Poppy Seed cardstock for my card base and made this a side folding card. I chose a dark grey cardstock so that when the planks are mounted, the darker color would show through each area where the planks meet. I start to glue down each plank using Gina K. Designs Connect liquid glue so that I have a little wiggle room to get the planks lined up. I leave a little space between each section that meets, including the next row of planks. I use my T-Square Ruler to make sure each piece is mounted straight. After I have all of the pieces glued down, I use my trimmer to cut off any pieces that overhang.


Now it is time to work on our greeting. I die cut the word Happy from The Stamps Of Life Happy Statement Set two times using Earl Grey and once using Taylored Expressions Oreo cardstock. I use my Connect glue and glue the two Earl Grey dies together, then glue the Oreo die on top, slightly offsetting to create a shadow effect.


Next, using my Taylored Expressions Simple Strips Background and Simple Strips Die, I use the greeting Happy Anniversary. I then mount the Happy die onto my card with the Happy Anniversary strip over the top and my card is finished.

This completes today's project. This is a simple card that you could very easily use for any occasion by switching out the greeting or sentiment.
Come back tomorrow for the final project of 2019! If you have any questions, comments or future projects that you would like to see, please leave them in the comments section.
Thank you so much for visiting my blog, I greatly appreciate it. If you would like to know of future projects, you can subscribe (at the top) to this blog and be notified by email each time a new project is posted.
Happy Stamping!!
Jeannie
I never would have thought to cut the planks apart and then leave a little space between each section - genius!
ReplyDeleteThank you Crystal!!
Delete