Hello, welcome to my blog!!
I want to start out by thanking everyone for the support and nice comments you all leave for me. I truly appreciate the support of this blog!! I enjoy card making and bringing my creations to you, this wouldn't be possible without your support, so again, thank you!!
I'm back!!! For those of you that don't know, I took a couple of weeks off to spend some time with my brand new grand babies!! We were blessed with two more grandsons (who are cousins, their dads are brothers!) that were born only two days apart! We now have three grandsons and one granddaughter and feel so blessed!!
Today I am using Distress Oxide inks to watercolor a 3D embossing folder from Simon Says Stamp. I was blown away by the detail of this embossing folder and knew right away that I wanted to watercolor something soft. Having all of these raised areas to color made watercoloring so simple and really took little effort. With all of the dimension of the 3D effect it is easy to see where color should be added to create more depth. When going for a soft watercolored look I like to use Distress Oxide inks as they give more of a muted tone than the regular Distress inks. I kept my card pretty simple by framing the image and stamping a simple sentiment, I wanted the image to stand out. I have a lot of photos to show each step of my coloring so you can better understand how I achieved this soft look. Let's get started!!

I will be doing all of my work today on my Tim Holtz Glass Media Mat.
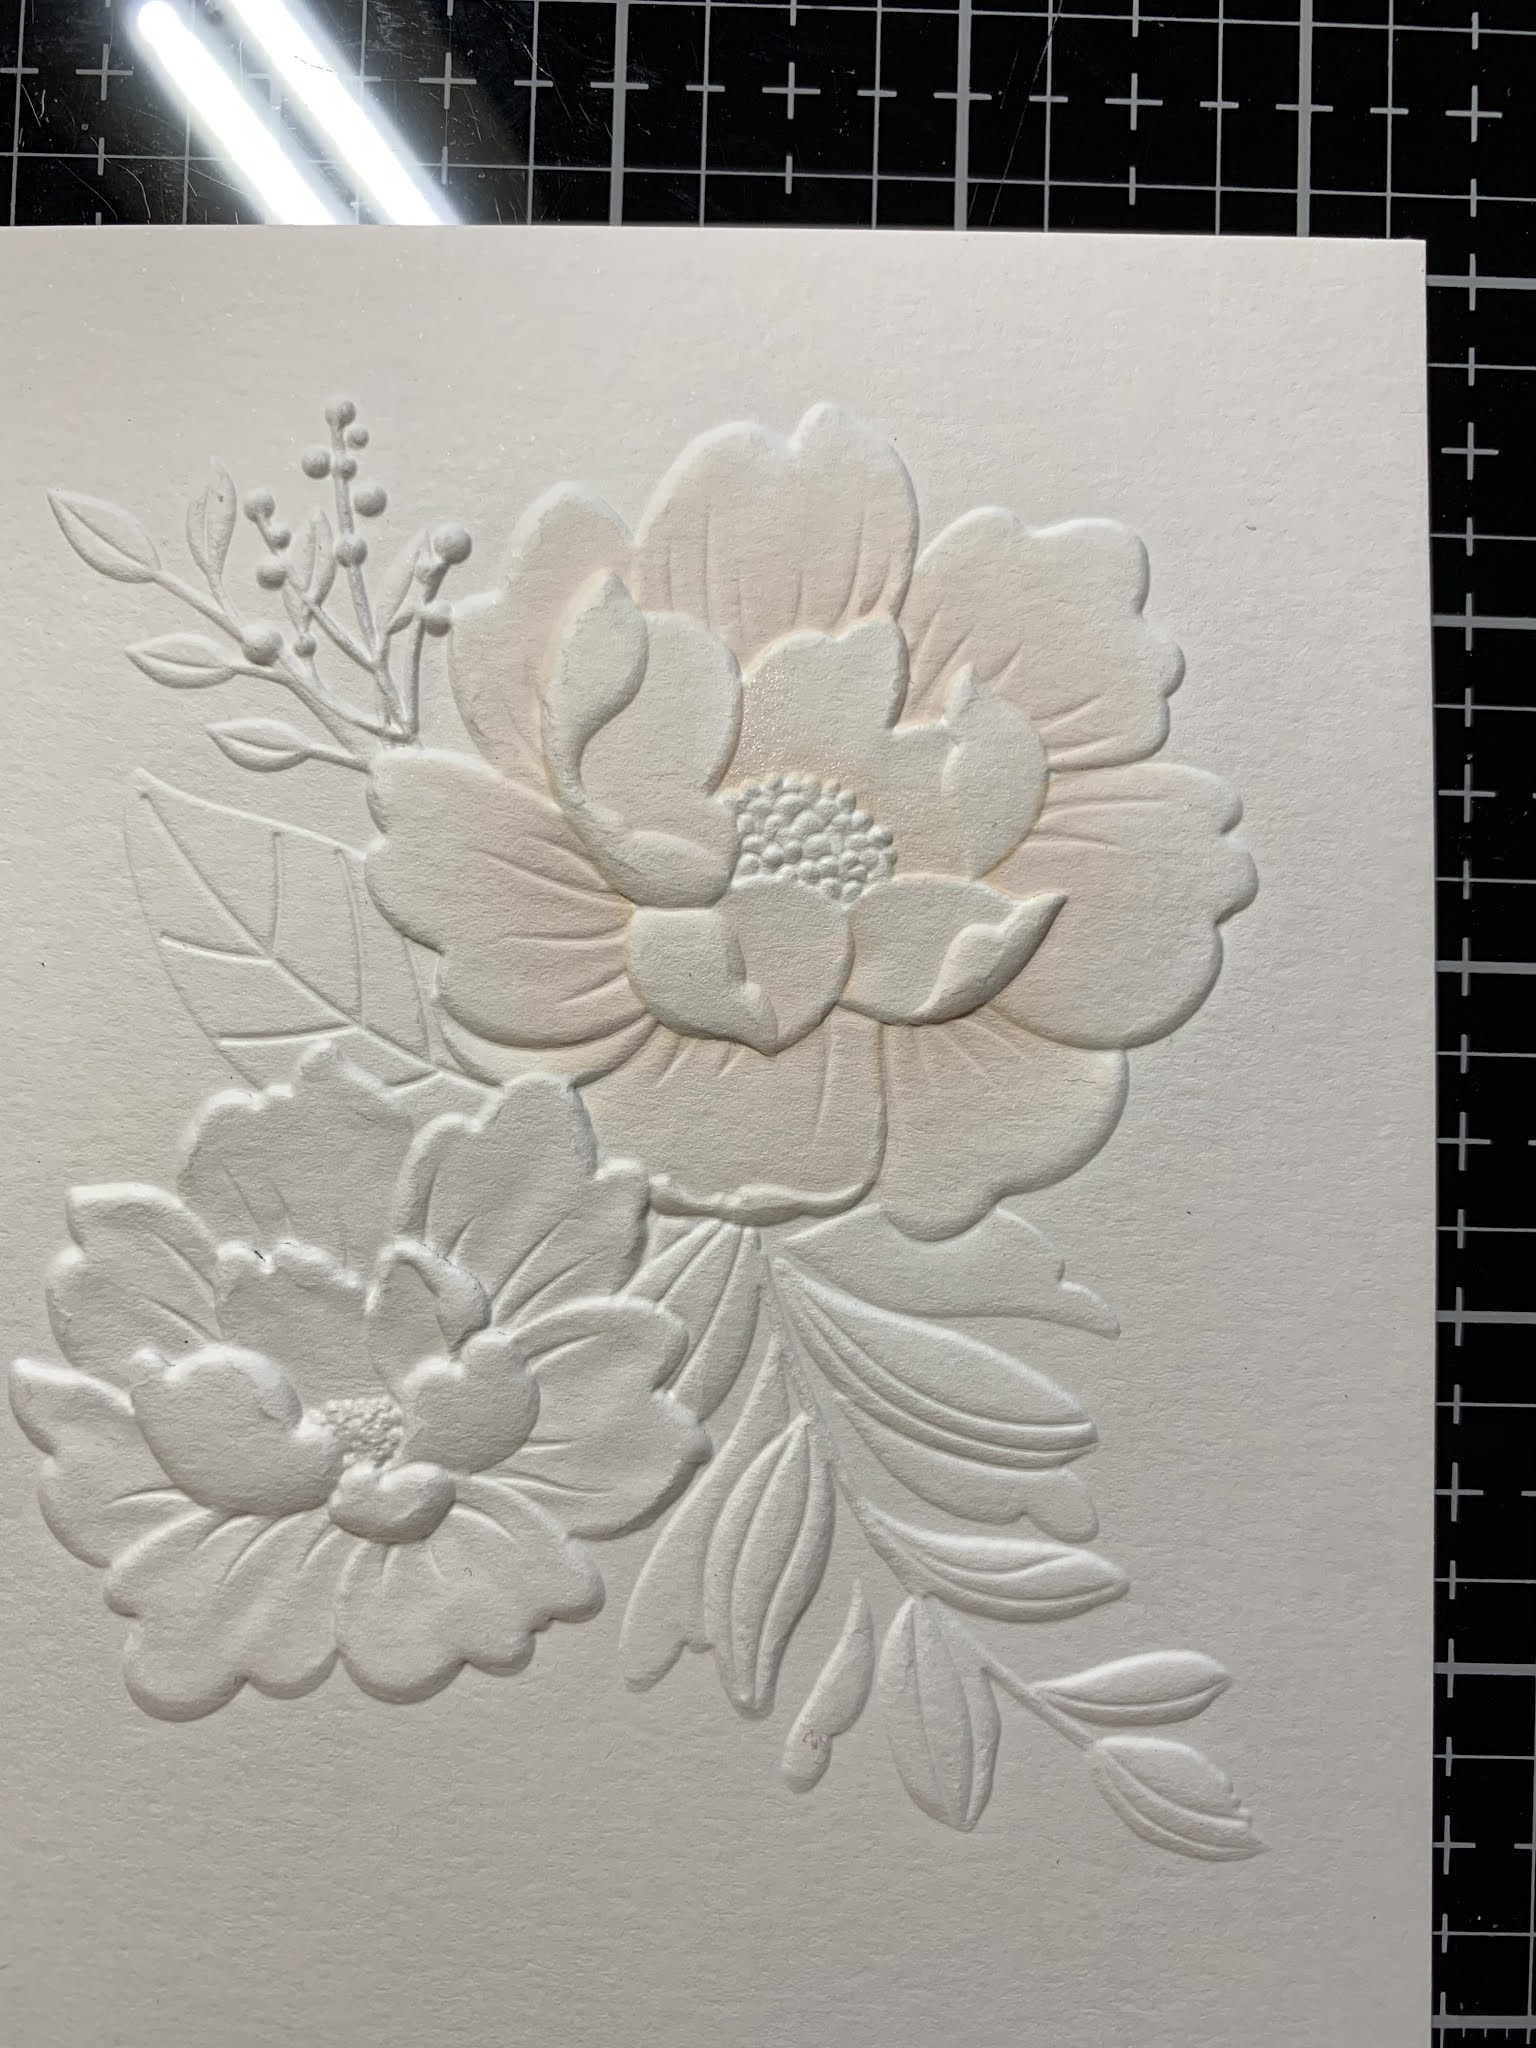
To start I use my Tim Holtz Guillotine Paper Trimmer to cut a 4 1/4" x 5 1/2" panel out of Water Color Cardstock. I then place my panel into the Peony Bundle 3D Embossing Folder lining it up so that the image is centered and a little higher up on the panel as I know I will be stamping a greeting below the image later. I then run the folder through my Big Shot Die Cut Machine. *Be sure to check the correct sandwich order for your die cut machine when using 3D embossing folders.


Using the white area of my Glass Mat I press the colors of Oxide inks I will be using for my coloring onto it and will be using this as my palette. Taking my Water Brush filled with clean water I wet the first petal I will be working on. I then use my Water Brush to pick up some Tattered Rose Distress Oxide Ink and add it to the base of the petal. I then pull and fade the color out towards the end of the petal. I then move onto the next petal and repeat this process. I do the same for each of the remaining petals. This first layer will be very light, I am just creating a base for each of the petals to start. *I like to have a paper towel handy that I can clean off my brush when needed or to remove excess water if the brush becomes too wet.


Using the same color, Tattered Rose Distress Oxide Ink I again add to the base of the petal and blend out a bit. I repeat this process for the rest of the petals. The more layers of ink you add the darker the color will become. I was going for a soft look so I stopped after two layers. I did however, go back and add a little more ink to areas where petals fold or overlap to add a little more depth.


I now move on to the smaller flower and use my Water Brush to wet my first petal then add Victorian Velvet Distress Oxide Ink to the base of the petal and blend the ink out towards the end. I continue to add color and blend out for each of the remaining petals.


I then go back with the same Victorian Velvet Distress Oxide Ink and again add another layer of ink to the base of the petals and blend out with my Water Brush. I also add a little color to the very base where petals overlap and anywhere the petals fold for added depth.


For the centers of both flowers I add a lighter wash with Antique Linen Distress Oxide Ink using my Water Brush. I then use the tip of my Water Brush to add small dots with another layer of Antique Linen Distress Oxide Ink to some of the areas of the center. This creates a little depth to the centers. I repeat this for the second flower.


For the longer sprig of leaves I wet the first leaf with my Water Brush then add Weathered Wood Distress Oxide Ink to the base of the leaf and blend out towards the end. I repeat for all remaining leaves. I also add Weathered Wood Distress Oxide Ink to the smaller sprig of leaves towards the top left with the same process.


Next, I wet the large leaf with my Water Brush then add Bundled Sage Distress Oxide Ink to the base and blend out to the end of the leaf. I then add another layer of the same color to the very base of this leaf as this is where the petals of both flowers overlap where shadows would be, then fade the ink out. I also add Bundled Sage Distress Oxide Ink to the stems of the tiny sprig of the dotted flowers. To color the small dotted flowers I use the tip of my Water Brush and add Milled Lavender Distress Oxide Ink. My coloring is now complete.


Using the Stitched Scallop Rectangle Die I cut out of Watercolor Cardstock three times, running them through my Big Shot. I then add Liquid Glue to stack and glue the die cuts together.


Next, I place my painted panel into my MISTI Stamp Positioner and center the scallop frame over the panel to determine my stamp placement. I then remove the scallop frame and stamp a sentiment from the Flowers For You Stamp Set using Weathered Wood Distress Oxide Ink onto the panel. Next, I take one of the "You" stamps from the same Flowers For You Stamp Set and stamp it just above the sentiment using Iced Spruce Distress Oxide Ink. Seeing my painting is done with soft muted tones, I wanted my sentiment to be a bit soft as well so I decide to stamp with Oxide inks.


To attach my scallop frame onto the panel I added Liquid Glue to the back of the frame then centered and adhered onto the panel.

Next, I place a 5 1/2" x 8 1/2" piece of White Cardstock into my Scor Buddy and scored it at 4 1/4" creating a side folding card base. I then added Liquid Glue to the back of the panel and mounted it onto my card base.


To finish, I used my Jewel Picker to add some Clear Raindrops with Liquid Glue and this completes my card.

I hope you enjoyed today's card. This was such a fun card to make and I love how it turned out! There are so many 3D embossing folders out on the market but I especially love the design of this one being an actual image and not a background. I would love to see more floral images of this type in future releases as I am hooked!! I love the texture that watercolor cardstock has and that is why I used it on the scallop frame, to bring in added texture. The scallop frame set I used is very versatile as it cuts out two frames at once that can be used together or single like the one I used today. (The other fits inside of today's frame with the scallops facing towards the center giving it a double scalloped look) Also included in this set is a smaller size, so beautiful!
If this is your first time visiting my blog, welcome and I hope you return. If you are a returning visitor, thank you so much for your support!
Should you have any questions or comments please leave them in the comments section. I'd love to hear from you and what you thought about today's card.
If you would like to be notified by email each time I post something new to my blog, you can click on the subscribe button at the top of the page. *Be sure to verify your subscription through the email link to activate. There is also a follow button that you can click on located below my profile if you would like to follow my blog.
Thank you for visiting and I hope you come back soon!
Happy Stamping and God bless!!
Jeannie
Wow, Jeannie! This is beautiful! I bought the tulip 3D folder, now I wish I had bought this one!
ReplyDeleteThank you!! The tulip folder would be great also! That one is next on my wish list!
DeleteOooommmmggggg beautiful
ReplyDeleteThank you Donna!!
DeleteThank you Janice!! It is such a beautiful EF!
ReplyDeleteexquisite because of the very delicate touches of color! thanks so much for sharing.
ReplyDeleteThank you so much Debbie!!
DeleteFirst time here. WON’T be my last! Absolutely incredible. Gorgeous. And I very much appreciate all of the detail and explanation. THANK YOU!
ReplyDeleteWelcome Debra, I'm so happy you stopped by and enjoy my blog!! You are very welcome! :)
DeleteHi Jeannie, I just found your blog and your work is beautiful & inspiring. I am falling in love with the new 3D embossing folders. Check out Altenew. They have some new stunning ones.
ReplyDeleteThank you so much Melanie and welcome!! I have seen the Altenew EF and have my eye on a couple of them!! :)
DeleteGorgeous card!!! Congratulations on the addition of new grandbabies!
ReplyDeleteThank you so much Dana!!
DeleteAbsolutely stunning! Thank you so much for sharing your process. You make it sound so easy, I just have to try this technique. ❤️
ReplyDeleteThank you so much!! Yes, give it a try, it really is easy!! :)
DeleteHopped over from Share Handmade Kindness. This card is gorgeous and your step-by-step instructions and photos are fantastic!
ReplyDeleteThank you so much Jen and welcome!!
DeleteAbsolutely stunning! I love everything about this card!
ReplyDeleteThank you so much!!
DeleteThis is a beautiful card and the color are so soft.
ReplyDeleteThank you so much Vivian!!
DeleteSo beautiful. And what an excellent step by step. You've inspired me !!
ReplyDeleteThank you so much Pam!! Have fun!
DeleteI certainly agree with all the other comments that your card is beautiful and love all the details on how you made it. Thank You!
ReplyDeleteThank you so much Carol!! :)
DeleteLovely
ReplyDeleteThank you Mary!!
DeleteWow! This is just gorgeous! I have a few floral 3D folders, and I can't wait to try this! Tyfs!
ReplyDeleteThank you!! Have fun, 3D folders are the best!
Deletebeautiful - ordered ! :)
ReplyDeleteThank you so much Nancy... you will love it!!
DeleteThank you from the bottom of my card- making heart. So often I look at a card and wonder how it was done. You have been kind enough to share and teach us your techniques.
ReplyDeleteYou are the BEST!!!
Thank you so much for your kind words!!! :)
DeleteAs a new card maker, I thank you for the step by step tutorial and can’t wait to try my hand at this technique! Absolutely beautiful card!
ReplyDeleteThank you so much Peggy!! I try to be as detailed as possible to make it easy to understand for even new stampers. I'm happy you found my blog helpful! Have fun!!! :)
DeleteThis is one of the most beautiful cards I have seen in a long time. It’s the softness that’s getting me! Ohhhhh myyyyy! I can’t wait to make this!
ReplyDeleteThank you so much Teresa, have fun creating!!
DeleteStunning card! I love the soft pastels and the scalloped-edge panel. Your card is a work of art!
ReplyDeleteThank you so much Karen!! It is such a beautiful embossing folder!
DeleteWow, your card is gorgeous. Love the detail of the embossing folder and your lovely soft coloring. TFS
ReplyDeleteThank you so much JoAnn!! 3D folders are so fun!!
DeleteBE-AU-TIFUL. So so elegant. I’m very inspired, thank you for sharing. You’re one to watch!
ReplyDeleteThank you so much for your kind words Sally!! Have fun!
DeleteSuch a beautiful card
ReplyDeleteThank you so much Karen!!
DeleteAwesome card! Beautiful work!
ReplyDeleteThank you so much Connie!!
DeleteHow do I buy the kit with all the inks, embossing folder etc. The detailed instructions are a breath of fresh air and I love your work, Thank you.
ReplyDeleteUnfortunately there is no kit, the products I used to create my card are sold separately. I do have all of the products linked in the instructions above, (highlighted in pink) they are clickable links that take you to the retail store where they can be purchased. Thank you so much for your kind words!!
DeleteThank you so much for sharing. What a beautiful card.
ReplyDeleteThank you so much!!
ReplyDeleteWhere do you purchase these embossing pads they are beautiful
ReplyDeleteThank you! I have everything linked in the instructions as to where they can be purchased, I hope this helps.
ReplyDeleteI find this card great. Especially the soft colours you used. Would like to buy this embossig folder. I`m from Austria in Europa. Have you any idea how I could get one?
ReplyDeleteThank you for your kind words Trudy! I do have this embossing folder linked in the instructions above that will take you directly to the store, "Simon Says Stamp" that sells it. They also ship worldwide!
ReplyDeleteThank you, Angela for your kind words! Have you tried using watercolor cardstock and wetting the petal a bit with water before adding ink? I always like to start with a small amount of color. You can always add more color to build up the intensity with layers. Have fun creating!!
ReplyDeleteJeannie, I know these instructions are not new, but I just discovered you and am blown away by how beautiful this is. Thanks so much for sharing and you even inspire me to try to do this technique, too.
ReplyDeleteThank you so much Saydra! I'm glad you discovered my blog, welcome! Enjoy creating and trying this technique!
DeleteWOW!!!!! Just found your blog and am blown away. Thank you so much for all the hard work that went into this and I also appreciate all the pictures showing all the different steps to achieve this beautiful card. Thanks again.....
ReplyDeleteThank you so much, Marilyn for your kind words!! I'm so happy you found my blog helpful.
DeleteI just found you in Pinterest so I am very late to this entry but I am so glad I found you. This technique is absolutely beautiful! I really appreciate all the photos and detailed instructions, I think even I can do this! Your card is a work of art!
ReplyDeleteThank you so much for your kind words!!
DeleteThis card is absolutely stunning. I definitely need that embossing folders! Just beautiful!
ReplyDeleteThank you for the kind words and visiting my blog! EF are so much fun!
Delete