Hello, welcome to my blog!!
I want to start out by thanking everyone for the support and nice comments you all leave for me. I truly appreciate the support of this blog!! I enjoy card making and bringing my creations to you, this wouldn't be possible without your support, so again, thank you!! *Affiliate links are used at no additional cost to you. When you purchase products through my links I receive a small commission from these sales, which helps me to purchase new products for the cards I share on my blog. Thank you so much for your support, it is greatly appreciated!!
Last year's big hit, Gnome For The Holidays Kit is back and added to the line this year is the add on, Gnome Festive Fall Kit! These kits are packed with stamps, dies and stencils and is so fun to mix and match the elements of each kit to create endless projects. The gnome dies are included in the Gnome For The Holidays Kit, the Gnome Festive Kit is and add on kit and perfect for the upcoming fall season! If you already own the holiday set from last year, then you know how fun these cute little gnomes are to play with! Quantities are limited so pick up your kits while they are still available! Both kits can be found HERE. There will be four $50 gift certificates being given away from the hop so be sure to visit each stop leaving comments along the way! Entries will close on Sunday, August 29th at 11:59 CST. Winners will be chosen at random from all comments and announced on August 30th. Have fun hopping along, checking out all of the fun projects and good luck to all!!
I had so much fun playing with these sets and this was my first time using transfer gel, foil and flock! I learned some things along the way and stumbled upon a happy mistake! The Duo Transfer Gel is great as it can be used with a laminator or if you don't have a laminator you can still get great results using your die cutting machine! If you love to foil and have never checked out Therm O web, I highly suggest giving them a look! They have SO MANY different colors of foil and flock to choose from!! I have lots of photos to detail the process of making my card, what the photos don't show is the bouncy gnome! To add a little fun to my card I popped my gnome up using a wobble!! You will have to take my word for it, he bounces around and adds so much to the card! Now let's get started!!

I will be doing all of my work today on my Tim Holtz Glass Media Mat.
To start I take the large stitched rectangle die from the Master Layouts 7 Die Set and cut out of Kraft Cardstock, running them through my Big Shot Die Cut Machine. I then take the stencil from the Gnome For The Holidays and remove the slopes from the stencil. Next, I lay the stencil across the bottom portion of my panel and adhere the stencil onto my work surface with Purple Tape.


Using my Blending Brush I blend Grass Green Ink at the stencil line and fade the ink out towards the bottom. To define the hill a bit I add Fresh Asparagus Ink close to the stencil edge and fade into the previous color.


Next, I turn the stencil to use the other sloped edge and adhere it down a little above my previous blend to create another grassy hill. I again start by using my Blending Brush to add Grass Green Ink and fade out down to the previous hill. I then add Fresh Asparagus Ink along the edge of the stencil and fade into the previous color. Switching back to the other slope on the stencil I repeat the process to create a third hill. I ended up adding a little more ink to the middle hill also. I now have some rolling hills for my scenery.
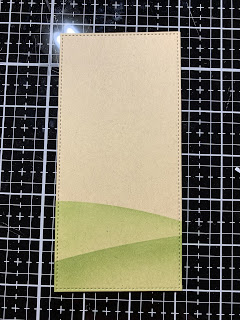


Taking the large layering rectangle from the Master Layouts 7 Die Set, I cut out of Charcoal Brown Cardstock, running them through my Big Shot. Using Terrific Tape I adhere my blended panel on the brown panel.


Next, I take to oval die from the Gnome Festive Fall Kit and cut out of Lucky Clover Cardstock, running them through my Big Shot. I then take my Blending Brush and blend Fresh Asparagus Ink around the edges of the oval and fade out towards the center. Using the tree trunk die from the Gnome Festive Fall Kit, I cut out of Dark Chocolate Cardstock, running them through my Big Shot. I did blend some Black Onyx Ink onto the right side of the die cut for a little shading but it's hard to see in the photo. Using Liquid Glue I attach the trunk die cut onto the tree. I then add Liquid Glue onto the back of the tree and adhere it onto my panel letting the right side of the tree hang of the edge. Using my Guillotine Paper Trimmer I cut off the overhang.


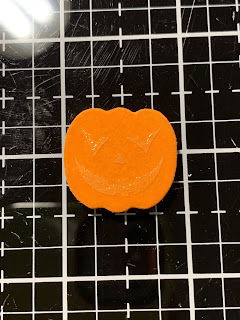
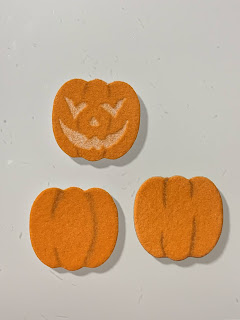
Using the pumpkin die from the Gnome Festive Fall Kit, I cut out of Orange Glow Flock three times. I take the stem die from the same set and cut out of Lucky Clover Cardstock, Key Lime Cardstock, and Charcoal Brown Cardstock running them all through my Big Shot. (I trimmed the vine off of the stem on the brown die cut). I want to create a face on one of the pumpkins so I take the stencil from the Gnome Festive Fall Kit and center it over one of the pumpkin die cuts. Next, I add a small amount of Transfer Gel Duo onto the stencil then use a Palette Knife to pull the gel across the opening so that I have a smooth even amount covering the opening. I carefully remove the stencil then set the die cut aside to completely dry.


Once the gel is completely dry, (you will know this when the gel is clear and no longer white) I place a panel of cardstock into a folded piece of parchment paper (mine is from the grocery store) and place my die cut face side up onto the cardstock. Here is my "happy mistake"... I then trim a small square out of Black Velvet Flock and place it over my pumpkin die cut fuzzy (black) side up. My intensions were to give my pumpkin a black face... remember when I said this was my first time playing with flock??? LOL! I fold the parchment paper together and send it through my laminator. *I like to send my pieces through the laminator two times to be sure everything transfers nicely. I gently peel the black flock piece from my die cut... and what do you know!? There is no black face, the black flock backing (because I place it backwards) pulled the orange flocking off! I ended up loving this look and was happy that I made the mistake, I think this looks just like the cut out insides of a pumpkin!! I now have a jack-o-lantern! ***The correct way of adding the black flock was to place the black flock down against the transfer gel so that the fuzzy flock would have adhered to the pumpkin. Can you transfer flock onto flock??? I am not entirely sure as I haven't attempted to do it the correct way!


To add a little texture and detail for the other two pumpkins I take one of my colored pencils and gently draw some lines onto them. I then use Liquid Glue and add the stems to the two pumpkins. I ended up gluing a brown stem onto the jack-o-lantern later as seen in the final photo.


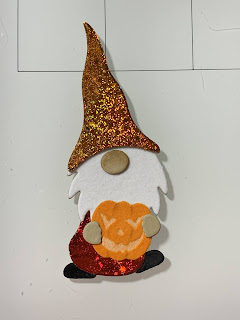
Next, I will work on my little gnome. I take the beard die and cut out of White Latte Flock, the feet dies and cut out of Black Velvet Flock, the nose die and cut out of Kraft Cardstock, all dies are from the Gnome For The Holidays Kit. I also take the hands dies from the Gnome Festive Fall Kit and cut out of Kraft Cardstock, running them all through my Big Shot. I also take the hat die from the Gnome Festive Fall Kit and the body die from the Gnome For The Holidays Kit and cut out of the Toner Sheets, running them through my Big Shot. ***To add some stability to all of my die cut pieces I use the same dies and cut two for each die cut out of Kraft Cardstock then stack and glue them behind each colored die cut piece. Except for the pumpkin stems.


I take the hat and body die cuts and place them into my parchment paper then place Dazzling Orange Foil over the hat and Radiant Red Foil over the body, close the parchment paper over them and run them through my laminator then gently remove the foil.


Using Liquid Glue I start to assemble my gnome. I start my gluing the hat onto the beard. To add a little shading to the nose I use my Blending Brush and blend Warm Cocoa Ink over the top edge of the die cut. I then glue the nose onto the beard just below the hat. Next I glue the body under the beard at an angle followed by gluing the jack-o-lantern over the bottom portion of the beard. I then glue the hands on either side of the jack-o-lantern and finally add the feet.


Next, I place my panel into my MISTI Stamp Positioner and lay out my scene to position my greeting. I then remove the gnome and pumpkins and stamp my greeting from the Gnome Festive Fall Kit using Amalgam Obsidian Ink.


Using Liquid Glue I adhere the pumpkins onto the lower right side of my panel. To adhere my gnome I remove the release paper from a Wobble and first attach it to the back of the gnome. I then position him onto my panel and press down adhering him to the panel. Now when you touch him he wiggles and wobbles in place!


To finish, I place a 6 1/4" x 6 1/2" piece of Jelly Bean Green Cardstock into my Scor Buddy and score it at 3 1/4" creating a mini slimline side folding card base. I add Terrific Tape to the back of my panel and mount it onto the card base and this completes my card.


I hope you enjoyed today's card, I really had a fun time making it!! There are so many fun elements in both of these kits to make some cute fun cards not only for fall and holidays but any occasion just by changing the colors and greeting from any sets you already own. Remember, the Gnome For The Holidays includes the gnome dies, the Gnome Festive Fall Kit is and add on set which gives many more options for creating fun projects! The Transfer Duo Gel can also be used with a die cutting machine. Add the gel as you normally would and let it completely dry. Once dry, add foil or flock over the dry gel and run it through your die cutting machine as you would if you were die cutting. Then carefully remove the foil or flock and there you go!! Don't forget to check out all of the other stops on this Hop and leave comments along the way for your chance to win a $50 gift certificate!! I want to thank both Gina K. Designs and Therm O Web for including me in this fun Hop with all of their beautiful products!! Your next stop is @suzlee72.
If this is your first time visiting my blog, welcome and I hope you return. If you are a returning visitor, thank you so much for your support!
Should you have any questions or comments please leave them in the comments section. I'd love to hear from you and what you thought about today's card.
**My blogging platform no longer supports the Subscribe feature, therefore there is no longer an option to Subscribe via email. I apologize for this inconvenience and am looking into other platforms that I may switch to in the future. There is however, a follow button that you can click on located below my profile if you would like to follow my blog.
Thank you for visiting and I hope you come back soon!
Happy Stamping and God Bless!!
Jeannie
such a cute card, and so much work for this blog post with ALL the photos! thanks a bunch for the detailed instructions!
ReplyDeleteThank you so much for your kind comments!!
DeleteI had so much fun following your steps in making your fall gnome. He has a large presence with his halloween pumpkin. I'd say he's ready! Cute other pumpkins with their stems and vines. The whole card is CUTE!
ReplyDeleteThank you so much for your kind words, this was a fun card to make!
DeleteVery cute card Jeannie! Loved all the step by step photos :)
ReplyDeleteThank you Jess!! :)
Delete